Thursday, March 27, 2014

Use One Outlook Meeting Request for Multiple Meetings

Use One Outlook Meeting Request for Multiple Meetings

Outlook is able to invite attendees to meetings that take place on different days if that meeting is first created as a recurring appointment.
    1. Create a new appointment in Outlook.
    2. Open the appointment. Click Recurrence from the Appointment tab in the Options group. Appointment Recurrence dialog displays.
    3. Choose a Recurrence pattern for the meeting in order to place the meeting on multiple days. It is possible to edit or remove individual appointments created through this method after the recurrence is created.
    4. Choose an End by date to stop the recurring appointment.
Appointment Recurrence Outlook
    1. Click OK.
    2. Click Save & Close from the Appointment tab. The appointment displays on your calendar based on the recurrence pattern chosen.
    3. To edit or remove an individual appointment, double click on the appointment. Open Recurring Item dialog box displays. Click Open this occurrence.
    4. Change details of the appointment such as the time, location, or subject. Click Save & Close.
    5. To delete the appointment, click Delete from the Appointment Occurrence tab.
Outlook Calendar
  1. To send out the meeting invitation, double click on an appointment in the series. Open Recurring Item dialog box displays. Click Open the series. Click Invite Attendees from the Appointment Series tab. Complete the form as normal. When sent, attendees will be invited to all meetings in the series.

Monday, March 24, 2014

How to enable Google Now for iOS devices (iPhone, iPad) with Google Apps for Business Accounts

Google Now for iOS
I've got GAFYD (Google Apps for your Domain) running mail for hanselman.com and managing Google logins for the family. (There's 14 of us.)
Google Now (that's the fancy cards and predictive assistant) for iOS was just released (you can download Google Now here) and integrated into the Google Search app for iPhone and iPad.
If you install it and log in with your Google Apps account, you'll get an error that "your administrator hasn't enabled Google Now for your domain."
You'll need to (or your admin will need to) turn it on for your Google Apps Domain. It just takes a moment.
Note that you're changing this setting under Android but it affects iOS as well, which is why it's so unintuitive.
Google Apps for Business, Education, and Government: Google Now needs to be turned on by an administrator before it can be used.
If you are an administrator, you can enable Google Now for users in your organization by following these steps:
  1. Sign in to your Google Apps control panel.
  2. Go to Settings > Mobile > Org Settings > Android settings.
  3. Click the checkbox next to Enable Google Now to turn on Google Now.
  4. Click Save.
Here's a screenshot describing the flow, as it's not obvious.
Click Settings, Mobile, Enable Google Now
It took about 10 minutes for the setting to propagate. You may also need to force-quit the Google app for it to pick up the new setting. Your mileage may vary, but this IS how you enable Google Now, regardless of device.
I hope this saves you time and frustration. Pass it on.
UPDATE: If you've updated to the new console, the location in the new console is:https://admin.google.com/AdminHome#ServiceSettings/notab=1&service=mobile&subtab=org

Thursday, March 20, 2014

Assign a File Type to an Application in Mac OS X

Assign a File Type to an Application in Mac OS X


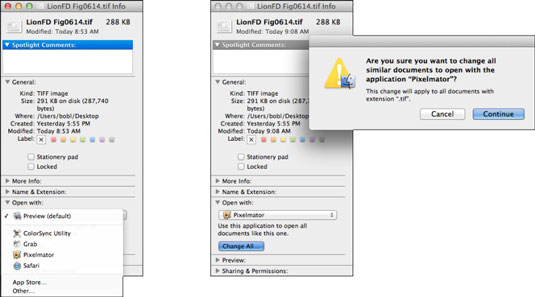
Sometimes, if your Mac doesn’t recognize a file type as something that one of its programs can handle, or if you want a specific file type to always open in a specific program, Mac OS X Lion might need a little help from you. Mac OS X lets you specify the application in which you want to open a document in the future when you double-click it. Suppose that you want all .tif graphic files that usually open in Preview to open instead in Pixelmator, a more capable third-party program
More than that, you can specify that you want all documents of that type to open with the specified application. “Where is this magic bullet hidden?” you ask. Right there in the file’s Info window.
Here’s how you do it:
  1. Click one of the files in the Finder.
  2. Choose File→Get Info (Command+I).
  3. In the Info window, click the gray triangle to disclose the Open With pane.
  4. From the pop-up menu, choose an application that Mac OS X believes will open this document type.
    image0.jpg
  5. (Optional) If you click the Change All button at the bottom of the Open With pane, you make Pixelmator the new default application for all .tif files that would otherwise be opened in Preview.
    Notice the handy alert that appears when you click the Change All button and how nicely it explains what will happen if you click Continue.

Thursday, March 13, 2014

Linux and Unix fc and history command

Linux and Unix fc and history command


About fc and history
The fc command lists, edits, or re-executes commands previously entered to a shell.
The history command allows you to use words from previous command lines in the command line you are typing. This simplifies spelling corrections and the repetition of complicated commands or arguments.
Each shell (the Bourne shell, the Bourne Again Shell, the C Shell, the Korn Shell, etc.) has its own slight differences in how it handles, and allows access to, the command history. In general, the following commands will help you navigate and use your command history within your Linux/Unix shell.
The "history" command
history [-c] [-d offset] [n] or history -anrw [filename] or history -ps arg [arg...]
history displays or manipulate the history list with line numbers, prefixing each modified entry with a `*'. An argument of n lists only the last b entries.

Options

-cclear the history list by deleting all of the entries.
-doffsetdelete the history entry at offset OFFSET.
-aappend history lines from this session to the history file.
-nread all history lines not already read from the history file.
-rread the history file and append the contents to the history list.
-wwrite the current history to the history file and append them to the history list
-pperform history expansion on each ARG and display the result without storing it in the history list.
-sappend the ARGs to the history list as a single entry.
If FILENAME is given, it is used as the history file. Otherwise, if $HISTFILE has a value, that is used, else ~/.bash_history.
If the $HISTTIMEFORMAT variable is set and not null, its value is used as a formatstring for strftime to print the time stamp associated with each displayed history entry. No time stamps are printed otherwise.
The "fc" command
fc [-e ename] [-lnr] [first] [last] or fc -s [pat=rep] [command]
fc is used to list or edit and re-execute commands from the history list. FIRST and LAST can be numbers specifying the range, or FIRST can be a string, which means the most recent command beginning with that string.

Options

-e ENAMEselect which editor to use. Default is FCEDIT, then EDITOR, then vi
-llist lines instead of editing.
-nomit line numbers when listing.
-rreverse the order of the lines (newest listed first).
With the `fc -s [pat=rep ...] [command]' format, COMMAND is re-executed after the substitution OLD=NEW is performed.
A useful alias to use with this is r='fc -s', so that typing `r cc' runs the last command beginning with `cc' and typing `r' re-executes the last command.
Other History Commands and Shortcuts
!stringExecute the most recent command that begins with string.
!numExecute command that is number num in the command history.
!-numExecute the command was run num commands previous in the history.
!!Execute the previous (most recently-executed) command.
!?string[?]Execute the most recent command containing the string string. The trailing ?may be omitted if string represents the end of the command in question.
^string1^string2^Repeat the previous command executed, replacing string1 with string2. The previous command must contain string1.

Examples

fc -l
Lists the history of commands on the computer similar to the following:
 2 grep --help 3 bg 4 fg 5 pine 6 cd public_html 7 rm index.html 8 sz index.html 9 ls -laxo 10 chmod 755 index.htm 
fc -e - ls
Executes the most recently executed command that begins with the letters ls.
history
Typing history alone would give results similar to the following:
 2 grep --help 3 bg 4 fg 5 pine 6 cd public_html 7 rm index.html 8 sz index.html 9 ls -laxo 10 chmod 755 index.htm 
!ls
Executes the most recently executed command that begins with the letters ls.
!!
Would re-execute the most recently executed command.

Re-running a command from the history list in Linux


To run a command from the history list use a command from this table.
To...                                          Do this...


Move up through the command history list ^P one command at a time. Move down through the command history list ^N one command at a time. Run the previous command. !! Run command number n !n Run most recent command starting with !string characters in string Run most recent command containing !?string characters that match string

Wednesday, March 12, 2014

Automatically Printing/Saving Emails/Attachments in Outlook


Issue.  One of the more frequent Outlook questions I see here on EE is "How can I automatically save or print an email and/or its attachments?"  There are a number of variations to the basic question.  For example, "How can I save attachments to a specific file system folder?" or "How can I print a message and all its attachments to a specific printer?" or "How can I print a specific type of attachment?" or "My organization places a strict limit on mailbox size.  How can I save attachments to the file system and insert a link to them in the original message thereby saving space in my mailbox?".

Background.  Outlook’s rules wizard does include the "print it" action which will print the message, but will not print the attachments.  If you manually print an item, then you can elect to print the attachments too, but only to the default printer.  The rules wizard does not include an action for saving a message or attachment to the file system, nor saving and replacing attachments with hyperlinks to them.  

Solution.  The solution is to use a bit of scripting, a macro, and a rule to perform the desired actions.  The rule is triggered when an item meeting a given condition arrives.  The rule calls the macro which performs the actual work.  

Until now I’ve handled each question requesting one of these capabilities individually.  That is, I wrote a custom macro to address each author’s specific needs.  If the author wanted to print a given attachment, then I produced a macro that would do just that.  If instead they wanted to save and remove attachments replacing them with hyperlinks in the message itself, then I wrote a macro for that alone.  

Recently I saw another of these questions and decided it was time to put together a macro that would handle almost any of these situations.  This macro has the ability to perform any combination of the following actions:

  a.  Print the message.
  b.  Print the message to a specific printer.
  c.  Save the message to a specific folder in the file system.
  d.  Save the message in a specific format.
  e.  Print all attachments.
  f.  Print only certain types of attachments (e.g. all .doc, .wks, .pdf).
  g.  Print attachments to a specific printer.
  h.  Save attachments to a specific folder in the file system.
  i.  Remove (save and delete) attachments replacing each with a hyperlink to the saved attachment.
      The hyperlinks are inserted at the bottom of the message.

Requirements.  Microsoft Outlook.  The macro should work with any version of Outlook from 2000 on, but I’ve only tested it with 2007.  The instructions assume that you are using Outlook 2007.

Instructions.  Follow these instructions to use this solution.


Add the Macro to Outlook

  a.  Start Outlook.
  b.  Click Tools > Macro  > Visual Basic Editor.
  c.  If not already expanded, expand Microsoft Office Outlook Objects.
  d.  If not already expanded, expand Modules.
  e.  Select an existing module (e.g. Module1) by double-clicking on it or create a new module 
       by right-clicking Modules and selecting Insert  > Module.
  f.  Copy the code below and paste it into the right-hand pane of Outlook's VB Editor window.
  g.  Edit the code as needed.  I included comments wherever something needs to or can change.
  h.  Click the diskette icon on the toolbar to save the changes.
Public Declare Function GetProfileString Lib "kernel32" Alias "GetProfileStringA" _
        (ByVal lpAppName As String, ByVal lpKeyName As String, _
        ByVal lpDefault As String, ByVal lpReturnedString As String, _
        ByVal nSize As Long) As Long

Private Declare Function ShellExecute Lib "shell32.dll" _
  Alias "ShellExecuteA" (ByVal hwnd As Long, ByVal lpOperation As String, _
  ByVal lpFile As String, ByVal lpParameters As String, _
  ByVal lpDirectory As String, ByVal nShowCmd As Long) As Long

Sub MessageAndAttachmentProcessor(Item As Outlook.MailItem, _
    Optional bolPrintMsg As Boolean, _
    Optional bolSaveMsg As Boolean, _
    Optional bolPrintAtt As Boolean, _
    Optional bolSaveAtt As Boolean, _
    Optional bolInsertLink As Boolean, _
    Optional strAttFileTypes As String, _
    Optional strFolderPath As String, _
    Optional varMsgFormat As OlSaveAsType, _
    Optional strPrinter As String)
   
    Dim olkAttachment As Outlook.Attachment, _
        objFSO As FileSystemObject, _
        strMyPath As String, _
        strExtension As String, _
        strFileName As String, _
        strOriginalPrinter As String, _
        strLinkText As String, _
        strRootFolder As String, _
        strTempFolder As String, _
        varFileType As Variant, _
        intCount As Integer, _
        intIndex As Integer, _
        arrFileTypes As Variant

    Set objFSO = CreateObject("Scripting.FileSystemObject")
    strTempFolder = Environ("TEMP") & "\"
    
    If strAttFileTypes = "" Then
        arrFileTypes = Array("*")
    Else
        arrFileTypes = Split(strAttFileTypes, ",")
    End If
    
    If bolPrintMsg Or bolPrintAtt Then
        If strPrinter <> "" Then
            strOriginalPrinter = GetDefaultPrinter()
            SetDefaultPrinter strPrinter
        End If
    End If
    
    If bolSaveMsg Or bolSaveAtt Then
        If strFolderPath = "" Then
            strRootFolder = Environ("USERPROFILE") & "\My Documents\"
        Else
            strRootFolder = strFolderPath & IIf(Right(strFolderPath, 1) = "\", "", "\")
        End If
    End If
    
    If bolSaveMsg Then
        Select Case varMsgFormat
            Case olHTML
                strExtension = ".html"
            Case olMSG
                strExtension = ".msg"
            Case olRTF
                strExtension = ".rtf"
            Case olDoc
                strExtension = ".doc"
            Case olTXT
                strExtension = ".txt"
            Case Else
                strExtension = ".msg"
        End Select
        Item.SaveAs strRootFolder & RemoveIllegalCharacters(Item.Subject) & strExtension, varMsgFormat
    End If
        
    For intIndex = Item.Attachments.count To 1 Step -1
        Set olkAttachment = Item.Attachments.Item(intIndex)
        'Print the attachments if requested'
        If bolPrintAtt Then
            If olkAttachment.Type <> olEmbeddeditem Then
                For Each strFileType In arrFileTypes
                    If (strFileType = "*") Or (LCase(objFSO.GetExtensionName(olkAttachment.FileName)) = LCase(strFileType)) Then
                        olkAttachment.SaveAsFile strTempFolder & olkAttachment.FileName
                        ShellExecute 0&, "print", strTempFolder & olkAttachment.FileName, 0&, 0&, 0&
                    End If
                Next
            End If
        End If
        'Save the attachments if requested'
        If bolSaveAtt Then
            strFileName = olkAttachment.FileName
            intCount = 0
            Do While True
                strMyPath = strRootFolder & strFileName
                If objFSO.FileExists(strMyPath) Then
                    intCount = intCount + 1
                    strFileName = "Copy (" & intCount & ") of " & olkAttachment.FileName
                Else
                    Exit Do
                End If
            Loop
            olkAttachment.SaveAsFile strMyPath
            If bolInsertLink Then
                If Item.BodyFormat = olFormatHTML Then
                    strLinkText = strLinkText & "<a href=""file://" & strMyPath & """>" & olkAttachment.FileName & "</a><br>"
                Else
                    strLinkText = strLinkText & strMyPath & vbCrLf
                End If
                olkAttachment.Delete
            End If
        End If
    Next
    
    If bolPrintMsg Then
        Item.PrintOut
    End If
    
    If bolPrintMsg Or bolPrintAtt Then
        If strOriginalPrinter <> "" Then
            SetDefaultPrinter strOriginalPrinter
        End If
    End If
    
    If bolInsertLink Then
        If Item.BodyFormat = olFormatHTML Then
            Item.HTMLBody = Item.HTMLBody & "<br><br>Removed Attachments<br><br>" & strLinkText
        Else
            Item.Body = Item.Body & vbCrLf & vbCrLf & "Removed Attachments" & vbCrLf & vbCrLf & strLinkText
        End If
        Item.Save
    End If

    Set objFSO = Nothing
    Set olkAttachment = Nothing
End Sub

Function GetDefaultPrinter() As String
    Dim strPrinter As String, _
        intReturn As Integer
    strPrinter = Space(255)
    intReturn = GetProfileString("Windows", ByVal "device", "", strPrinter, Len(strPrinter))
    If intReturn Then
        strPrinter = UCase(Left(strPrinter, InStr(strPrinter, ",") - 1))
    End If
    GetDefaultPrinter = strPrinter
End Function

Function RemoveIllegalCharacters(strValue As String) As String
    ' Purpose: Remove characters that cannot be in a filename from a string.'
    ' Written: 4/24/2009'
    ' Author:  BlueDevilFan'
    ' Outlook: All versions'
    RemoveIllegalCharacters = strValue
    RemoveIllegalCharacters = Replace(RemoveIllegalCharacters, "<", "")
    RemoveIllegalCharacters = Replace(RemoveIllegalCharacters, ">", "")
    RemoveIllegalCharacters = Replace(RemoveIllegalCharacters, ":", "")
    RemoveIllegalCharacters = Replace(RemoveIllegalCharacters, Chr(34), "'")
    RemoveIllegalCharacters = Replace(RemoveIllegalCharacters, "/", "")
    RemoveIllegalCharacters = Replace(RemoveIllegalCharacters, "\", "")
    RemoveIllegalCharacters = Replace(RemoveIllegalCharacters, "|", "")
    RemoveIllegalCharacters = Replace(RemoveIllegalCharacters, "?", "")
    RemoveIllegalCharacters = Replace(RemoveIllegalCharacters, "*", "")
End Function

Sub SetDefaultPrinter(strPrinterName As String)
    Dim objNet As Object
    Set objNet = CreateObject("Wscript.Network")
    objNet.SetDefaultPrinter strPrinterName
    Set objNet = Nothing
End Sub
1:
2:
3:
4:
5:
6:
7:
8:
9:
10:
11:
12:
13:
14:
15:
16:
17:
18:
19:
20:
21:
22:
23:
24:
25:
26:
27:
28:
29:
30:
31:
32:
33:
34:
35:
36:
37:
38:
39:
40:
41:
42:
43:
44:
45:
46:
47:
48:
49:
50:
51:
52:
53:
54:
55:
56:
57:
58:
59:
60:
61:
62:
63:
64:
65:
66:
67:
68:
69:
70:
71:
72:
73:
74:
75:
76:
77:
78:
79:
80:
81:
82:
83:
84:
85:
86:
87:
88:
89:
90:
91:
92:
93:
94:
95:
96:
97:
98:
99:
100:
101:
102:
103:
104:
105:
106:
107:
108:
109:
110:
111:
112:
113:
114:
115:
116:
117:
118:
119:
120:
121:
122:
123:
124:
125:
126:
127:
128:
129:
130:
131:
132:
133:
134:
135:
136:
137:
138:
139:
140:
141:
142:
143:
144:
145:
146:
147:
148:
149:
150:
151:
152:
153:
154:
155:
156:
157:
158:
159:
160:
161:
162:
163:
164:
165:
166:
167:
168:
169:
170:
171:
172:


2

Create a Subroutine That Calls the Macro

We can’t call the macro directly from a rule since the macro requires parameters to tell it what actions to take and we can’t pass those parameters from a rule.  Instead you need to create a subroutine of your own that calls the macro and tells it which actions you want it to perform for the given message.  You can create as many subroutines as you need.  Typically you’ll have one subroutine for each set of actions you want to perform.  

For example, assume that you receive messages pertaining to a project you’re working on, we’ll call it Project X, and you receive a daily message from accounting that includes a rather large spreadsheet attachment.  You want to automatically print and save theProject X messages, while for the accounting messages you want to remove the attached spreadsheet and replace it with a hyperlink.  Since the actions are required are different you’d need to create a subroutine for each.  You can create your subroutine(s) in the same module with the other macro code or you can place it in another module.  The decision is yours.  

To create a subroutine:

  a.  Start Outlook.
  b.  Click Tools > Macro  > Visual Basic Editor.
  c.  If not already expanded, expand Microsoft Office Outlook Objects.
  d.  If not already expanded, expand Modules.
  e.  Select an existing module (e.g. Module1) by double-clicking on it or create a new module by 
       right-clicking Modules and selecting Insert > Module.
  f.  Copy the code below and paste it into the right-hand pane of Outlook's VB Editor window.
  g.  Edit the code.  At a minimum you must give the subroutine a unique name and you must 
       set the parameters.  
  h.  Click the diskette icon on the toolbar to save the changes.

Parameters.
The macro takes a maximum of nine parameters.  In the code below these are represented as P1 through P9.  The parameters are positional (i.e. they must appear in the sequence given).

P1.  Print the message.
Tells the macro to print the email.  Valid values are True or False.

P2.  Save the message.
Tells the macro to save the email to the file system.  Valid values are True or False.

P3.  Print the attachments.
Tells the macro to print the attachments.  Valid values are True or False.

P4.  Save the attachments.
Tells the macro to save the attachments.  Valid values are True or False.

P5.  Remove attachments.
Tells the macro to remove the attachments and insert hyperlinks to  them at the bottom of the message.  Valid values are True or False.

P6. Attachment types.
Tells the macro what attachment types to save/print.  The macro will only process attachments that match the file types.  This parameter is a comma separated list of file extensions.  For example, to only process Word documents (both 2007 and earlier) you’d set this parameter to "doc,docx".

P7. Target file system folder.
This tells the macro which file system folder to save the message and/or attachments to.  Valid values are any existing file system folder, including network shares and UNC paths.  If you’ve told the macro to save the message and/or attachments and you fail to specify this parameter, then the macro will save the items to your My Documents folder.

P8. Message save format.
Tells the macro what format to save the message in (assuming that you are saving the message).  You will be prompted with a list of valid values when you enter this parameter.

P9. Printer name.
Tells the macro what printer to print the message and/or attachments to.  This allows you to print to any printer, not just the default printer.  Valid values include the name of any printer that appears in your list of printers.  If you’ve told the macro to print the message and/or attachments and you don’t specify a printer, then the macro will print them to your default printer.

All the parameters are optional so you can omit those that you don’t need.
‘Change MySubroutineName to a unique name on the next line’
Sub MySubroutineName(Item As Outlook MailItem)
        MessageAndAttachmentProcessor Item, P1, P2, P3, P4, P5, P6, P7, P8, P9
End Sub
1:
2:
3:
4:


Examples Of Usage


  • You want to print all messages to the default printer.
    MessageAndAttachmentProcessor Item, True
  • You want to print all messages to a non-default printer named "HP Deskjet 3320".
    MessageAndAttachmentProcessor Item, True, , , ,,,,,"HP Deskjet 3320"
  • You want to save all attachments to a folder on your C: drive named "Project X".
    MessageAndAttachmentProcessor Item,,,,True,,"C:\Project X"
  • You want to remove all PDF attachments to a folder on your C: drive named "Accounting" and insert a hyperlink to the saved attachment.
    MessageAndAttachmentProcessor Item,,,,True,True,"pdf","C:\Accounting"
  • You want to print all Word documents to the default printer.
    MessageAndAttachmentProcessor Item,,,True,,"doc,docx"
3

Configure Security

  a.  Click Tools > Trust Center.
  b.  Click Macro Security.
  c.  Set Macro Security to Warnings for all macros.
  d.  Click OK.
  e.  Close Outlook.
  f.  Start Outlook.

4

Create a Rule that Triggers the Subroutine

  a.  Click Tools > Rules and Alerts.
  b.  Click the New Rule button.
  c.  Under "Start from a blank rule" select Check messages when they arrive.
  d.  Click the Next button.
  e.  Select a condition for the messages you want to process.  If you want the macro to run against 
       all messages, then don’t select a condition.  Outlook will display a dialog-box warning  you 
       that "This rule will be applied to every message you receive.  Is this correct?".   ClickYes.
  f.  Click the Next button.
  g.  Place a check in the box next to run a script.
  h.  In the lower pane click the underlined a script.  Select your subroutine as the script to run.
  i.   Work your way through the rest of the Rules Wizard.

Print Tools for Outlook 1.7.5 - Outlook Add-On

Print Tools for Outlook 1.7.5 - Outlook Add-On


The Bottom Line

Print Tools for Outlook prints messages together with any attachments (zipped files are unpacked for printing) either comfortably via a wizard or automatically via Outlook rules. It's a pity you cannot customize the template used for printing much, and Print Tools for Outlook does not give any preview.

Pros

  • Print Tools for Outlook prints messages plus attachments in Outlook
  • You can automate Print Tools for Outlook printing flexibly using Outlook's rules engine
  • Print Tools for Outlook can automatically decompress zipped attachments for printing

Cons

  • Print Tools for Outlook does not allow you to customize the print template
  • Print preview is lacking from Print Tools for Outlook

Description

  • Print Tools for Outlook prints email messages and attachments in Outlook.
  • You can print using Print Tools for Outlook toolbar icons or automatically using Outlook rules.
  • Print Tools for Outlook automatically unpacks compressed attachment.
  • The extensions of attached files that are printed can be customized in Print Tools for Outlook.
  • Print Tools for Outlook supports Windows 98/ME/2000/3/XP/Vista and Outlook 2000/2/3/7.

Guide Review - Print Tools for Outlook 1.7.5 - Outlook Add-On

Outlook can print emails, of course. You can even set up a rule to have certain emails sent to the printer automatically, which is more than most users need.
You, however, need more. You need to print attachments, too, and multiple emails in a row, and possibly attached files that have been zipped.
Print Tools for Outlook does all that in an elegant and simple manner. A wizard or easily accessible toolbar buttons let you print any combination of emails with or without attachments in two formats fast. Using a "custom action" in Outlook rules, the process can be automated flexibly.
Print Tools for Outlook will dutifully print messages and any type of attached file fit to print (the file extensions used to determine that can be customized).
Unfortunately, you do not get a preview when printing manually with Print Tools for Outlook. This is usually a minor point, though, as is my other gripe with Outlook as much as with Print Tools for Outlook: the template used for printing emails, while nice, cannot be customized in any way.

How to Print Incoming Mail Automatically in Outlook

How to Print Incoming Mail Automatically in Outlook


The great thing about junk mail is that it comes in printed form. The paper feels nice, and the mail is often interesting to look at even though the advertised products might not be.
Now, I won't advocate printing spam to appreciate it more, but emails in printed form do feel better than something on a screen. A paper copy is also a nice archive, and many can ponder difficult material better when it is printed.
Printing an individual message, of course, is easy in Outlook. What if you want to automate the process, though, and have Outlook print incoming emails automatically? Maybe even filtering them first and printing only certain messages?

Print Incoming Mail Automatically in Outlook

To make Outlook print emails automatically as they are retrieved:
  • In Outlook 2013:
    • Click FILE.
    • Open the Info category.
    • Click Manage Rules & Alerts.
  • In Outlook 2007:
    • Select Tools | Rules and Alerts... from the menu in Outlook.
  • Click New Rule....
  • In Outlook 2013:
    • Highlight Apply rule on messages I receive under Start from a blank rule.
  • In Outlook 2007:
    • Highlight Check messages when they arrive under Step 1: Select a template.
  • Click Next >.
  • Check a filtering criterion or criteria if you want to print only certain messages and make sure you fill in the variables under Step 2: Edit the rule description.
  • Click Next >.
  • If you specified no filtering criteria, click Yes.
  • Check print it under Step 1: Select action(s).
  • Click Finish.
  • Now click OK.
For more automatic printing options in Outlook (including automatic printing of attachments), you can use a tool such as Print Tools for Outlook.  (Check my other post for this information)

Tuesday, March 11, 2014

Red Hat Software Raid

Red Hat Software Raid
This is a quick and dirty document on software raid there are many more documents on the web that go into greater detail, the following is covered in this document:
  • Creating a raid array with a hot spare
  • Checking the array
  • Simulating a drive failure
  • Removing a disk from an array
  • Adding a disk to the array
  • Extend the array
  • Starting stopping array
The following was tested using a centos 4 installation on Dell hardware, three partitions have already been created /dev/sdb10, /dev/sdb11 and /dev/sdb12 all are 1Gb in size.
Set the partition type
Set partition type
[root]# fdisk /dev/sdb
Command (m for help): t
Paratition number (1-12): 10
Partition ID (L to list options): fd
Command (m for help): w
Command (m for help): q
Note: repeat above for /dev/sdb11 and /dev/sdb12
fd = raid autodetect
Create partiton copy to new disk
create partition table of new disk
sfdisk -d /dev/sda | sfdisk /dev/sdb
Note: this is like the prtvtoc ... | fmthard ... command in Solaris
Create the array
Using mkraid1. Update the configuration file /etc/raidtab with these lines of code

[root]# vi /etc/raidtab
raiddev /dev/md0
raid-level 1
nr-raid-disks 2
nr-spare-disks 1
persistent-superblock
chunk-size 4
device /dev/sdb10
raid-disk 0
device /dev/sdb11
raid-disk 1
device /dev/sdb12
spare-disk 0
2. Now make the RAID device md0 and create a filesystem on it

[root]# mkraid /dev/md0
[root]# mke2fs -j –b 4096 –R stride=8 /dev/md0
3. Now add entry to /etc/fstab and mount it:
Add line to fstab:
          /dev/md0   /mirror1    ext3       defaults 1   2
Create the mount point:
          [root]# mkdir /mirror1
Mount the mirror:
          [root]# mount /mirror1
Using mdadm
mdadm -C /dev/md0 -l1 -n2 /dev/sdb10 /dev/sdb11 -x1 /dev/sdb12
               
-C   create an array               
-l   the raid level (raid 1 in this case)               
-n   Number of devices in raid (2 devices in this case)
-x   Number of spare disks in the raid (1 in this case)
mdadm configuration file
detail, examine and assembledetail = applies to the whole array which is currently active
examine = applies to the devices which are a component of the array
assemble = assemble the array using all devices (will use config file first then scan devices)
Commands
Saving the configuration
echo "DEVICE partitions" > /etc/mdadm.conf
mdadm --detail --scan >> /etc/mdadm.conf
Note: by default the system will look in /etc/mdadm.conf then /etc/mdadm/mdadm.conf
Lost the configuration fileecho "DEVICE partitions" > /etc/mdadm.conf
mdadm --examine --scan >> /etc/mdadm.conf
mdadm --assemble --scan
Check the raid array
/proc/mdstatcat /proc/mdstat
lsraidlsraid –a /dev/md0
mdadmmdadm --detail /dev/md0
mdadm -D /dev/md0
Display device configurationmdadm --misc -D /dev/md0
mdadm --misc -E /dev/sdb11

Simulating a drive failure

To test the raid integrity you might want to simulate a disk failure again there are a number of ways to do this.

raidtoolsraidsetfaulty /dev/md0 /dev/sdb11
mdadmmdadm -–manage /dev/md0 –f /dev/sdb11
Use the above “check the array” options to see that the disk has been faulted.
Remove a disk from the array
To remove a disk from the raid array use the following commands, the disk has to be faulty not faulted (see above) to allow this option to work, at this point the disk can be physically removed.
raidtoolsraidhotremove /dev/md0 /dev/sdb11
mdadmmdadm --manage /dev/md0 –r /dev/sdb11
Use the above “check the array” options to see that the disk has been removed.
Add a disk to the array
Adding a disk to the array could result in two outcomes, if the array is already degraded the new will be used to fix the fault (if a hot spare has not already been used), if not then the disk will be used as a hot spare.
raidtoolsraidhotadd /dev/md0 /dev/sdb11
mdadmmdadm --manage /dev/md0 –a /dev/sdb11
Use the above “check the array” options to see that the disk has been added.
Extend/Shrink the array
grow## First you need to change the configuration
mdadm --grow /dev/md0 -n3

## Then you can add the disks
mdadm --manage /dev/md0 -a /dev/sdb12

## Now you can resize the filesystem
resize2fs /dev/md0
shrink## MAKE SURE EVERYTHING IS BACKED UP
## First fail the disk you want to remove,
mdadm --manage /dev/md0 -f /dev/sdb12

# Then alter the configuration, yes I know the grow actually shrinks the array????
mdadm --grow /dev/md0 -n2

## Now you can remove the disk
mdadm --manage /dev/md0 -r /dev/sdb12
Change the type from raid 1 to raid 5
It is possible to change the type of the array from a raid 1 to a raid 5, I would advise to backup first but it worked without any problems for me
change from raid 1 to raid 5## First you need to unmount any filesystem from the array
umount /array1

## Then you need to stop the array
mdadm -S /dev/md0

## Then recreate the array
mdadm -C /dev/md0 -l5 -n3 /dev/sdb10 /dev/sdb11 /dev/sdb12 -x1 /dev/sdb13

## you will get errors stating the below, select Y to carry on creating the array

mdadm: /dev/sdb1 appears to contain an ext2fs file system
size=51072K mtime=Tue Feb 8 10:30:06 2011
mdadm: /dev/sdb1 appears to be part of a raid array:
level=raid1 devices=2 ctime=Tue Feb 8 10:26:56 2011
mdadm: /dev/sde1 appears to contain an ext2fs file system
size=51072K mtime=Tue Feb 8 10:30:06 2011
mdadm: /dev/sde1 appears to be part of a raid array:
level=raid1 devices=2 ctime=Tue Feb 8 10:26:56 2011
Continue creating array? y
mdadm: array /dev/md0 started.
## Once the array has started then mount it again and check everything
mount /dev/md0 /array1

## check the array
mdadm -D /dev/md0

## Don't forget to update the configuration file
cp /etc/mdadm.conf /etc/mdadm.conf_old
echo "DEVICE partitions" > /etc/mdadm.conf
mdadm --detail --scan >> /etc/mdadm.conf 

Starting and stopping array
raidtoolsraidstop /dev/md0                 
raidstart /dev/md0  
mdadm## Make sure you have the configuration /etc/mdadm.conf file created
mdadm -S /dev/md0
mdadm -A -R /dev/md0
-S  stopping
-A  assemble
-R  starting
Remove the Array
Remove the arraymdadm --stop /dev/md0
mdadm --remove /dev/md0
## Once you run the below command there is no going back
mdadm --zero-superblock /dev/sdb11
mdadm --zero-superblock /dev/sdb12
Restore the Array
Restore the array## standard header for mdadm.conf file
echo "DEVICE partitions" > /etc/mdadm.conf
## get the information from the disks and append that information to mdadm.conf file
mdadm --examine --scan /dev/sdb1 /dev/sdb2 /dev/sdb3 >> /etc/mdadm.conf
## use the mdadm.conf file to start the array
mdadm -A -s
Persistant-superblockWhen an array is initialised with the persistent-superblock option in the /etc/raidtab file, a special superblock is written in the beginning of all disks participating in the array. This allows the kernel to read the configuration of RAID devices directly from the disks involved, instead of reading from some configuration file that may not be available at all times. 
AutodetectionAutodetection allows the RAID devices to be automatically recognized by the kernel at boot-time, right after the ordinary partition detection is done.