#!/bin/bash
# @Function
# Find out the highest cpu consumed threads of java, and print the stack of these threads.
#
# @Usage
#   $ ./show-busy-java-threads.sh
#
# @author Jerry Lee

readonly PROG=`basename $0`
readonly -a COMMAND_LINE=("$0" "$@")

usage() {
    cat <<EOF
Usage: ${PROG} [OPTION]...
Find out the highest cpu consumed threads of java, and print the stack of these threads.
Example: ${PROG} -c 10

Options:
    -p, --pid       find out the highest cpu consumed threads from the specifed java process,
                    default from all java process.
    -c, --count     set the thread count to show, default is 5
    -h, --help      display this help and exit
EOF
    exit $1
}

readonly ARGS=`getopt -n "$PROG" -a -o c:p:h -l count:,pid:,help -- "$@"`
[ $? -ne 0 ] && usage 1
eval set -- "${ARGS}"

while true; do
    case "$1" in
    -c|--count)
        count="$2"
        shift 2
        ;;
    -p|--pid)
        pid="$2"
        shift 2
        ;;
    -h|--help)
        usage
        ;;
    --)
        shift
        break
        ;;
    esac
done
count=${count:-5}

redEcho() {
    [ -c /dev/stdout ] && {
        # if stdout is console, turn on color output.
        echo -ne "\033[1;31m"
        echo -n "$@"
        echo -e "\033[0m"
    } || echo "$@"
}

yellowEcho() {
    [ -c /dev/stdout ] && {
        # if stdout is console, turn on color output.
        echo -ne "\033[1;33m"
        echo -n "$@"
        echo -e "\033[0m"
    } || echo "$@"
}

blueEcho() {
    [ -c /dev/stdout ] && {
        # if stdout is console, turn on color output.
        echo -ne "\033[1;36m"
        echo -n "$@"
        echo -e "\033[0m"
    } || echo "$@"
}

# Check the existence of jstack command!
if ! which jstack &> /dev/null; then
    [ -z "$JAVA_HOME" ] && {
        redEcho "Error: jstack not found on PATH!"
        exit 1
    }
    ! [ -f "$JAVA_HOME/bin/jstack" ] && {
        redEcho "Error: jstack not found on PATH and $JAVA_HOME/bin/jstack file does NOT exists!"
        exit 1
    }
    ! [ -x "$JAVA_HOME/bin/jstack" ] && {
        redEcho "Error: jstack not found on PATH and $JAVA_HOME/bin/jstack is NOT executalbe!"
        exit 1
    }
    export PATH="$JAVA_HOME/bin:$PATH"
fi

readonly uuid=`date +%s`_${RANDOM}_$$

cleanupWhenExit() {
    rm /tmp/${uuid}_* &> /dev/null
}
trap "cleanupWhenExit" EXIT

printStackOfThreads() {
    local line
    local count=1
    while IFS=" " read -a line ; do
        local pid=${line[0]}
        local threadId=${line[1]}
        local threadId0x="0x`printf %x ${threadId}`"
        local user=${line[2]}
        local pcpu=${line[4]}

        local jstackFile=/tmp/${uuid}_${pid}

        [ ! -f "${jstackFile}" ] && {
            {
                if [ "${user}" == "${USER}" ]; then
                    jstack ${pid} > ${jstackFile}
                else
                    if [ $UID == 0 ]; then
                        sudo -u ${user} jstack ${pid} > ${jstackFile}
                    else
                        redEcho "[$((count++))] Fail to jstack Busy(${pcpu}%) thread(${threadId}/${threadId0x}) stack of java process(${pid}) under user(${user})."
                        redEcho "User of java process($user) is not current user($USER), need sudo to run again:"
                        yellowEcho "    sudo ${COMMAND_LINE[@]}"
                        echo
                        continue
                    fi
                fi
            } || {
                redEcho "[$((count++))] Fail to jstack Busy(${pcpu}%) thread(${threadId}/${threadId0x}) stack of java process(${pid}) under user(${user})."
                echo
                rm ${jstackFile}
                continue
            }
        }
        blueEcho "[$((count++))] Busy(${pcpu}%) thread(${threadId}/${threadId0x}) stack of java process(${pid}) under user(${user}):"
        sed "/nid=${threadId0x} /,/^$/p" -n ${jstackFile}
    done
}


ps -Leo pid,lwp,user,comm,pcpu --no-headers | {
    [ -z "${pid}" ] &&
    awk '$4=="java"{print $0}' ||
    awk -v "pid=${pid}" '$1==pid,$4=="java"{print $0}'
} | sort -k5 -r -n | head --lines "${count}" | printStackOfThreads
Tuesday, February 14, 2017
Find out the highest cpu consumed threads of java, and print the stack of these threads.
Identify Java code consuming high CPU in Linux (linking JVM thread and Linux PID)
We can easily identify a problematic java code which leads to high CPU utilization in Linux. Let me explain the steps with the following example,
- package test;
- public class ThreadDumpTest {
- public void test(){
- for (int i = 0; i < 10 ; i++) {
- Thread th=new Thread(new TR(i));
- th.setName(“MyThread-“+(1000+i));
- th.start();
- }
- }
- public static void main(String[] args) {
- ThreadDumpTest t=new ThreadDumpTest();
- t.test();
- }
- private class TR implements Runnable{
- int ins=0;
- TR(int i){
- ins=i;
- }
- public void run(){
- while (true) {
- if(ins!=5) {
- try {
- Thread.sleep(10000);
- } catch (Exception e) {
- e.printStackTrace();
- }
- }
- }
- }
- }
- }
In the above example, all the threads are in while loop. Except ‘MyThread-1005‘ thread, all other threads will sleep 10 secs inside the loop. The ‘MyThread-1005‘ thread will not enter sleep part, so it will run in while loop without sleep. Due to while loop, the ‘MyThread-1005‘ thread will leads to high CPU utilization.
How to identify ?
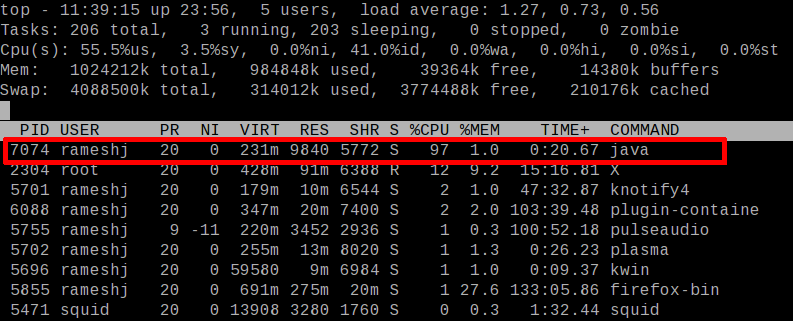
Step 1 :
Execute ‘top‘ command on the console. You can see the ‘java’ command with PID 7074 utilized 97% of CPU.
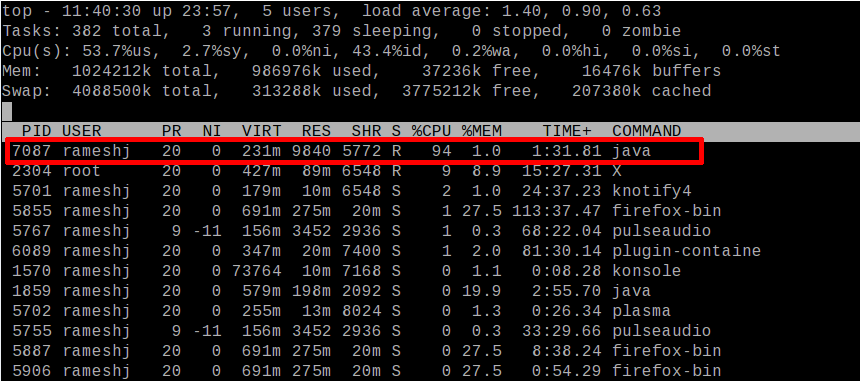
Step 2 :
The top command displays the process list like the above image. Press ‘Shift + h‘ and wait few secs. You can see ‘Show threads on‘ message in the top console. Now, you can see thread level details like CPU/Memory utilization. You can see a ‘java’ command thread with PID 7087 utilized 94% of CPU.
Step 3:
The identified problematic thread PID ( 7087 ) is in decimal format. Convert it into hexadecimal format. The respective hexadecimal for 7087 is 1BAF. And convert it into lowercase (1baf ).
Step 4:
Take thread dump and search the converted hexadecimal PID ( 1baf ) in the thread dump. You can find the hex PID as ‘nid‘ (with ‘0x’) of the thread trace. From the trace, you can find ‘MyThread-1005‘ is the problematic thread in the test program. And using the thread trace you can identify the problematic code and fix the problem.
- [rameshj@rameshj thread]$ java test/ThreadDumpTest
- ^\Full thread dump Java HotSpot(TM) Client VM (1.5.0_06-b05 mixed mode):
- “DestroyJavaVM” prio=1 tid=0x083d2d78 nid=0x1ba2 waiting on condition [0x00000000..0xbff4bf60]
- “MyThread-1009” prio=1 tid=0x08510a88 nid=0x1bb3 waiting on condition [0xa9cca000..0xa9ccb020]
- at java.lang.Thread.sleep(Native Method)
- at test.ThreadDumpTest$TR.run(ThreadDumpTest.java:45) &nbs
p; - at java.lang.Thread.run(Thread.java:595)
- “MyThread-1008” prio=1 tid=0x08510318 nid=0x1bb2 waiting on condition [0xa9d4b000..0xa9d4bea0]
- at java.lang.Thread.sleep(Native Method)
- at test.ThreadDumpTest$TR.run(ThreadDumpTest.java:45)
- at java.lang.Thread.run(Thread.java:595)
- “MyThread-1007” prio=1 tid=0x0850f298 nid=0x1bb1 waiting on condition [0xa9dcc000..0xa9dccf20]
- at java.lang.Thread.sleep(Native Method)
- at test.ThreadDumpTest$TR.run(ThreadDumpTest.java:45)
- at java.lang.Thread.run(Thread.java:595)
- “MyThread-1006” prio=1 tid=0x0850d818 nid=0x1bb0 waiting on condition [0xa9e4d000..0xa9e4dda0]
- at java.lang.Thread.sleep(Native Method)
- at test.ThreadDumpTest$TR.run(ThreadDumpTest.java:45)
- at java.lang.Thread.run(Thread.java:595)
- “MyThread-1005” prio=1 tid=0x0850c9f8 nid=0x1baf runnable [0xa9ece000..0xa9ecee20]
- at test.ThreadDumpTest$TR.run(ThreadDumpTest.java:43)
- at java.lang.Thread.run(Thread.java:595)
- “MyThread-1004” prio=1 tid=0x0850b8e8 nid=0x1bae waiting on condition [0xa9f4f000..0xa9f500a0]
- at java.lang.Thread.sleep(Native Method)
- at test.ThreadDumpTest$TR.run(ThreadDumpTest.java:45)
- at java.lang.Thread.run(Thread.java:595)
- “MyThread-1003” prio=1 tid=0x0850aac8 nid=0x1bad waiting on condition [0xa9fd0000..0xa9fd1120]
- at java.lang.Thread.sleep(Native Method)
- at test.ThreadDumpTest$TR.run(ThreadDumpTest.java:45)
- at java.lang.Thread.run(Thread.java:595)
- “MyThread-1002” prio=1 tid=0x085099b8 nid=0x1bac waiting on condition [0xaa051000..0xaa051fa0]
- at java.lang.Thread.sleep(Native Method)
- at test.ThreadDumpTest$TR.run(ThreadDumpTest.java:45)
- at java.lang.Thread.run(Thread.java:595)
- “MyThread-1001” prio=1 tid=0x08508a28 nid=0x1bab waiting
on condition [0xaa0d2000..0xaa0d3020] - at java.lang.Thread.sleep(Native Method)
- at test.ThreadDumpTest$TR.run(ThreadDumpTest.java:45)
- at java.lang.Thread.run(Thread.java:595)
- “MyThread-1000” prio=1 tid=0x08508520 nid=0x1baa waiting on condition [0xaa153000..0xaa153ea0]
- at java.lang.Thread.sleep(Native Method)
- at test.ThreadDumpTest$TR.run(ThreadDumpTest.java:45)
- at java.lang.Thread.run(Thread.java:595)
- “Low Memory Detector” daemon prio=1 tid=0x0843cf58 nid=0x1ba8 runnable [0x00000000..0x00000000]
- “CompilerThread0” daemon prio=1 tid=0x0843b930 nid=0x1ba7 waiting on condition [0x00000000..0xaa3eb808]
- “Signal Dispatcher” daemon prio=1 tid=0x0843a9d0 nid=0x1ba6 waiting on condition [0x00000000..0x00000000]
- “Finalizer” daemon prio=1 tid=0x08430740 nid=0x1ba5 in Object.wait() [0xaa52c000..0xaa52d120]
- at java.lang.Object.wait(Native Method)
- – waiting on <0xaa6b0848> (a java.lang.ref.ReferenceQueue$Lock)
- at java.lang.ref.ReferenceQueue.remove(ReferenceQueue.java:116)
- – locked <0xaa6b0848> (a java.lang.ref.ReferenceQueue$Lock)
- at java.lang.ref.ReferenceQueue.remove(ReferenceQueue.java:132)
- at java.lang.ref.Finalizer$FinalizerThread.run(Finalizer.java:159)
- “Reference Handler” daemon prio=1 tid=0x0842e898 nid=0x1ba4 in Object.wait() [0xaa5ad000..0xaa5adfa0]
- at java.lang.Object.wait(Native Method)
- – waiting on <0xaa6b0758> (a java.lang.ref.Reference$Lock)
- at java.lang.Object.wait(Object.java:474)
- at java.lang.ref.Reference$ReferenceHandler.run(Reference.java:116)
- – locked <0xaa6b0758> (a java.lang.ref.Reference$Lock)
- “VM Thread” prio=1 tid=0x0842bb68 nid=0x1ba3 runnable
- “VM Periodic Task Thread” prio=1 tid=0x0843e538 nid=0x1ba9 waiting on condition
Update : FYI : You can automatically take a thread dump of a Java application when a high CPU threshold is violated by using Applications Manager. Learn more orwatch a related video or download Applications Manager now.
Figure out why is JAVA eating CPU?
Figure out why is JAVA eating CPU?
In a production environment profiling is not an option, we have seen several times that our CPU has reached almost 100%, we are running tomcat on Redhat 5.5, so what is happening?
Fortunately, java comes with some great debugging tools, cooperating those tools with Linux built-in tools will let you know what is happening.
Here is what i am going to explain:
Fortunately, java comes with some great debugging tools, cooperating those tools with Linux built-in tools will let you know what is happening.
Here is what i am going to explain:
- An introduction about java threads and its relation to what-so-called Linux LWP
- A step-by-step
1- An introduction
as you may know, any java program starts when the JVM calls the main method, this creates a thread called the main thread and any thread you create using java code will be derived from the main thread (out-of-focus: it is always a good practice to give your threads a name, it is very useful in debugging, however, it is not required here) the same exact behavior occurs on the Linux level, the main thread for java means a process for the OS, and every thread you create using java the OS will create a Light-weight-process or LWP.
to cut it short, Java main thread = Linux process and Java thread = Linux LWP.
the idea here:
- Ask Linux which LWP is eating the CPU.
- Ask Java for a Thread Dump.
- Map this LWP to a Java thread.
- Get the part of code causing the issue.
2- A Step-By-Step:
- Get the PID: the very first step is to know what is the Java process ID, we will use Linux tools ps and grep
ps -A|grep java
if you are running multiple java processes we can executeps -ef|grep java - the next step is to get CPU usage per each LWP related to the main process, again we will use ps and grep
ps -eLo pid,lwp,nlwp,ruser,pcpu,stime,etime,args|grep {pid} > lwpthread.txt
the file lwpthread.txt will contain some thing similar:PID NLWP SZ RUSER %CPU STIME ELAPSED COMMAND 8234 8234 1110 admin 0.3 08:11 30:15 /usr/java/jdk1.6.0_24/bin/java 8234 8245 1110 admin 99.0 08:45 10:15 /usr/java/jdk1.6.0_24/bin/java
as you can see, we have an LWP(mapped to a java thread) eating the CPU, get the NLWP, that will be our lead in the next step. - the next step is to generate a java thread dump, there are two main ways to create a thread dump, the first one is to use the JDK tool jstack and pass the PID to it, the second way is to send a kill signal to the JVM, however in the first way you will have control over where you want to save the thread dump, while on the second way you will have the thread dump written on the java process standard output stream.
as said, we are using tomcat, so the thread dump will be in catalina.outkill -3 {pid}
the thread dump will be printed to the file with full stack trace. the file will contain the thread you are after, but first convert your LWP id from DEC to HEX so 8245 would be 2035, now open the thread dump with text editor and search for 2035, you will find something similar:"TP-Processor234786" daemon prio=10 tid=0x00002aaad8024800 nid=0x2035 runnable [0x00002aaadef29000]
java.lang.Thread.State: RUNNABLE
at java.util.HashMap.get(HashMap.java:303)
at ......
How To Migrate Linux Servers Part 3 - Final Steps
Introduction
There are many scenarios where you might have to move your data and operating requirements from one server to another. You may need to implement your solutions in a new datacenter, upgrade to a larger machine, or transition to new hardware or a new VPS provider.
Whatever your reasons, there are many different considerations you should make when migrating from one system to another. Getting functionally equivalent configurations can be difficult if you are not operating with a configuration management solution such as Chef, Puppet, or Ansible. You need to not only transfer data, but also configure your services to operate in the same way on a new machine.
In our last article, we covered how to transfer data with rsync and migrate your database. We will continue our migration in this article by migrating users, groups, mail, crontabs, and other settings.
Migrate Users and Groups
Although your primary concern may be for your services and programs, we need to pay attention to users and groups as well.
Most services that need specific users to operate will create these users and groups at installation. However, this still leaves users and groups that have been created manually or through other methods.
Luckily, all of the information for users and groups is contained within a few files. The main files we need to look at are:
- /etc/passwd: This file defines our users and basic attributes. Despite its name, this file no longer contains any password information. Instead, it focuses on username, user and primary group numbers, home directories, and default shells.
- /etc/shadow: This file contains the actual information about passwords for each user. It should contain a line for each of the users defined in the
passwdfile, along with a hash of their password and some information about password policies. - /etc/group: This file defines each group available on your system. Basically, this just contains the group name and the associated group number, along with any usernames that use this as a supplementary group.
- /etc/gshadow: This file contains a line for each group on the system. It basically lists the group, a password that can be used by non-group members to access the group, a list of administrators and non-administrators.
While it may seem like a good idea to just copy these files directly from the source system onto the new system, this can cause complications and is not recommended.
One of the main issues that can come up is conflicting group and user id numbers. If software that creates its own users and groups is installed in a different order between the systems, the user and group numbers can be different, causing conflicts.
It is instead better to leave the majority of these files alone and only adjust the values that we need. We can do this in a number of ways.
Creating Migration Files
Regardless of the method we'd like to use to add users to our new system, we should generate a list of the users, groups, etc. that should be transferred and added.
A method that has been floating around the internet for awhile is mentioned below:
We will create a file associated with each of the above files that we need to modify. They will contain all of the appropriate transfer information.
First, figure out what the ID limit between regular and system users is on your machine. This is typically either 500 or 1000 depending on your system. If you have a regular user, an easy way to find out is to inspect the
/etc/passwd file and see where the regular user accounts start:less /etc/passwd
Afterwards, we can use this number (the first regular user ID number, in the 3rd column) to set the limit on our command. We won't be exporting users or groups below this limit. We will also exclude the "nobody" account that is given the user ID of "65534".
We can create a sync file for our
/etc/passwd file by typing this. Substitute the limit# with the lowest regular user number you discovered in the /etc/passwd file:awk -v LIMIT=limit# -F: '($3>=LIMIT) && ($3!=65534)' /etc/passwd > /root/passwd.sync
Afterwards, we can do a similar thing to make a group sync file:
awk -v LIMIT=limit# -F: '($3>=LIMIT) && ($3!=65534)' /etc/group > /root/group.sync
We can use the usernames within the range we're interested in from our
/etc/passwd file to get the values we want from our shadow file:awk -v LIMIT=limit# -F: '($3>=LIMIT) && ($3!=35534) {print $1}' /etc/passwd | tee - | egrep -f - /etc/shadow > /root/shadow.sync
For the
/etc/gshadow file, we'll do a similar operation:awk -v LIMIT=limit# -F: '($3>=LIMIT) && ($3!=65534) {print $1}' /etc/group | tee - | egrep -f - /etc/gshadow > /root/gshadow.sync
Once we know the commands we want to run, we can add them to our script after a regular SSH command and then rsync them off, like this:
ssh 111.222.333.444 "awk -v LIMIT=limit# -F: '($3>=LIMIT) && ($3!=65534)' /etc/passwd > /root/passwd.sync"
ssh 111.222.333.444 "awk -v LIMIT=limit# -F: '($3>=LIMIT) && ($3!=65534)' /etc/group > /root/group.sync"
ssh 111.222.333.444 "awk -v LIMIT=limit# -F: '($3>=LIMIT) && ($3!=35534) {print $1}' /etc/passwd | tee - | egrep -f - /etc/shadow > /root/shadow.sync"
ssh 111.222.333.444 "awk -v LIMIT=limit# -F: '($3>=LIMIT) && ($3!=65534) {print $1}' /etc/group | tee - | egrep -f - /etc/gshadow > /root/gshadow.sync"
rsync 111.222.333.444:/root/passwd.sync /root/
rsync 111.222.333.444:/root/group.sync /root/
rsync 111.222.333.444:/root/shadow.sync /root/
rsync 111.222.333.444:/root/gshadow.sync /root/
Manually Add Users
If we want to just add a comment to our script file and do this manually, the
vipw and vigr commands are recommended, because they lock the files while editing and guard against corruption. You can edit the files manually by typing:vipw
Passing the
-s flag edits the associated shadow file, and passing the -g flag edits the group file.
You may be tempted to just add the lines from the files directly onto the end of the associated file on the new system like this:
cat /root/passwd.sync >> /etc/passwd
If you choose to go this route, you must be aware that there can be ID conflicts if the ID is already taken by another user on the new system.
You can also add each username using the available tools on the system after getting a list from the source computer. The
useradd command can allow you to quickly create user accounts to match the source computer:useradd -s /path/to/shell -m -d /home/username -p password -G supplementary_groups
You can use the
*.sync files for reference and add them in this way.Automatically Add Users
If we instead want to script the user and group additions within our file, we can easily do that too. We'll want to comment these out after the first successful run though, because the script will attempt to create users/groups multiple times otherwise.
There is a command called
newusers that can bulk add users from a file. This is perfect for us, but we want to modify our files first to remove the user and group IDs. The command will generate the next available users and groups for the new system.
We can strip the group and user IDs from the passwd file like this:
awk 'BEGIN { OFS=FS=":"; } {$3=""; $4=""; } { print; }' /root/passwd.sync > /root/passwd.sync.mod
We can apply this new modified file like this:
newusers /root/passwd.sync.mod
This will add all of the users from the file to the local
/etc/passwd file. It will also create the associated user group automatically. You will have to manually have to add additional groups that aren't associated with a user to the /etc/group file. Use your migration files to edit the appropriate files.
For the
/etc/shadow file, you can copy the second column from your shadow.sync file into the second column of the associated account in the new system. This will transfer the passwords for your accounts to the new system.
You can attempt to script these changes, but this may be one case where it is easier to do it by hand. Remember to comment out any user or group lines after the users and groups are configured.
Transfer Mail and Jobs to New System
Now that your users are transferred from the old system, and have your user's home directories populated by the rsync commands that have been running, you can migrate the mail of each user as well. We want to replicate the cron jobs too.
We can begin by doing another rsync command for the spool directory. Within the spool directory on our source system, we can usually see some important files:
ls /var/spool
anacron cron mail plymouth rsyslog
We want to transfer the mail directory to our target server, so we can add an rsync line that looks like this to our migration script:
rsync -avz --progress 111.222.333.444:/var/spool/mail/* /var/spool/mail/
Another directory within the
/var/spool directory that we want to pay attention to is the cron directory. This directory keeps cron and at jobs, which are used for scheduling. The crontabs directory within contains individual user's crontab are used to schedule jobs.
We want to preserve the automated tasks that our users have assigned. We can do this with yet another rsync command:
rsync -avz --progress 111.222.333.444:/var/spool/cron/crontabs/* /var/spool/cron/crontabs/*
This will get individual user's crontabs onto our new system. However, there are other crontabs that we need to move. Within the
/etc directory, there is a crontab and a number of other directories that containing cron info.ls /etc | grep cron
anacrontab
cron.d
cron.daily
cron.hourly
cron.monthly
crontab
cron.weekly
The
crontab file contains system-wide cron details. The other items are directories that contain other cron information. Look into them and decide if they contain any information you need.
Once again, use rsync to transfer the relevant cron information to the new system.
rsync -avz --progress 111.222.333.444:/etc/crontab /etc/crontab
Once you have your cron information on your new system, you should verify that it works. This is a manual step, so you'll have to do this at the end.
The only way of doing this correctly is to log in as each individual user and run the commands in each user's crontab manually. This will make sure that there are no permissions issues or missing file paths that would prevent these commands from silently failing when running automatically.
Restart Services
At the end of your migration script, you should make sure that all of the appropriate services are restarted, reloaded, flushed, etc. You need to do this using whatever mechanisms are appropriate for the operating system that you are using.
For instance, if we're migrating a LAMP stack on Ubuntu, we can restart the important processes by typing:
service mysql restart
service apache2 restart
service php5-fpm restart
You can add these to the end of your migration script as-is, and they should operate as expected.
Test Sites and Services
After you have finished your migration script and ran it with all of the syncing and modifications, as well as performed all of the necessary manual steps, you should test out your new system.
There are quite a few areas that you'll want to check. Pay attention to any associated log files as you're testing to see if any issues come up.
First, you'll want to test the directory sizes after you've transferred. For instance, if you have a
/datapartition that you've rsynced, you will want to go to that directory on both the source and target computers and run the du command:cd /data
du -hs
471M .
Verify that the sizes are close to the same. There might be slight differences between the original and the new system, but they should be close. If there is a large disparity, you should investigate as to why.
Next, you can check the processes that are running on each machine. You can do this by looking for important information in the
ps output:ps auxw
USER       PID %CPU %MEM    VSZ   RSS TTY      STAT START   TIME COMMAND
root         1  0.0  0.0  27024  2844 ?        Ss   Feb26   0:00 /sbin/init
root         2  0.0  0.0      0     0 ?        S    Feb26   0:00 [kthreadd]
root         3  0.0  0.0      0     0 ?        S    Feb26   0:00 [ksoftirqd/0]
root         4  0.0  0.0      0     0 ?        S    Feb26   0:00 [kworker/0:0]
root         5  0.0  0.0      0     0 ?        S<   Feb26   0:00 [kworker/0:0H]
. . .
You also can replicate some of the checks that you did initially on the source machine to see if you have emulated the environment on the new machine:
netstat -nlp
Active Internet connections (only servers)
Proto Recv-Q Send-Q Local Address           Foreign Address         State       PID/Program name
tcp        0      0 127.0.1.1:53            0.0.0.0:*               LISTEN      1564/dnsmasq
tcp        0      0 127.0.0.1:631           0.0.0.0:*               LISTEN      2886/cupsd
tcp        0      0 0.0.0.0:445             0.0.0.0:*               LISTEN      752/smbd
tcp        0      0 0.0.0.0:139             0.0.0.0:*               LISTEN      752/
. . .
Again, another option is:
lsof -nPi
COMMAND     PID        USER   FD   TYPE  DEVICE SIZE/OFF NODE NAME
smbd        752        root   26u  IPv6    9705      0t0  TCP *:445 (LISTEN)
smbd        752        root   27u  IPv6    9706      0t0  TCP *:139 (LISTEN)
smbd        752        root   28u  IPv4    9707      0t0  TCP *:445 (LISTEN)
smbd        752        root   29u  IPv4    9708      0t0  TCP *:139 (LISTEN)
. . .
You should go through the package versions of your important services like we did in the first article in order to verify if you matched version for important packages. The way to do this will be system dependent.
If you transferred a web server or a LAMP stack, you should definitely test your sites on the new server.
You can do this easily by modifying your hosts file (on your local computer) to point to your new server instead of the old one. You can then test to see if your server accepts requests correctly and that all of the components are operating together in the correct way.
The way that you modify your local hosts file differs depending on the operating system you are using. If you are using an operating system with *nix based design, like OS X or Linux, you can modify the hosts file on your local system like this:
sudo nano /etc/hosts
Inside, you need to add an entry to point your domain name to the IP address of your new server, so that your computer intercepts the request and routes it to the new location for testing.
The lines you can add may look something like this:
111.222.333.444     www.domain.com
111.222.333.444     domain.com
Add any subdomains that are used throughout your site configuration as well (images.domain.com, files.domain.com, etc.). Once you have added the host lines, save and close the file.
If you are on OS X, you will need to flush your hosts file for your computer to see the new content:
sudo lookupd -flushcache
On Linux, this should work automatically.
On Windows, you'll have to edit the
C:\Windows\Wystem32\Drivers\etc\hosts file as an administrator. Add the lines in the same fashion that we did above for the *nix versions.
After your hosts file is edited on your local workstation, you should be able to access the test server by going to your domain name. Test everything you possibly can and make sure that all of the components can communicate with each other and respond in the correct way.
After you have completed testing, remember to open the hosts file again and remove the lines you added.
Change DNS Settings
When you've thoroughly tested your new server, look through your migration script and make sure that no portion of it is going to be reversing modifications you've made.
Afterwards, run the script one more time to bring over the most recent data from your source server.
Once you have all of the newest data on your target server, you can modify the DNS servers for your domain to point to your new server. Make sure that every reference to the old server's IP is replaced with the new server's information.
If you are using DigitalOcean's DNS servers, you can read about how to configure your domain nameshere.
The DNS servers will take some time to update. After all of the DNS servers have gotten your new changes, you may have to run the migration script a final time to make sure that any stray requests that were still going to your original server are transferred.
Look closely at your MySQL commands to ensure that you are not throwing away or overwriting data that has been written to either the old or new servers.
Conclusion
If all went well, your new server should now be up and running, accepting requests and handling all of the data that was on your previous server. You should continue to closely monitor the situation and keep an eye out for any anomalies that may come up.
Migrations, when done properly, are not trivial, and many issues can come up. The best chance of successfully migrating a live server is to understand your system as best as you can before you begin. Every system is different and each time, you will have to work around new issues. Do not attempt to migrate if you do not have time to troubleshoot issues that may arise.
Subscribe to:
Posts (Atom)