Wednesday, January 21, 2009

Where can I get the Windows Server 2003 Reskit Tools?

The Windows Server 2003 Resource Kit Tools are a set of software tools for administrators, developers, and power users to manage Active Directory, Group Policy, TCP/IP Networks, Registry, Security, Scalability and many other areas of the Windows Server 2003 operating system.

The following tools are provided:

  • Acctinfo.dll (documented in Readme.htm)
  • Adlb.exe: Active Directory Load Balancing Tool
  • Admx.msi: ADM File Parser
  • Atmarp.exe: Windows ATM ARP Server Information Tool
  • Atmlane.exe: Windows ATM LAN Emulation Client Information
  • Autoexnt.exe: AutoExNT Service
  • Cdburn.exe: ISO CD-ROM Burner Tool
  • Checkrepl.vbs: Check Replication
  • Chklnks.exe: Link Check Wizard
  • Chknic.exe: Network Interface Card Compliance Tool for Network Load Balancing
  • Cleanspl.exe: Spooler Cleaner
  • Clearmem.exe: Clear Memory
  • Clusdiag.msi: Cluster Diagnostics and Verification Tool
  • Clusfileport.dll: Cluster Print File Port
  • Clusterrecovery.exe: Server Cluster Recovery Utility
  • Cmdhere.inf: Command Here
  • Cmgetcer.dll: Connection Manager Certificate Deployment Tool
  • Compress.exe: Compress Files
  • Confdisk.exe: Disk Configuration Tool
  • Consume.exe: Memory Consumers Tool
  • Creatfil.exe: Create File
  • Csccmd.exe: Client-Side Caching Command-Line Options
  • Custreasonedit.exe: Custom Reason Editor (documented in Readme.htm)
  • Delprof.exe: User Profile Deletion Utility
  • Dh.exe: Display Heap
  • Diskraid.exe: RAID Configuration Tool
  • Diskuse.exe: User Disk Usage Tool
  • Dnsdiag.exe: SMTP DNS Diagnostic Tool (documented in Readme.htm)
  • Dumpfsmos.cmd: Dump FSMO Roles
  • Dvdburn.exe: ISO DVD Burner Tool
  • Empty.exe: Free Working Set Tool
  • Eventcombmt.exe: Check Replication
  • Fcopy.exe: File Copy Utility for Message Queuing
  • Frsflags.vbs
  • Getcm.exe: Connection Manager Profile Update
  • Gpmonitor.exe: Group Policy Monitor
  • Gpotool.exe: Group Policy Objects
  • Hlscan.exe: Hard Link Display Tool
  • Ifilttst.exe: IFilter Test Suite
  • Ifmember.exe: User Membership Tool
  • Inetesc.adm: Internet Explorer Enhanced Security Configuration
  • Iniman.exe: Initialization Files Manipulation Tool
  • Instcm.exe: Install Connection Manager Profile
  • Instsrv.exe: Service Installer
  • Intfiltr.exe: Interrupt Affinity Tool
  • Kerbtray.exe: Kerberos Tray
  • Kernrate.exe: Kernel Profiling Tool
  • Klist.exe: Kerberos List
  • Krt.exe: Certification Authority Key Recovery
  • Lbridge.cmd: L-Bridge
  • Linkd.exe
  • Linkspeed.exe: Link Speed
  • List.exe: List Text File Tool
  • Lockoutstatus.exe: Account Lockout Status (documented in Readme.htm)
  • Logtime.exe
  • Lsreport.exe: Terminal Services Licensing Reporter
  • Lsview.exe: Terminal Services License Server Viewer
  • Mcast.exe: Multicast Packet Tool
  • Memmonitor.exe: Memory Monitor
  • Memtriage.exe: Resource Leak Triage Tool
  • Mibcc.exe: SNMP MIB Compiler
  • Moveuser.exe: Move Users
  • Mscep.dll: Certificate Services Add-on for Simple Certificate Enrollment Protocol
  • Nlsinfo.exe: Locale Information Tool
  • Now.exe: STDOUT Current Date and Time
  • Ntimer.exe: Windows Program Timer
  • Ntrights.exe
  • Oh.exe: Open Handles
  • Oleview.exe: OLE/COM Object Viewer
  • Pathman.exe: Path Manager
  • Permcopy.exe: Share Permissions Copy
  • Perms.exe: User File Permissions Tool
  • Pfmon.exe: Page Fault Monitor
  • Pkiview.msc: PKI Health Tool
  • Pmon.exe: Process Resource Monitor
  • Printdriverinfo.exe: Drivers Source
  • Prnadmin.dll: Printer Administration Objects
  • Qgrep.exe
  • Qtcp.exe: QoS Time Stamp
  • Queryad.vbs: Query Active Directory
  • Rassrvmon.exe: RAS Server Monitor
  • Rcontrolad.exe: Active Directory Remote Control Add-On
  • Regini.exe: Registry Change by Script
  • Regview.exe (documented in Readme.htm)
  • Remapkey.exe: Remap Windows Keyboard Layout
  • Robocopy.exe: Robust File Copy Utility
  • Rpccfg.exe: RPC Configuration Tool
  • Rpcdump.exe
  • Rpcping.exe
  • RPing: RPC Connectivity Verification Tool
  • Rqc.exe: Remote Access Quarantine Client
  • Rqs.exe: Remote Access Quarantine Agent
  • Setprinter.exe: Spooler Configuration Tool
  • Showacls.exe
  • Showperf.exe: Performance Data Block Dump Utility
  • Showpriv.exe: Show Privilege
  • Sleep.exe: Batch File Wait
  • Sonar.exe: FRS Status Viewer
  • Splinfo.exe: Print Spooler Information
  • Srvany.exe: Applications as Services Utility
  • Srvcheck.exe: Server Share Check
  • Srvinfo.exe: Remote Server Information
  • Srvmgr.exe: Server Manager
  • Ssdformat.exe: System State Data Formatter
  • Subinacl.exe
  • Tail.exe
  • Tcmon.exe: Traffic Control Monitor
  • Timeit.exe (documented in Readme.htm)
  • Timezone.exe: Daylight Saving Time Update Utility
  • Tsctst.exe: Terminal Server Client License Dump Tool
  • Tsscalling.exe: Terminal Services Scalability Planning Tools
  • Uddicatschemeeditor.exe: UDDI Services Categorization Scheme Editor
  • Uddiconfig.exe: UDDI Services Command-line Configuration Utility
  • Uddidataexport.exe: UDDI Data Export Wizard
  • Usrmgr.exe: User Manager for Domains
  • Vadump.exe: Virtual Address Dump
  • Vfi.exe: Visual File Information
  • Volperf.exe: Shadow Copy Performance Counters
  • Volrest.exe: Shadow Copies for Shared Folders Restore Tool
  • Vrfydsk.exe: Verify Disk
  • Winexit.scr: Windows Exit Screen Saver
  • Winhttpcertcfg.exe: WinHTTP Certificate Configuration Tool
  • Winhttptracecfg.exe: WinHTTP Tracing Facility Configuration Tool
  • Winpolicies.exe: Policy Spy
  • Wins.dll: WINS Replication Network Monitor Parser
  • Wlbs_hb.dll & Wlbs_rc.dll: Windows Load Balancing Server Network Monitor Parsers

Supported Operating Systems:

  • Windows Server 2003, Windows XP
  • Windows XP 2600
  • Windows XP SP1
  • Windows Server 2003 family (3790)

Plus, 30 MB of free disk space are needed for the installation.

Download the Windows 2003 Resource Kit Support Tools (12mb)

How can I change the store limits in Exchange 2003 SP2?

By default, the size limit of each database on a server running Exchange 2000 and Exchange Server 2003 Standard Edition is 16 GB (this limit is also enforced in SBS 2000/2003). Exchange Server 2003 Service Pack 2 (SP2) is supposed to remove this limit and thus allow for further DB size growth.

After installing Exchange Server 2003 Service Pack 2, the default size limit for each Exchange database is 18 GB, but can easily be configured to allow for database size limits of up to 75 GB per database (for the Standard and SBS 2003 versions), or up to 8000 GB (or 8 TB) per database (for the Enterprise version).

By default, Exchange 2003 SP2 logs events when the database has grown to within 10% of the configured database size limit (i.e. using 90% of the allocated limit). This threshold is configurable and can range from 1% to 100%.

BTW, you can easily check your store size by performing the steps outlined in the Reporting Storage Size in Exchange article.

The database size check happens at 5am, every 24 hours by default. This time can be changed through the registry. The first database size check will not take the database offline if the size limit has been exceeded, but an error event (ID 9689) will be logged in the Application event log (i.e. it has reached the 18 GB limit, or any other limit you have manually set).

On the second check (24 hours later) the error event will be logged in the Application event log and the database will be taken offline. An administrator can then mount the database but he or she will have 24 hours fix this issue before the database goes offline again.

Important note: Exchange 2003 SP2 now calculates the logical size of the store, and not the actual size it takes on the hard disk. For example, if you have a 30 GB store (.EDB + .STM files combined) but within it you have 5 GB of white space (look at event id 1221) then Exchange will look only at 25 GB - the logical size.

Note: Exchange 2000 Standard Edition and SBS 2000 do not have this feature and continue to have the 16 GB limit enforced.

Warning!
This document contains instructions for editing the registry. If you make any error while editing the registry, you can potentially cause Windows to fail or be unable to boot, requiring you to reinstall Windows. Edit the registry at your own risk. Always back up the registry before making any changes. If you do not feel comfortable editing the registry, do not attempt these instructions. Instead, seek the help of a trained computer specialist.

To configure the database size limit for a database:

  1. On the computer running Exchange Server, start Regedit.exe.

  2. Open one of the following registry keys:

  • To configure the database size limit on a mailbox store, use the following registry key:

  • To configure the database size limit on a public store, use the following registry key:

Note: In some cases you might find more than one "Private-Mailbox Store GUID" and "Public-Public Store GUID" values in the above registry path. These values can be determined by looking at the objectGUID attribute of each store.

In order to view this value you should use a tool like LDP.exe or ADSIEDIT.msc (both can be found in the Windows Server 2003 Reskit Tools - Download Windows 2003 Reskit Tools).

Navigate to the following DN:

Note the objectGUID attribute of each store, then find the appropriate value in the registry path mentioned in step #2.

  1. Create a new DWORD entry called "Database Size Limit in Gb" and give it the appropriate value for maximum database size in GB.

For Exchange Server 2003 Standard Edition type a value between 1 and 75 (the default is 18 GB).

For Exchange Server 2003 Enterprise Edition type a value between 1 and 8000 (the default is 8000 GB). Click OK.

Note: Entries should be in decimal format.

Note: The setting in Exchange Server 2003 Enterprise Edition is useful when you want to limit the store size, mostly due to hardware restrictions.

  1. Create a new DWORD entry called "Database Size Buffer in Percentage" and give it the appropriate value between 1 and 100 to specify when you want events to be logged in the application log in Event Viewer to warn you that you are nearing the maximum size for a database.

The default value of 10 (i.e. 10%) will result in warning events to be logged when you have 10 percent capacity left before you reach the maximum size for that database.

  1. Create a new DWORD entry called "Database Size Check Start Time in Hours From Midnight" and give it the appropriate value between 0 and 23 to specify when you want Exchange to check the database size.

The default value of 5 results in Exchange Server checking the database size 5 hours after midnight (i.e. 5:00 AM).

  1. Close Registry Editor.

I'm not sure if I've mentioned this but you should dismount and mount your stores, or restart the Information Store service for this tip to work.

Monday, January 19, 2009

Installing Ubuntu Server 8.10 in Microsoft Virtual Server 2005 R2

I managed to get it up and running perfectly, Here’s how:

  • Configure your Virtual Server: Install Virtual; Server 2005 and create a new virtual machine. Since I am using my machine for testing purposes and it will not be always running, I set aside 10 gigs of hard drive space and 1 gig of memory. Make sure to set your virtual network adapter to whatever network adapter on your computer that is connected to the Internet.
  • Install Ubuntu Server: Download the Ubuntu Server install ISO. You can mount the ISO as a CD in VPC rather than burning it to a disk. Start your virtual machine, click CD > Capture ISO Image…, and select the Ubuntu Server install ISO. Then, restart the virtual machine with Action > Reset. At the Ubuntu Server CD screen, choose your language, highlight Install Ubuntu Server and press F6. At the end of the Boot Options line, add the following before the --:

    noreplace-paravirt

    Now, the installer should load correctly.

  • Configure Kernel: The default linux-server kernel will not work with VPC2007, so you must install linux-386. Reboot from the Ubuntu Server ISO, this time highlighting Rescue a broken system. Press F6 and insert the same line before the --:

    noreplace-paravirt

    Answer all of the questions until the end. Mount the first disk partition when asked and choose Execute a Shell…. Run the following commands when you are prompted with the #:

    apt-get update

    apt-get install linux-386

    apt-get remove linux-server

    exit

    Now, reboot the machine and eject the ISO with CD > Release.

  • Configure GRUB: Start the virtual machine back up and press Esc when you see the GRUB countdown. Highlight the linux-386 option (hopefully the first) and press e to edit. On the next screen, highlight the line beginning with “kernel” and press e to edit. Replace “quiet splash” with the following:

    noreplace-paravirt vga=791

    Press enter to save. Now, with the kernel line highlighted, press b to boot. You should now boot up into Ubuntu Server. Login and type the following into the command prompt to edit GRUB:

    sudo nano /boot/grub/menu.lst

    Scroll down to the line similar to ”title Ubuntu 8.04, kernel x.x.xx-xx-386″ and replace “quiet splash” with the following:

    noreplace-paravirt vga=791

    Press ctrl+x to exit, y to save changes, then enter to confirm.

    Now, Ubuntu Server should boot up correctly in the virtual machine! If you have any questions or additions to these steps, don’t hesitate to comment.

Thursday, January 15, 2009

Setup an automated response to emails directly from the server.

Many a times we have a generic email account that is published on the internet for customers / vendors to send emails to for making inquiries. The emails to that mailbox are generally forwarded to another mailbox of a real person who will then read and respond to the email.

Depending on the volume of the incoming email and the nature of the inquiry, the response to the email may take anywhere between 1 day to 7 days. In the meantime we don't want to keep our customers in dark and with a feeling that the emails go into a black hole and want to respond with a canned message which would go out automatically only when an email is received from the generic id and none else. This would be because the person may be receiving emails from many people and it is not desirable to send out this message to them.

Setting up Rule in MS-Exchange - 04

In such cases, the auto response does not work as intended if you choose the first option "from people or distribution list" (circled in red) and give the generic id as the email address. No email will be sent out to either the original sender or the generic id. This is because when setting up the forward at the server level, Microsoft Exchange instructs the intermediary mailbox to act as a mailman and it does not add any headers to the email. So the final recipients still received the email from the original sender and not the generic id. But in the To: field, the recipient still remains as the generic intermediate mailbox address.

To overcome this, instead of setting the rule to trigger on receiving email FROM someone, set the rule to trigger on receiving email SENT TO someone (in this case the generic Id) by checking the box next to "sent to people or distribution list" (circled in blue).

Once this change is made, this rule will again start working.


PLEASE NOTE:

The reason why it is not working for some users is because you have to enable automatic replies in Exchange Server Manager.

Carry out as instructed about and then make sure this is enabled on ESM:

1. Open Exchange System Manager
2. Select Internet Message Formats under Global Settings
3. Double click on DEFAULT in the Right pane of the MMC
4. Select the Advanced tab
5. Select "Allow Automatic Replies"

Thats it.

Monday, January 12, 2009

Microsoft Office Compatibility Pack

Stuck with .docx, .xlsx, and .pptx files? These are also called OpenXML or Microsoft Office 2007 format. Here's a way to convert them in to .doc, .xls, and .ppt (respectively) in Windows.

Don't let the name "Microsoft Office Compatibility Pack for Word, Excel, and PowerPoint 2007 file format" fool you. You do not need Microsoft Office, so it works great with OpenOffice.org, Google Docs, Abiword, WordPerfect, and Microsoft Office 2003.

Installation

Just download and install Microsoft Office Compatibility Pack for Word, Excel, and PowerPoint 2007 file format. The site does not require the annoying Windows Genuine Advantage validation required for some other Microsoft downloads.

GUI conversion

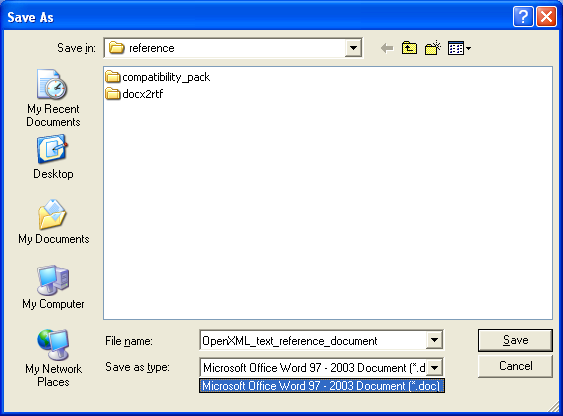
Simply open the .docx, .xlsx, or .pptx document as you would any other. For example, if the document is on your desktop, just double click on it. Then, you'll see this simple dialog:

Microsoft Office Compatibility Pack dialog box

Command line conversion

While most people will use the GUI, others may want automated or batch conversions. If so, use the Windows command line with this format:

"C:\Program Files\Microsoft Office\Office12\wordconv.exe" -oice -nme

Quality of conversion

Microsoft being the OpenXML experts, the conversion was excellent and rendered well in OpenOffice.org 2.3.1. The following converted properly: the text, bold, italics, underline, typefaces changes, font sizes, character colors, paragraph indentation, paragraph alignment, highlighting, hyperlinks, bookmarks, footnotes, track changes, comments, lists, tables, picture, columns, and manual page break.

The same two problems were visible in OpenOffice.org 2.3.1 and Word 2003: the header was not aligned properly, and the embedded Excel object displays correctly but cannot be edited. OpenOffice.org complains, "Error activating object: General OLE error." Word 2003 complains, "The server application, source, or item cannot be found." I assume they are both looking for an Excel 2007 installation.

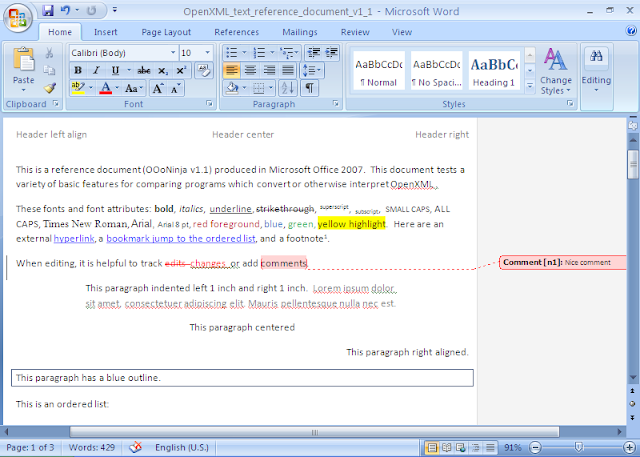
Here is the original reference document shown in Word 2007:

OpenXML reference document in Microsoft Office Word 2007

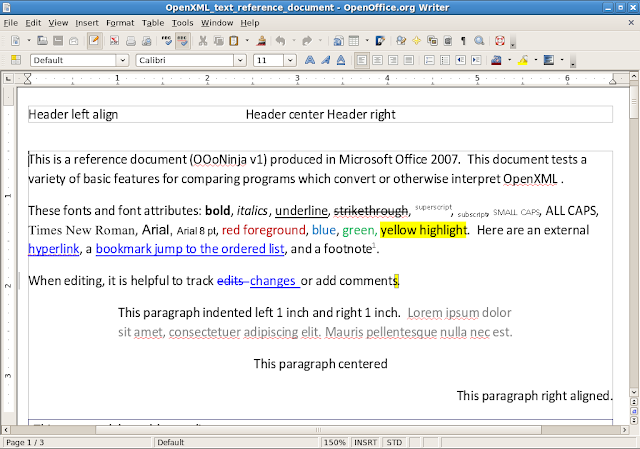
Here is the converted .doc document viewed in OpenOffice.org 2.3.1 with the Calibri font installed:

In OpenOffice.org 2.3.1 the results of the OpenXML conversion

Thursday, January 1, 2009

Rootkit Removal Guide

Rootkits are a special kind of malware that are specifically designed to hide the activities of other viruses and worms, and compromise the operating system so that it may not be repaired. If your machine is infected with a rootkit, you will very likely not be able to regain complete control of the system. Reinstallation is highly recommended.

However, there are exceptional cases when you absolutely need to attempt to repair the system. Although no tool can guarantee results for rootkit identification and removal, there is at least one program which has show limited success from time to time in this area. It's called UnHackMe.

Before You Continue:

If your computer is unable to access the internet, then you must perform the downloads on a functional computer (such as a friend's, a neighbor's, or a functional campus machine), save the respective downloaded files onto a CD-RW or a USB Flash Drive and transfer them to your computer.

Rootkit Removal with UnHackMe
  1. Installation

    Download UnHackMe and save it to the desktop.

    Open the compressed folder on your desktop named unhackme.zip and double click unhackme250.exe to begin the installation. When asked if you wish to continue, click Yes.

    Select all the default installation options by clicking Next for every step in the installation. When prompted, choose Yes to create a directory.

  2. Step 2: Check for infections

    Select the Check tab at the top of the window and then click on the Check Me Now! button. UnHackMe will begin scanning your operating system for rootkits.

  3. Step 3: Remove the infected files

    Click on the key that you want to remove

    After selecting the key, click on the Delete Key button. A window will appear asking you to verify the deletion.

    Click "Yes" to delete the infected key. Do this for all the infected keys in the list. When you're finished deleting all the keys in the list, you may close down UnHackMe.

Remember that in computer security there's no such thing as a silver bullet, and that you can't be certain which files were compromised by the viruses, worms and trojans on your machine. If you've been infected, you could still have "backdoors" riddled throughout your computer's operating system, and you should think very hard about reinstalling your operating system, and starting over from scratch. Safe computing is a habit, not a toolkit.