Wednesday, January 28, 2015

How To Patch and Protect Linux Server Against the Glibc GHOST Vulnerability # CVE-2015-0235

How To Patch and Protect Linux Server Against the Glibc GHOST Vulnerability # CVE-2015-0235


Avery serious security problem has been found in the GNU C Library (Glibc) called GHOST.  How can I fix GHOST vulnerability and protect my Linux server against the attack?  How do I verify that my server has been fixed against the Glibc GHOST vulnerability?

A very serious security problem has been found and patched in the GNU C Library called Glibc.  It was announced on 27th January 2015.

What is the GHOST security bug?

Tutorial details
DifficultyEasy (rss)
Root privilegesYes
RequirementsLinux+reboot required
Estimated completion time10m

From the RHEL bugzilla:
A heap-based buffer overflow was found in __nss_hostname_digits_dots(), which is used by the gethostbyname() and gethostbyname2() glibc function call. A remote attacker could use this flaw to execute arbitary code with the permissions of the user running the application.
A mailing list entry with more details, including in-depth analysis and exploit vectors is here.

What C library (Glibc) version does my Linux system use?

The easiest way to check the version number is to run the following command:
ldd --version
 
Sample outputs from RHEL/CentOS Linux v6.6:
ldd (GNU libc) 2.12
Copyright (C) 2010 Free Software Foundation, Inc.
This is free software; see the source for copying conditions.  There is NO
warranty; not even for MERCHANTABILITY or FITNESS FOR A PARTICULAR PURPOSE.
Written by Roland McGrath and Ulrich Drepper.
Sample outputs from Ubuntu Linux 12.04.5 LTS:
ldd (Ubuntu EGLIBC 2.15-0ubuntu10.9) 2.15
Copyright (C) 2012 Free Software Foundation, Inc.
This is free software; see the source for copying conditions.  There is NO
warranty; not even for MERCHANTABILITY or FITNESS FOR A PARTICULAR PURPOSE.
Written by Roland McGrath and Ulrich Drepper.
Sample outputs from Debian Linux v7.8:
ldd (Debian EGLIBC 2.13-38+deb7u6) 2.13
Copyright (C) 2011 Free Software Foundation, Inc.
This is free software; see the source for copying conditions.  There is NO
warranty; not even for MERCHANTABILITY or FITNESS FOR A PARTICULAR PURPOSE.
Written by Roland McGrath and Ulrich Drepper.

A list of affected Linux distros

  • RHEL (Red Hat Enterprise Linux) version 5.x, 6.x and 7.x
  • CentOS Linux version 5.x, 6.x & 7.x
  • Ubuntu Linux version 10.04, 12.04 LTS
  • Debian Linux version 7.x
  • Linux Mint version 13.0
  • Fedora Linux version 19 or older
  • SUSE Linux Enterprise 11 and older (also OpenSuse Linux 11 or older versions).
  • Arch Linux glibc version <= 2.18-1

GHOST vulnerability check

You can test or reproduce the bug using the following C code:
/* ghosttest.c:  GHOST vulnerability tester */
/* Credit: http://www.openwall.com/lists/oss-security/2015/01/27/9 */
#include <netdb.h>
#include <stdio.h>
#include <stdlib.h>
#include <string.h>
#include <errno.h>
 
#define CANARY "in_the_coal_mine"
 
struct {
  char buffer[1024];
  char canary[sizeof(CANARY)];
} temp = { "buffer", CANARY };
 
int main(void) {
  struct hostent resbuf;
  struct hostent *result;
  int herrno;
  int retval;
 
  /*** strlen (name) = size_needed - sizeof (*host_addr) - sizeof (*h_addr_ptrs) - 1; ***/
  size_t len = sizeof(temp.buffer) - 16*sizeof(unsigned char) - 2*sizeof(char *) - 1;
  char name[sizeof(temp.buffer)];
  memset(name, '0', len);
  name[len] = '\0';
 
  retval = gethostbyname_r(name, &resbuf, temp.buffer, sizeof(temp.buffer), &result, &herrno);
 
  if (strcmp(temp.canary, CANARY) != 0) {
    puts("vulnerable");
    exit(EXIT_SUCCESS);
  }
  if (retval == ERANGE) {
    puts("not vulnerable");
    exit(EXIT_SUCCESS);
  }
  puts("should not happen");
  exit(EXIT_FAILURE);
}
 
Compile and run it as follows:
$ gcc ghosttest.c -o ghosttest
$ ./ghosttest
Sample outputs from patched Debian v7.8 server:
not vulnerable
Sample outputs from unpatched Ubuntu 12.04 LTS server:
vulnerable

How do list packages/applications depends upon vulnerable Glibc?

Type the following lsof command:
lsof | grep libc | awk '{print $1}' | sort | uniq
Sample outputs from my Debian Linux v7.x nas:
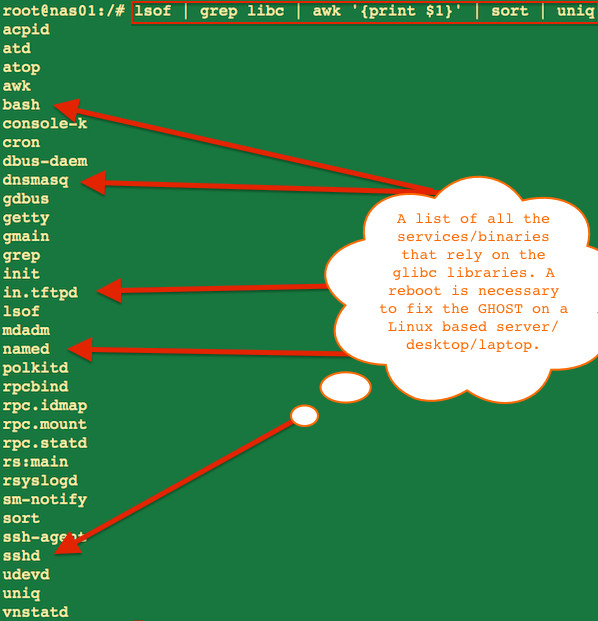
Fig.01: Linux find all the services/applications that rely on the GNU C libraries (Glibc) command

Fix the GHOST vulnerability on a CentOS/RHEL/Fedora/Scientific Linux

Type the following yum command as the root user:
sudo yum clean all
sudo yum update
Finally, reboot RHEL/SL/Fedora/CentOS Linux server by typing the following command:
### Sysadmin should plan on updating as soon as possible or use maintenance reboot window ##
sudo reboot
Sample outputs:
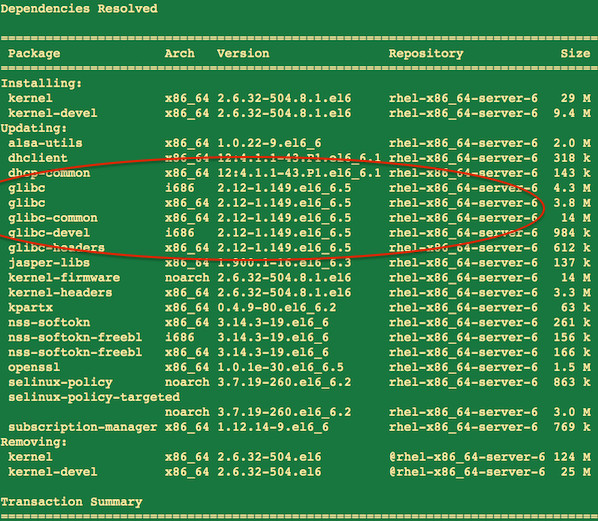
Fig.02 Fix the GHOST vulnerability on a CentOS/RHEL/Fedora/Scientific Linux

Fix the GHOST vulnerability on a Ubuntu Linux

Type the following apt-get command as the root user:
sudo apt-get clean
sudo apt-get update
sudo apt-get dist-upgrade
Finally, reboot Ubuntu Linux server by typing the following command:
sudo reboot
Sample outputs:
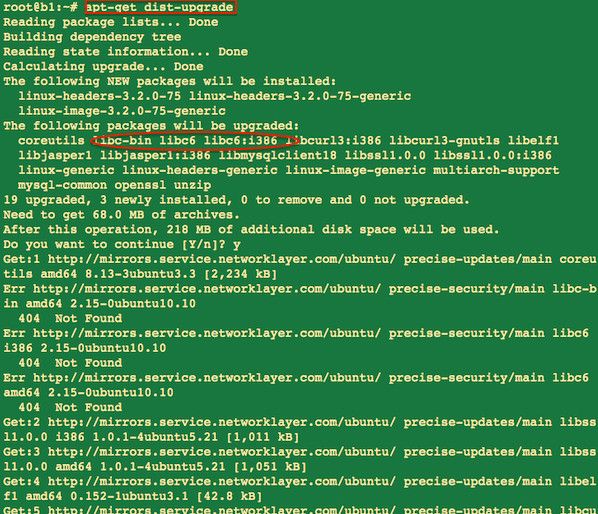
Fig.03: Fix the GHOST vulnerability on a Ubuntu Linux LTS

Fix the GHOST vulnerability on a Debian Linux

Type the following apt-get command as the root user:
sudo apt-get clean
sudo apt-get update
sudo apt-get dist-upgrade
Finally, reboot Debian Linux server by typing the following command:
sudo reboot
Sample session:
Gif 01: Fix the GHOST vulnerability on a Debian Linux server

How can I verify that my Linux system no longer vulnerable after the reboot?

Method #1: The easiest way to check vulnerability and/or confirm remediation is to run the following command to verify that you are running an updated version of Glibc:
$ ldd --version
Method #2: Run the instructions given in the previous section called GHOST vulnerability check (generic method for all Linux based systems).
Method #3: If you are RHN subscriber see the Red Hat Access Lab: GHOST tool (only for RHEL/CentOS/SL systems:
#!/bin/bash
# rhel-GHOST-test.sh -  GHOST vulnerability tester. Only for CentOS/RHEL based servers.  #
# Credit : Red Hat, Inc - https://access.redhat.com/labs/ghost/ #
vercomp () {
    if [[ $1 == $2 ]]
    then
        return 0
    fi
    local IFS=.
    local i ver1=($1) ver2=($2)
    # fill empty fields in ver1 with zeros
    for ((i=${#ver1[@]}; i<${#ver2[@]}; i++))
    do
        ver1[i]=0
    done
    for ((i=0; i<${#ver1[@]}; i++))
    do
        if [[ -z ${ver2[i]} ]]
        then
            # fill empty fields in ver2 with zeros
            ver2[i]=0
        fi
        if ((10#${ver1[i]} > 10#${ver2[i]}))
        then
            return 1
        fi
        if ((10#${ver1[i]} < 10#${ver2[i]}))
        then
            return 2
        fi
    done
    return 0
}
 
glibc_vulnerable_version=2.17
glibc_vulnerable_revision=54
glibc_vulnerable_version2=2.5
glibc_vulnerable_revision2=122
glibc_vulnerable_version3=2.12
glibc_vulnerable_revision3=148
echo "Vulnerable glibc version <=" $glibc_vulnerable_version"-"$glibc_vulnerable_revision
echo "Vulnerable glibc version <=" $glibc_vulnerable_version2"-"$glibc_vulnerable_revision2
echo "Vulnerable glibc version <=" $glibc_vulnerable_version3"-1."$glibc_vulnerable_revision3
 
glibc_version=$(rpm -q glibc | awk -F"[-.]" '{print $2"."$3}' | sort -u)
if [[ $glibc_version == $glibc_vulnerable_version3 ]]
then
    glibc_revision=$(rpm -q glibc | awk -F"[-.]" '{print $5}' | sort -u)
else
    glibc_revision=$(rpm -q glibc | awk -F"[-.]" '{print $4}' | sort -u)
fi
echo "Detected glibc version" $glibc_version" revision "$glibc_revision
 
vulnerable_text=$"This system is vulnerable to CVE-2015-0235. <https://access.redhat.com/security/cve/CVE-2015-0235>
Please refer to <https://access.redhat.com/articles/1332213> for remediation steps"
 
if [[ $glibc_version == $glibc_vulnerable_version ]]
then
    vercomp $glibc_vulnerable_revision $glibc_revision
elif [[ $glibc_version == $glibc_vulnerable_version2 ]]
then
    vercomp $glibc_vulnerable_revision2 $glibc_revision
elif [[ $glibc_version == $glibc_vulnerable_version3 ]]
then
    vercomp $glibc_vulnerable_revision3 $glibc_revision
else
    vercomp $glibc_vulnerable_version $glibc_version
fi
 
case $? in
    0) echo "$vulnerable_text";;
    1) echo "$vulnerable_text";;
    2) echo "Not Vulnerable.";;
esac
 
Sample outputs from patched RHEL v6.8 server:
bash rhel-GHOST-test.sh
Vulnerable glibc version <= 2.17-54
Vulnerable glibc version <= 2.5-122
Vulnerable glibc version <= 2.12-1.148
Detected glibc version 2.12 revision 149
Not Vulnerable.

Monday, January 26, 2015

Setup Postfix with a remote SMTP relay host

Setup Postfix with a remote SMTP relay host


Postfix config
Postfix config
Platforms: 
any Linux distro
What You'll Need:
Postfix 2.2+
cyrus-sasl 2.1.19+
3rd party email account
Sending outgoing email thru a 3rd party SMTP relay service is a quick and easy alternative to setting up a full fledged local email server. Google Apps/Gmail, Yahoo, and many ISPs provide SMTP relaying for free. This guide will cover configuring Postfix on a CentOS server to relay outgoing email to a 3rd party.
Most Linux distros come with Sendmail already installed, and is usually the default mail client used by the running services. However, Postfix beats the crap out of Sendmail and is a complete, seamless replacement. Here's how I got it going on my CentOS box.

Install

Install Postfix and cyrus-sasl with your application manager of choice. If you're compiling from source, be sure to make Postfix with the -DUSE_SASL_AUTH flag for SASL support and -DUSE_TLS for TLS support.
Note: CentOS 6+ now packages cyrus-sasl-plain separately, so if it's not specifically installed, you'll get a "Authentication failed: cannot SASL authenticate to server ...: no mechanism available" error.
$ yum install postfix cyrus-sasl cyrus-sasl-plain
Stop the sendmail service
$ /etc/init.d/sendmail stop
Remove sendmail from the startup runlevels
$ chkconfig --del sendmail


Typical Setup

Edit /etc/postfix/main.cf
# Set this to your server's fully qualified domain name.
# If you don't have a internet domain name,
# use the default or your email addy's domain - it'll keep
# postfix from generating warnings all the time in the logs
mydomain = local.domain
myhostname = host.local.domain
# Set this to your email provider's smtp server.
# A lot of ISP's (ie. Cox) block the default port 25
# for home users to prevent spamming.  So we'll use port 80
relayhost = yourisp.smtp.servername:80
smtpd_sasl_auth_enable = yes
smtpd_sasl_path = smtpd
smtp_sasl_password_maps = hash:/etc/postfix/sasl_passwd
smtp_sasl_type = cyrus
smtp_sasl_auth_enable = yes
# optional: necessary if email provider uses load balancing and
# forwards emails to another smtp server
# for delivery (ie: smtp.yahoo.com --> smtp.phx.1.yahoo.com)
smtp_cname_overrides_servername = no
# optional: necessary if email provider
# requires passwords sent in clear text
smtp_sasl_security_options = noanonymous
There's roughly a 99.9% chance that your email provider's SMTP server requires authentication. We need to set that up with the username and password given by your email provider.
Add the following line to /etc/postfix/sasl_passwd
yourisp.smtp.servername:80 username:password
The above server hostname and port must exactly match the value for "relayhost" in /etc/postfix/main.cf.
Generate a postfix lookup table from the previous file
$ postmap hash:/etc/postfix/sasl_passwd
Test the lookup table, if all is good then the following will return the specified username:password
$ postmap -q yourisp.smtp.servername:80 /etc/postfix/sasl_passwd
Make sure the sasl_passwd and sasl_passwd.db files are readable/writable only by root
$ chmod 600 /etc/postfix/sasl_passwd /etc/postfix/sasl_passwd.db
Add postfix to be started at boot
$ chkconfig --add postfix
Fire up Postfix
$ /etc/init.d/postfix start
Test it out using sendmail alias from the command prompt
$ $ sendmail -t
To: to.address@example.com
From: from.address@example.com
Subject: Test 123
Postfix is good to go.
.


Gmail Setup

If you're attempting to relay mail using Gmail, then it will be necessary to use TLS with Postfix. You'll have to point Postfix at your server's trusted CA root certificate bundle, but luckily "...client-side certificates are not required when relaying mail to GMail".
First, double-check that Postfix was configured with SSL support (ie. ldd should return at least one line starting with libssl):

$ whereis -b postfix
postfix: /usr/sbin/postfix /etc/postfix /usr/libexec/postfix
$ ldd /usr/sbin/postfix
...
libssl.so.6 => /lib/libssl.so.6 (0x00111000)
...
Now we need to find your server's CA root certificate bundle, which is typically distributed with openssl. The bundle file is used by Postfix to verify Gmail's SSL certificate (signed by Thawte). On my CentOS server, this file was located at /etc/pki/tls/certs/ca-bundle.crt, but may be in a different location on your OS (ie. /etc/ssl/certs).

$ locate ca-bundle.crt
/etc/pki/tls/certs/ca-bundle.crt
Edit /etc/postfix/main.cf with the following values:

relayhost = smtp.gmail.com:587
# your FQDN, or default value below
mydomain = local.domain
# your local machine name, or default value below
myhostname = host.local.domain
myorigin = $myhostname
# SASL
smtpd_sasl_path = smtpd
smtp_sasl_password_maps = hash:/etc/postfix/sasl_passwd
smtp_sasl_type = cyrus
smtp_sasl_auth_enable = yes
smtp_sasl_security_options = noanonymous
# TLS
smtp_use_tls  = yes
smtp_tls_CAfile = /path/to/your/ca-bundle.crt
smtp_sasl_tls_security_options = noanonymous
If you haven't already, add the following to /etc/postfix/sasl_passwd

smtp.gmail.com:587 username:password
Generate a postfix lookup table from the previous file
$ postmap hash:/etc/postfix/sasl_passwd
Make sure the sasl_passwd and sasl_passwd.db files are readable/writable only by root
$ chmod 600 /etc/postfix/sasl_passwd /etc/postfix/sasl_passwd.db
Restart postfix and send a test email

$ postfix reload
$ sendmail -t
To: to.address@example.com
From: from.address@example.com
Subject: Testing 123
Test relay thru Gmail
.
If this is a new Google email account, make sure to login to the gmail web interface with it first. You'll need to accept the Google TOS before you can send any email thru the account.
Note that Google places daily limits on the amount of emails and recipients.

Sending from multiple email accounts

Postfix 2.3+ can also be setup to authenticate, relay, and send from multiple email accounts (see Configuring Sender-Dependent SASL authentication). Postfix will lookup and relay to the appropriate host based on the sender address specified by the client. This can be configured using a per-sender relayhost file that maps each sender addresses to a relay provider. Clients must specify a sender address when composing an email so that Postfix can lookup the appropriate sender's relay host info.
Let's assume we'll be sending from two email accounts: foo@foo.com (which uses smtp.gmail.com:587) and bar@bar.com (which uses smtp.bar.com:666). We'll first add them to the /etc/postfix/sasl_passwd, along with a default relay host and user (smtp.gmail.com:587/foo@bar.com) which will be used as the sender in case a client omits the sender address or a matching sender address is not found:
foo@foo.com foo@foo.com:password
bar@bar.com bar@bar.com:password
smtp.gmail.com:587 foo@foo.com:password

Generate a postfix lookup table from the previous file
$ postmap hash:/etc/postfix/sasl_passwd
Next, add the senders and their providers to a new /etc/postfix/sender_relay file
foo@foo.com smtp.gmail.com:587
bar@bar.com smtp.bar.com:666

Generate a postfix lookup table from the previous file
$ postmap hash:/etc/postfix/sender_relay

Make sure the all above files are readable/writable only by root
$ chmod 600 /etc/postfix/sasl_passwd /etc/postfix/sasl_passwd.db /etc/postfix/sender_relay /etc/postfix/sender_relay.db

Next, add the following directives to /etc/postfix/main.cf for multiple relay host support (this assumes you've already added the smtp_sasl_* directives mentioned earlier in this article)

# multiple sender relayhost maps
sender_dependent_relayhost_maps = hash:/etc/postfix/sender_relay
smtp_sender_dependent_authentication = yes

Finally, reload Postfix and send some test messages
$ /etc/init.d/postfix reload
$ sendmail -tf "foo@foo.com"
To: to.address@example.com
From: foo@foo.com
Test email should be from foo@foo.com
.
$ sendmail -tf "bar@bar.com"
To: to.address@example.com
From: bar@bar.com
This test email should be from bar@bar.com
.

Note: the sendmail -f argument is required for Postfix to select the appropriate sender and relay host. Also, if the "From:" message header is omitted, Postfix will automatically set the NAME environment variable as the sender's display name (the correct sender relay host is still used). Use the -F argument to set a custom display name, or specify the "From:" message header (though this latter option seems to be buggy and is ignored).

A quick note about sending email from WordPress

At the current version of 3.6.1, WordPress does not set the sender on outgoing emails. So on a server configured to relay thru multiple outgoing email accounts, all outgoing WordPress emails will be sent via the default relay host (specified in /etc/postfix/sasl_passwd).
A quick fix is to set the Sender attribute of WordPress's phpmailer object. This can be done by adding the following code to your theme's functions.php file, which will set the sender as the address specified in theWordPress admin > General Settings > Email Address.
function phpmailer_set_sender_address($phpmailer){
    $phpmailer->Sender = get_option('admin_email');
}
add_action('phpmailer_init''phpmailer_set_sender_address', 10, 1);
Alternatively, the sender address could be hardcoded above instead of using the WordPress admin email.

Other notes

Anytime you change the /etc/postfix/sasl_passwd or /etc/postfix/sender_relay files, remember to rehash them and reload Postfix
$ postmap hash:/etc/postfix/sasl_passwd
$ postmap hash:/etc/postfix/sender_relay
$ /etc/init.d/postfix reload


Troubleshooting

Monitor postfix mail log in a separate session with the following command
$ tail -f /var/log/maillog
If the log is displaying the following error
(Authentication failed: cannot SASL authenticate to server ...: no mechanism available)
then set this variable in /etc/postfix/main.cf
smtp_sasl_security_options = noanonymous
If the log is displaying this error
553 Sorry, that domain isn't in my list of allowed rcpthosts. (in reply to RCPT TO command)
check your username and password in /etc/postfix/sasl_passwd. Your user name is usually your full email address. If you have to fix it, don't forget to use postmap to generate a new lookup table.