Wednesday, December 31, 2014

Move or migrate user accounts from old Linux server to a new Linux server


Move or migrate user accounts from old Linux server to a new Linux server


You can migrate users from old Linux server to new Linux sever with standard commands such as tar, awk, scp and others. This is also useful if you are using old Linux distribution such as Redhat 9 or Debian 2.x.
Following files/dirs are required for traditional Linux user management:
/etc/passwd - contains various pieces of information for each user account
/etc/shadow - contains the encrypted password information for user's accounts and optional the password aging information.

/etc/group - defines the groups to which users belong
/etc/gshadow - group shadow file (contains the encrypted password for group)
/var/spool/mail - Generally user emails are stored here.
/home - All Users data is stored here.
You need to backup all of the above files and directories from old server to new Linux server.

Commands to type on old Linux system

First create a tar ball of old uses (old Linux system). Create a directory:
# mkdir /root/move/
Setup UID filter limit:
# export UGIDLIMIT=500
Now copy /etc/passwd accounts to /root/move/passwd.mig using awk to filter out system account (i.e. only copy user accounts)
# awk -v LIMIT=$UGIDLIMIT -F: '($3>=LIMIT) && ($3!=65534)' /etc/passwd > /root/move/passwd.mig
Copy /etc/group file:
# awk -v LIMIT=$UGIDLIMIT -F: '($3>=LIMIT) && ($3!=65534)' /etc/group > /root/move/group.mig
Copy /etc/shadow file:
# awk -v LIMIT=$UGIDLIMIT -F: '($3>=LIMIT) && ($3!=65534) {print $1}' /etc/passwd | tee - |egrep -f - /etc/shadow > /root/move/shadow.mig
Copy /etc/gshadow (rarely used):
# cp /etc/gshadow /root/move/gshadow.mig
Make a backup of /home and /var/spool/mail dirs:
# tar -zcvpf /root/move/home.tar.gz /home
# tar -zcvpf /root/move/mail.tar.gz /var/spool/mail
Where,
  • Users that are added to the Linux system always start with UID and GID values of as specified by Linux distribution or set by admin. Limits according to different Linux distro:
    • RHEL/CentOS/Fedora Core : Default is 500 and upper limit is 65534 (/etc/libuser.conf).
    • Debian and Ubuntu Linux : Default is 1000 and upper limit is 29999 (/etc/adduser.conf).
  • You should never ever create any new system user accounts on the newly installed Cent OS Linux. So above awk command filter out UID according to Linux distro.
  • export UGIDLIMIT=500 - setup UID start limit for normal user account. Set this value as per your Linux distro.
  • awk -v LIMIT=$UGIDLIMIT -F: '($3>=LIMIT) && ($3!=65534)' /etc/passwd > /root/move/passwd.mig - You need to pass UGIDLIMIT variable to awk using -v option (it assigns value of shell variable UGIDLIMIT to awk program variable LIMIT). Option -F: sets the field separator to : . Finally awk read each line from /etc/passwd, filter out system accounts and generates new file /root/move/passwd.mig. Same logic is applies to rest of awk command.
  • tar -zcvpf /root/move/home.tar.gz /home - Make a backup of users /home dir
  • tar -zcvpf /root/move/mail.tar.gz /var/spool/mail - Make a backup of users mail dir
Use scp or usb pen or tape to copy /root/move to a new Linux system.
# scp -r /root/move/* user@new.linuxserver.com:/path/to/location

Commands to type on new Linux system

First, make a backup of current users and passwords:
# mkdir /root/newsusers.bak
# cp /etc/passwd /etc/shadow /etc/group /etc/gshadow /root/newsusers.bak

Now restore passwd and other files in /etc/
# cd /path/to/location
# cat passwd.mig >> /etc/passwd
# cat group.mig >> /etc/group
# cat shadow.mig >> /etc/shadow
# /bin/cp gshadow.mig /etc/gshadow
Please note that you must use >> (append) and not > (create) shell redirection.
Now copy and extract home.tar.gz to new server /home
# cd /
# tar -zxvf /path/to/location/home.tar.gz
Now copy and extract mail.tar.gz (Mails) to new server /var/spool/mail
# cd /
# tar -zxvf /path/to/location/mail.tar.gz
Now reboot system; when the Linux comes back, your user accounts will work as they did before on old system:
# reboot
Please note that if you are new to Linux perform above commands in a sandbox environment. Above technique can be used to UNIX to UNIX OR UNIX to Linux account migration. You need to make couple of changes but overall the concept remains the same.

How do I remove the warning message: A program is trying to access data from Outlook, allow this?

How do I remove the warning message: A program is trying to access data from Outlook, allow this?


The Outlook E-mail Security Update changes the way that Outlook can be controlled programmatically, restricted programmatic to Outlook means Outlook will prompt you for permission when any code tries to perform its work.

With restricted programmatic access, you receive warning messages when any program tries to do anything in the following list:

  • Send mail on your behalf
  • Access your address book
  • Access e-mail names from your messages
  • Access e-mail information from your contacts or other types of items
  • Save your messages to the file system
  • Search your messages for content
  • Use the MAPI interface to create and/or send messages


How to disable the security warning in Outlook

You may change the programmatic access options within Outlook 2007/2010/2013 by using the following:

1) Close Outlook, and right-click on the Outlook shortcut to Run Outlook as administrator

2) In Outlook 2010/2013, go to File > Options > Trust Center > Programmatic Access 

     In Outlook 2007, go to Tools > Trust Center > Programmatic Access

3) Set the programmatic access to Never warn me
Please note, a better alternative is to update your anti-virus software


Another option is to edit the Windows Registry on the local machine (you may have to create the registry key if it does not exist)

Outlook 2010

HKEY_LOCAL_MACHINE\SOFTWARE\Microsoft\Office\14.0\Outlook\Security
DWORD: ObjectModelGuard
Value: 2

You can also set the keys below (create them if they do not exist)

HKEY_CURRENT_USER\Software\Policies\Microsoft\Office\14.0\outlook\security
DWORD: PromptOOMSend
Value: 2

DWORD: AdminSecurityMode
Value: 3

Outlook 2007

HKEY_LOCAL_MACHINE\SOFTWARE\Microsoft\Office\12.0\Outlook\Security
DWORD: ObjectModelGuard
Value: 2

HKEY_CURRENT_USER\Software\Policies\Microsoft\Office\12.0\outlook\security
DWORD: PromptOOMSend
Value: 2

DWORD: AdminSecurityMode
Value: 3


Monday, December 29, 2014

How to create the Wyse terminal definition in CentOS/Redhat and most other linux flavors.

The mechanism for modifying an existing terminfo definition is quite simple.
  1. Create a source definition for the terminal.
  2. Compile the source definition for the terminal into a binary entry in the terminfo database.
  3. Copy the new terminal definitions to the /lib/terminfo/w directory for a complete solution.
These 3 simple steps are shown below for the wyse definition (Note the 'vi' editor commands are shown to help out).

1. First you will need a valid Wyse terminal definition to create the .ti file that you will use to compile and create a new Wyse terminfo entries.

Using the vi editor, edit the /tmp/wyse.ti file by typing "vi /tmp/wyse.ti"

Copy and paste this into the file.  (Make sure you are in insert mode by typing "i" in the editor)

Here is the termcap file:

------------------ Cut Here --------------------------
60|wy60|wyse60|wy99gt|wyse99gt|Wyse 60 and Wyse 99GT:\
 :am:bw:hs:km:mi:ms:bs:pt:\
 :co#80:li#24:kn#8:\
 :ae=\EH^C:al=4\EE:as=\EH^B:bt=\EI:cd=100\Ey:ce=\Et:\
 :cl=100\E*:cm=\E=%+ %+ :ct=\E0:dc=10\EW:dl=5\ER:\
 :ds=\EF\r:ei=\Er:fs=\r:ho=^^:i1=\EcB0\EcC1:im=\Eq:\
 :ip=3:\
 :is=\Ed$\EcD\E'\Er\EH^C\Ed/\EO\Ee1\Ed*\E`@\E`9\E`1^N^T:\
 :k1=^A@\r:k2=^AA\r:k3=^AB\r:k4=^AC\r:k5=^AD\r:\
 :k6=^AE\r:k7=^AF\r:k8=^AG\r:k9=^AH\r:kb=\b:kd=\n:\
 :kh=^^:kl=\b:kr=\f:ku=^K:nd=\f:r1=150\E~!\E~4:\
 :r2=150\EeF:r3=150\EwG\Ee(:se=\EG0:so=\EGt:sr=7\Ej:\
 :st=\E1:ts=\EF:uc=\EG8%.\EG0:ue=\EG0:up=^K:us=\EG8:\
 :ve=\E`1:vi=\E`0:ko=le,do,nd,up,dc,dl,ho,al:
wy60-25-w|wyse60-25-w|wyse 60 132-column 25-lines:\
 :am:bw:hs:km:mi:ms:bs:pt:\
 :co#132:li#25:kn#8:\
 :ae=\EH^C:al=4\EE:as=\EH^B:bt=\EI:cd=100\Ey:ce=\Et:\
 :cl=100\E*:cm=\Ea%i%dR%dC:ct=\E0:dc=16\EW:dl=5\ER:\
 :ds=\EF\r:ei=\Er:fs=\r:ho=^^:i1=\EcB0\EcC1:im=\Eq:\
 :ip=5:\
 :is=\Ed$\EcD\E'\Er\EH^C\Ed/\EO\Ee1\Ed*\E`@\E`9\E`1^N^T:\
 :k1=^A@\r:k2=^AA\r:k3=^AB\r:k4=^AC\r:k5=^AD\r:\
 :k6=^AE\r:k7=^AF\r:k8=^AG\r:k9=^AH\r:kb=\b:kd=\n:\
 :kh=^^:kl=\b:kr=\f:ku=^K:nd=\f:r1=150\E~!\E~4:\
 :r2=300\EeF\E`;:r3=150\EwG\Ee):se=\EG0:so=\EGt:\
 :sr=7\Ej:st=\E1:ts=\EF:uc=\EG8%.\EG0:ue=\EG0:up=^K:\
 :us=\EG8:ve=\E`1:vi=\E`0:ko=le,do,nd,up,dc,dl,ho,al:
wy60-42-w|wyse60-42-w|wyse 60 132-column 42-lines:\
 :am:bw:hs:km:mi:ms:bs:pt:\
 :co#132:li#42:kn#8:\
 :ae=\EH^C:al=11\EE:as=\EH^B:bt=\EI:cd=260\Ey:ce=\Et:\
 :cl=260\E*:cm=2\Ea%i%dR%dC:ct=\E0:dc=19\EW:dl=11\ER:\
 :ds=\EF\r:ei=\Er:fs=\r:ho=2^^:i1=\EcB2\EcC3:im=\Eq:\
 :ip=6:\
 :is=\Ed$\EcD\E'\Er\EH^C\Ed/\EO\Ee1\Ed*\E`@\E`9\E`1^N^T:\
 :k1=^A@\r:k2=^AA\r:k3=^AB\r:k4=^AC\r:k5=^AD\r:\
 :k6=^AE\r:k7=^AF\r:k8=^AG\r:k9=^AH\r:kb=\b:kd=\n:\
 :kh=^^:kl=\b:kr=\f:ku=^K:nd=\f:r1=150\E~!\E~4:\
 :r2=300\EeF\E`;:r3=150\Ee*:se=\EG0:so=\EGt:sr=10\Ej:\
 :st=\E1:ts=\EF:uc=\EG8%.\EG0:ue=\EG0:up=^K:us=\EG8:\
 :ve=\E`1:vi=\E`0:ko=le,do,nd,up,dc,dl,ho,al:
wy60-43-w|wyse60-43-w|wyse 60 132-column 43-lines:\
 :am:bw:hs:km:mi:ms:bs:pt:\
 :co#132:li#43:kn#8:\
 :ae=\EH^C:al=11\EE:as=\EH^B:bt=\EI:cd=260\Ey:ce=\Et:\
 :cl=260\E*:cm=2\Ea%i%dR%dC:ct=\E0:dc=19\EW:dl=11\ER:\
 :ds=\EF\r:ei=\Er:fs=\r:ho=2^^:i1=\EcB2\EcC3:im=\Eq:\
 :ip=6:\
 :is=\Ed$\EcD\E'\Er\EH^C\Ed/\EO\Ee1\Ed*\E`@\E`9\E`1^N^T:\
 :k1=^A@\r:k2=^AA\r:k3=^AB\r:k4=^AC\r:k5=^AD\r:\
 :k6=^AE\r:k7=^AF\r:k8=^AG\r:k9=^AH\r:kb=\b:kd=\n:\
 :kh=^^:kl=\b:kr=\f:ku=^K:nd=\f:r1=150\E~!\E~4:\
 :r2=300\EeF\E`;:r3=150\Ee+:se=\EG0:so=\EGt:sr=10\Ej:\
 :st=\E1:ts=\EF:uc=\EG8%.\EG0:ue=\EG0:up=^K:us=\EG8:\
 :ve=\E`1:vi=\E`0:ko=le,do,nd,up,dc,dl,ho,al:
wy60-w|wyse60-w|wy99gt-w|wyse99gt-w|wyse 60/99gt 132-column:\
 :am:bw:hs:km:mi:ms:bs:pt:\
 :co#132:li#24:kn#8:\
 :ae=\EH^C:al=4\EE:as=\EH^B:bt=\EI:cd=100\Ey:ce=\Et:\
 :cl=100\E*:cm=\Ea%i%dR%dC:ct=\E0:dc=16\EW:dl=5\ER:\
 :ds=\EF\r:ei=\Er:fs=\r:ho=^^:i1=\EcB0\EcC1:im=\Eq:\
 :ip=5:\
 :is=\Ed$\EcD\E'\Er\EH^C\Ed/\EO\Ee1\Ed*\E`@\E`9\E`1^N^T:\
 :k1=^A@\r:k2=^AA\r:k3=^AB\r:k4=^AC\r:k5=^AD\r:\
 :k6=^AE\r:k7=^AF\r:k8=^AG\r:k9=^AH\r:kb=\b:kd=\n:\
 :kh=^^:kl=\b:kr=\f:ku=^K:nd=\f:r1=150\E~!\E~4:\
 :r2=300\EeF\E`;:r3=150\EwG\Ee(:se=\EG0:so=\EGt:\
 :sr=7\Ej:st=\E1:ts=\EF:uc=\EG8%.\EG0:ue=\EG0:up=^K:\
 :us=\EG8:ve=\E`1:vi=\E`0:ko=le,do,nd,up,dc,dl,ho,al:
wy60-25|wyse60-25|wyse 60 80-column 25-lines:\
 :am:bw:hs:km:mi:ms:bs:pt:\
 :co#80:li#25:kn#8:\
 :ae=\EH^C:al=4\EE:as=\EH^B:bt=\EI:cd=100\Ey:ce=\Et:\
 :cl=100\E*:cm=\E=%+ %+ :ct=\E0:dc=10\EW:dl=5\ER:\
 :ds=\EF\r:ei=\Er:fs=\r:ho=^^:i1=\EcB0\EcC1:im=\Eq:\
 :ip=3:\
 :is=\Ed$\EcD\E'\Er\EH^C\Ed/\EO\Ee1\Ed*\E`@\E`9\E`1^N^T:\
 :k1=^A@\r:k2=^AA\r:k3=^AB\r:k4=^AC\r:k5=^AD\r:\
 :k6=^AE\r:k7=^AF\r:k8=^AG\r:k9=^AH\r:kb=\b:kd=\n:\
 :kh=^^:kl=\b:kr=\f:ku=^K:nd=\f:r1=150\E~!\E~4:\
 :r2=150\EeF:r3=150\EwG\Ee):se=\EG0:so=\EGt:sr=7\Ej:\
 :st=\E1:ts=\EF:uc=\EG8%.\EG0:ue=\EG0:up=^K:us=\EG8:\
 :ve=\E`1:vi=\E`0:ko=le,do,nd,up,dc,dl,ho,al:
wy60-42|wyse60-42|wyse 60 80-column 42-lines:\
 :am:bw:hs:km:mi:ms:bs:pt:\
 :co#80:li#42:kn#8:\
 :ae=\EH^C:al=11\EE:as=\EH^B:bt=\EI:cd=260\Ey:ce=\Et:\
 :cl=260\E*:cm=2\E=%+ %+ :ct=\E0:dc=16\EW:dl=11\ER:\
 :ds=\EF\r:ei=\Er:fs=\r:ho=^^:i1=\EcB2\EcC3:im=\Eq:\
 :ip=5:\
 :is=\Ed$\EcD\E'\Er\EH^C\Ed/\EO\Ee1\Ed*\E`@\E`9\E`1^N^T:\
 :k1=^A@\r:k2=^AA\r:k3=^AB\r:k4=^AC\r:k5=^AD\r:\
 :k6=^AE\r:k7=^AF\r:k8=^AG\r:k9=^AH\r:kb=\b:kd=\n:\
 :kh=^^:kl=\b:kr=\f:ku=^K:nd=\f:r1=150\E~!\E~4:\
 :r2=150\EeF:r3=150\Ee*:se=\EG0:so=\EGt:sr=10\Ej:\
 :st=\E1:ts=\EF:uc=\EG8%.\EG0:ue=\EG0:up=^K:us=\EG8:\
 :ve=\E`1:vi=\E`0:ko=le,do,nd,up,dc,dl,ho,al:
wy60-43|wyse60-43|wyse 60 80-column 43-lines:\
 :am:bw:hs:km:mi:ms:bs:pt:\
 :co#80:li#43:kn#8:\
 :ae=\EH^C:al=11\EE:as=\EH^B:bt=\EI:cd=260\Ey:ce=\Et:\
 :cl=260\E*:cm=2\E=%+ %+ :ct=\E0:dc=16\EW:dl=11\ER:\
 :ds=\EF\r:ei=\Er:fs=\r:ho=^^:i1=\EcB2\EcC3:im=\Eq:\
 :ip=5:\
 :is=\Ed$\EcD\E'\Er\EH^C\Ed/\EO\Ee1\Ed*\E`@\E`9\E`1^N^T:\
 :k1=^A@\r:k2=^AA\r:k3=^AB\r:k4=^AC\r:k5=^AD\r:\
 :k6=^AE\r:k7=^AF\r:k8=^AG\r:k9=^AH\r:kb=\b:kd=\n:\
 :kh=^^:kl=\b:kr=\f:ku=^K:nd=\f:r1=150\E~!\E~4:\
 :r2=150\EeF:r3=150\Ee+:se=\EG0:so=\EGt:sr=10\Ej:\
 :st=\E1:ts=\EF:uc=\EG8%.\EG0:ue=\EG0:up=^K:us=\EG8:\
 :ve=\E`1:vi=\E`0:ko=le,do,nd,up,dc,dl,ho,al:
wy60-vb|wyse60-vb|wy99gt-vb|wyse99gt-vb|Wyse 60 and 99GT Visable bell:\
 :am:bw:hs:km:mi:ms:bs:pt:\
 :co#80:li#24:kn#8:\
 :ae=\EH^C:al=4\EE:as=\EH^B:bt=\EI:cd=100\Ey:ce=\Et:\
 :cl=100\E*:cm=\E=%+ %+ :ct=\E0:dc=10\EW:dl=5\ER:\
 :ds=\EF\r:ei=\Er:fs=\r:ho=^^:i1=\EcB0\EcC1:im=\Eq:\
 :ip=3:\
 :is=\Ed$\EcD\E'\Er\EH^C\Ed/\EO\Ee1\Ed*\E`@\E`9\E`1^N^T:\
 :k1=^A@\r:k2=^AA\r:k3=^AB\r:k4=^AC\r:k5=^AD\r:\
 :k6=^AE\r:k7=^AF\r:k8=^AG\r:k9=^AH\r:kb=\b:kd=\n:\
 :kh=^^:kl=\b:kr=\f:ku=^K:nd=\f:r1=150\E~!\E~4:\
 :r2=150\EeF:r3=150\EwG\Ee(:se=\EG0:so=\EGt:sr=7\Ej:\
 :st=\E1:ts=\EF:uc=\EG8%.\EG0:ue=\EG0:up=^K:us=\EG8:\
 :vb=100\E`8\E`9:ve=\E`1:vi=\E`0:\
 :ko=le,do,nd,up,dc,dl,ho,al:
wy60-w-vb|wy60-wvb|wyse60-wvb|wy99gt-wvb|wyse99gt-wvb|Wyse 60 and 99GT 132-column Visable bell:\
 :am:bw:hs:km:mi:ms:bs:pt:\
 :co#132:li#24:kn#8:\
 :ae=\EH^C:al=4\EE:as=\EH^B:bt=\EI:cd=100\Ey:ce=\Et:\
 :cl=100\E*:cm=\Ea%i%dR%dC:ct=\E0:dc=16\EW:dl=5\ER:\
 :ds=\EF\r:ei=\Er:fs=\r:ho=^^:i1=\EcB0\EcC1:im=\Eq:\
 :ip=5:\
 :is=\Ed$\EcD\E'\Er\EH^C\Ed/\EO\Ee1\Ed*\E`@\E`9\E`1^N^T:\
 :k1=^A@\r:k2=^AA\r:k3=^AB\r:k4=^AC\r:k5=^AD\r:\
 :k6=^AE\r:k7=^AF\r:k8=^AG\r:k9=^AH\r:kb=\b:kd=\n:\
 :kh=^^:kl=\b:kr=\f:ku=^K:nd=\f:r1=150\E~!\E~4:\
 :r2=300\EeF\E`;:r3=150\EwG\Ee(:se=\EG0:so=\EGt:\
 :sr=7\Ej:st=\E1:ts=\EF:uc=\EG8%.\EG0:ue=\EG0:up=^K:\
 :us=\EG8:vb=100\E`8\E`9:ve=\E`1:vi=\E`0:\
 :ko=le,do,nd,up,dc,dl,ho,al:
------------------ Cut Here --------------------------

Next, get out of insert mode in the editor by pressing escape.

Then type :wq and enter to write and quite the editor.

This will create the /tmp/wyse.ti file needed for the next step.

In this compilation of the terminal definition step, type the following at the shell prompt:
# tic /tmp/wyse.ti
This will create the necessary terminfo database entries for the new wyse terminal definition.

Next, for completion, copy the newly created terminal definitions.  Type the following:

cp /usr/share/terminfo/w/* /lib/terminfo/w    and press <enter>

After the items are copied, you can test and examine the definitiions by using "infocmp" utility.

The infocmp command is used to de-compile the binary database entry for the wyse terminal and the output is re-directed to file wyse.ti. This file can then be modified with any editor, in this example vi was shown. Finally , as root user, the tic command is used to compile the source file definition into a compiled binary entry in the terminfo database.

The layout of the source file 'wyse.ti' is explained fully by using the Unix command 'man terminfo'. 

Friday, December 12, 2014

HowTo Red Hat Enterprise Linux 5 Configure The Network Card

HowTo Red Hat Enterprise Linux 5 Configure The Network Card


Red hat Enterprise Linux version 5.x and 4.x provides the following tools to make changes to network configuration such as add new card, assign/change IP address/subnet/gateway, and change DNS server and more.

[a] GUI tool - system-config-network
[b] Command line text based GUI tool (No X Windows/Gnome/KDE required) - system-config-network
[c] Edit configuration files stored in/etc/sysconfig/network-scripts/ directory. This method works with remote server over the ssh based session.
The following instructions are tested and compatible with:
  1. Cent OS Linux v3/4/5.x.
  2. Fedora Core Linux (older version).
  3. Red Hat Enterprise Linux (RHEL) v3/4/5.x based server.
Method # 1: GUI tool system-config-network
Open the X terminal or login using ssh over X based session command (ssh -X user@server-name-here). Type the following command at shell prompt:
Warning: It is important that you configure network interface cards correctly over ssh -X based session; otherwise, you will be locked out due to wrong network configuration.
$ system-config-network &
Sample outputs:
Fig.01: Configuring the RHEL/CentOS server network card using GUI tool
You will see a Window as above. Next, select your Ethernet card (such as eth0 or eth1) and click on the Edit button. You can now setup/modify IP address, netmask, default gateway and other properties. Here is an example from my personal RHEL 5.x server:
Fig.02: Setting or modifying IPv4 and IPv6 properties on RHEL/CentOS based server
You can obtain IP address using DHCP or setup manually. Once IP address assigned, click onOk button to save the changes. You can activate card by clicking on Activate button.

Method # 2: Command line tool system-config-network-tui

If you don't have X windows GUI (gnome/kde desktop) installed on RHEL/CentOS/Fedora based system, than type the following command at shell prompt (this method also works on remote server using ssh based session):
Warning: It is important that you configure network interface cards correctly over ssh based session; otherwise, you will be locked out due to wrong network configuration.
# system-config-network-tui &
Sample outputs:
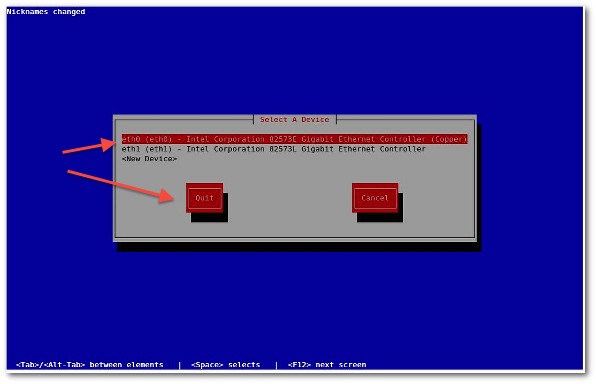
Fig.03: RHEL/CentOS command line network config tool (click to large)
Select your Ethernet card such as eth0 or eth1 and hit [Enter] or [F12] special key to configure IP properties for selected NIC:
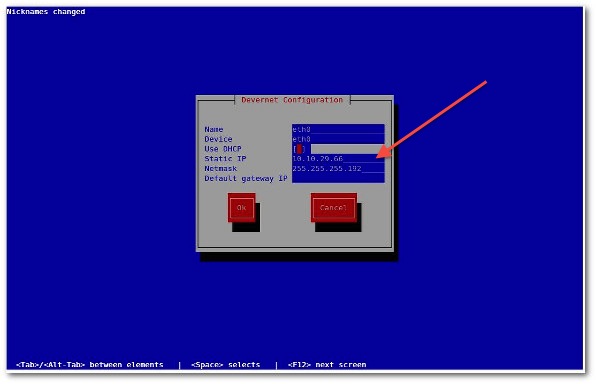
Fig.04: Setting up IPv4 properties on RHEL/CentOS (click to large)
You can obtain an IP address using DHCP or setup IP address manually. Once an IP address assigned, click on the Ok button to save the changes.

Method #3: Edit configuration files stored in/etc/sysconfig/network-scripts/ directory

You can configure network card by editing text files stored in /etc/sysconfig/network-scripts/ directory. Open the terminal or login using ssh. Next, change directory to /etc/sysconfig/network-scripts/:
# cd /etc/sysconfig/network-scripts/
You need to edit / create files as follows using a text editor such as vi:
  • /etc/sysconfig/network-scripts/ifcfg-eth0 : First Ethernet card configuration file.
  • /etc/sysconfig/network-scripts/ifcfg-eth1 : Second Ethernet card configuration file.

Examples: Edit eth0 configuration file

To edit/create first NIC file, type the following command in /etc/sysconfig/network-scripts/ directory:
Warning: It is important that you configure network interface cards correctly over ssh based session; otherwise, you will be locked out due to wrong network configuration.
# vi ifcfg-eth0
OR
# vi /etc/sysconfig/network-scripts/ifcfg-eth0
Edit or modify as follows for static ip configuration:
# eth0 - Intel Corporation 82573E Gigabit Ethernet Controller (Copper) on server1.cyberciti.biz by nixCraft on 10/4/2007
DEVICE=eth0
BOOTPROTO=static
DHCPCLASS=
HWADDR=00:30:48:56:A6:2E
IPADDR=10.10.29.66
NETMASK=255.255.255.192
ONBOOT=yes
 
Save and close the file.

Setting up default gateway and server (host) name

You need to define a default gateway (router IP) and hostname in /etc/sysconfig/network file. Edit /etc/sysconfig/network, enter:
# vi /etc/sysconfig/network
Append or modify configuration as follows:
NETWORKING=yes
HOSTNAME=www1.nixcraft.in
GATEWAY=10.10.29.65
 
Save and close the file. Finally, you need to restart the network service, run:
# /etc/init.d/network restart
OR
# /sbin/service network restart

Setting up dns server

Make sure you have correct DNS server defined in /etc/resolv.conf file:
# vi /etc/resolv.conf
Setup DNS server IP address as follows (feel free to replace 10.0.80.11, 10.0.80.12 as per your setup):
nameserver 10.0.80.11
nameserver 10.0.80.12
nameserver 202.67.222.222

Save and close the file. Now you can ping the gateway/other hosts using the ping command:
$ ping 10.0.80.12
Sample outputs:
PING 10.0.80.12 (10.0.80.12) 56(84) bytes of data.
64 bytes from 10.0.80.12: icmp_seq=1 ttl=251 time=0.972 ms
64 bytes from 10.0.80.12: icmp_seq=2 ttl=251 time=1.11 ms
You can also check for Internet connectivity with the ping, nslookup and/or host command:
$ nslookup cyberciti.biz
Sample outputs:
Server:         10.0.80.11
Address:        10.0.80.11#53
Non-authoritative answer:
Name:   cyberciti.biz
Address: 75.126.43.232
You can also use host dns lookup command as follows:
$ host nixcraft.in
Sample outputs:
nixcraft.in has address 75.126.43.232
nixcraft.in mail is handled by 10 mail.nixcraft.in.

How do I see or debug network configuration on RHEL/CentOS based server?

Simply use any one of the following commands:
 
###########################
## display ip config     ##
###########################
ifconfig
ifconfig -a | more
ifconfig eth0
ifconfig eth1
ip link
ip addr
 
###########################
## display routing table ##
###########################
route
route -nr
route -nr|more
ip route
 
###########################
## display dns config    ##
###########################
cat /etc/resolv.conf
 
###########################
## display firewall config#
###########################
iptables -L -n -v | more
cat /etc/sysconfig/iptables
 
###########################
## Debug network issues   #
###########################
ping host-name-here
ping ip-addeess-here
host ip-address-here
host domain-name-here
traceroute host-name-here
mtr host-name-here
dmesg | grep eth
lspci  | grep -i eth

Monday, December 8, 2014

5 Ways to Write Better Blog Posts


Kid on computer with glasses
Successful blogging drives qualified traffic to your website and helps establish you as an expert authority on subjects that are important to your clients. However, most blogs run into problems with a high bounce rates, meaning people that visit immediately leave, or that visitors aren’t converting into subscribers, leads or customers.

These problems can be alleviated with some simple modifications to your blog posts that will make them more inviting for both new and returning visitors.

1. Write About Topics Relevant to Your Audience  

When you brainstorm your upcoming blog post topics make sure you cater to the needs of your audience first. You’re an expert in all things related to your business, so think about some of the most frequently asked questions you’ve received in the past couple weeks. You can answer those with “how to” blog posts. These types of blog posts are going to be extremely relevant to your audience, and relevancy equates to engagement, meaning the more relevant the content is, the more likely a visitor will read the entire article and end up completing a desired action when they’re done; sharing, commenting, signing up, purchasing.

You can also invite relevant co-marketing partners to publish guest posts, bringing new opinions, insights, and audiences into play.

Don’t make your blog posts extremely self-promotional. Instead, focus on providing something unique and valuable to your audience.

2. Use Engaging Headlines

You need to make sure that your headlines grab attention. Readers make a split-second decision to either keep reading or leave when they see your headline, so it’s important that you hook them early.

I like to use the 4 U’s when formatting headlines:

  1. Be USEFUL to the reader
  2. Provide the reader with a sense of URGENCY
  3. Show that the main benefit is UNIQUE
  4. Do all of the above in an ULTRA-SPECIFIC way


3. Use Proper Formatting 

When it comes to content format and structure, your readers should be able to quickly skim your article and still leave with a key takeaway.

Here are some formatting tips for you to use in your blog posts:

  • Write in essay format with an intro, explanation of major points, conclusion and call-to-action
  • Keep your paragraphs short. Five sentences is too long. Two to three is ideal.
  • Use bold and italics to emphasize key points and encourage tone inflection.
  • Use bullets and numbered lists when applicable.
  • Separate out sections and start each one with relevant subheadlines. 
  • Use headline colors that are easy on the eyes.
  • Use whitespace intelligently. It improves overall legibility.

Review your blog post when you’re done and ask yourself, “Is this easy to quickly read/review?” That will give you a clear indication on whether or not it’s properly formatted.

4. Use High-Quality Imagery

Interesting imagery is a great way to attract more visitors, especially when used with social media posts.

If you don’t take your own pictures you can usually find relevant images from Creative Commons, just be sure to follow the proper licensing and author reference guidelines. Infographics are great too, here are 10 free tools you can use to create your own.

5. Keep The Right Length

When it comes to making your posts more inviting, I tend to side with shorter is better. Most readers prefer easily digestible content and don’t have a lot of time for reading super long blog posts.

I’m not suggesting making your blog posts just a couple sentences, they should still contain some substance. My general rule of thumb is to use as few words as possible to get the point across. When you’re done writing and proof-reading your post, time yourself reading through your article. If it takes longer than five minutes, consider removing some text.


Start implementing these tips today to make your blog posts as inviting as possible and you’ll see your average duration on site go up and your bounce rate go down, resulting in more traffic and customers for your business!

Monday, December 1, 2014

Booting CentOS in Single User Mode


Booting CentOS in Single User Mode
When you have an issue where CentOS will no longer boot, you have to be able to get into the operating system to resolve the problem.  I have had to boot into single user mode to resolve issues with file system mounting, or edit network settings when there is a problem with eth0 settings.  All of these situations are easy enough to resolve if you can just get into the operating system to fix the problems.  In these cases, booting into single user mode has allowed me the chance to resolve the problem.

So, let’s get started…


Step 1 – Boot CentOS into Single User Mode – Hit Any Key
Power up the machine and when you see this screen, hit the space bar or any other key before the timeout.
Boot CentOS in Single User Mode - Press Any Key to Edit Boot Options
Boot CentOS in Single User Mode – Press Any Key to Edit Boot Options


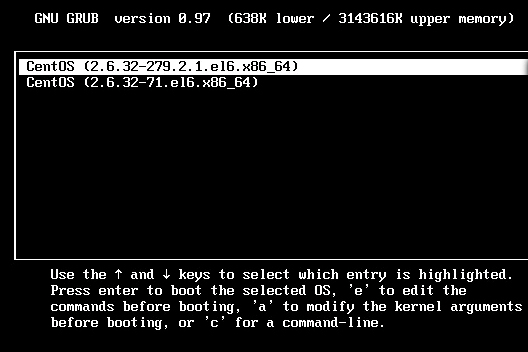
Step 2 – Boot CentOS into Single User Mode – Choose Boot Kernel

Next up, we will be given the list of kernels that we can boot from.  Choose the one that you typically boot to.  Typically, it is the latest one.  We use our up and down arrows to get to the proper kernel and then hit the “e” key to signify that we wish to edit it.

Boot CentOS in Single User Mode - Select Kernel
Boot CentOS in Single User Mode – Select Kernel

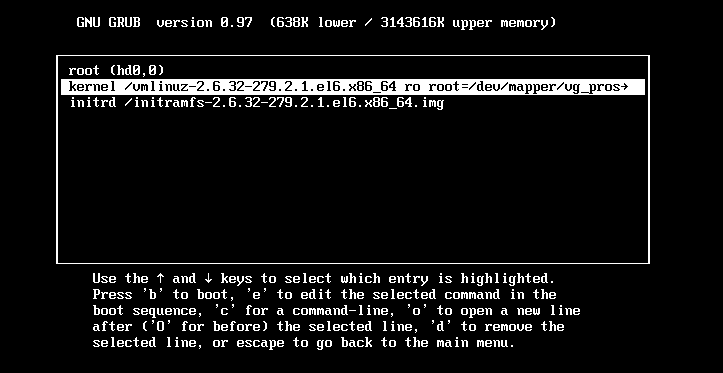
Step 3 – Boot CentOS into Single User Mode – Edit Boot Options 

Now, we are editing the kernel’s boot options.  Choose the line that begins with “kernel” as shown in the image to the right.  Then hit the “e” key again.


Boot CentOS in Single User Mode - Edit Kernel Boot Options
Boot CentOS in Single User Mode – Edit Kernel Boot Options


Step 4 – Boot CentOS into Single User Mode – Add Single User Mode Option

Type the word “single” at the end of the options.  

Then hit the “Enter” key.  

It will now boot your CentOS operating system into single user mode and you can resolve whatever issues you have that caused you to need to boot CentOS into single user mode in the first place.


Boot CentOS in Single User Mode - Add "Single" to the Kernel Boot Options
Boot CentOS in Single User Mode – Add “Single” to the Kernel Boot Options