How to automatically bcc all emails you send in Outlook?
When you sending an email message and you have a permanent secret recipient but don’t want the other recipients see his or her address, you should use the bcc function. But when we need to bcc, we have to manually show the bcc field and select a contact for it. To avoid these manual operations, the following article will show you how to modify outlook to automatically bcc an email address on all emails you send.
 Default auto bcc in outlook by using VBA
1. This VBA codes can successfully use on outlook 2007, 2010 and 2013. The first thing you should do is to enable the Visual Basic Editor program.
In outlook 2007, click Tool tab > Macro > Visual Basic Editor.
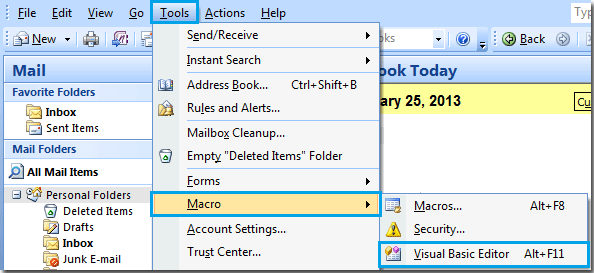
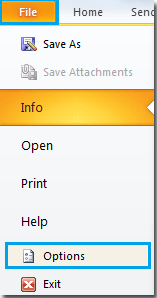
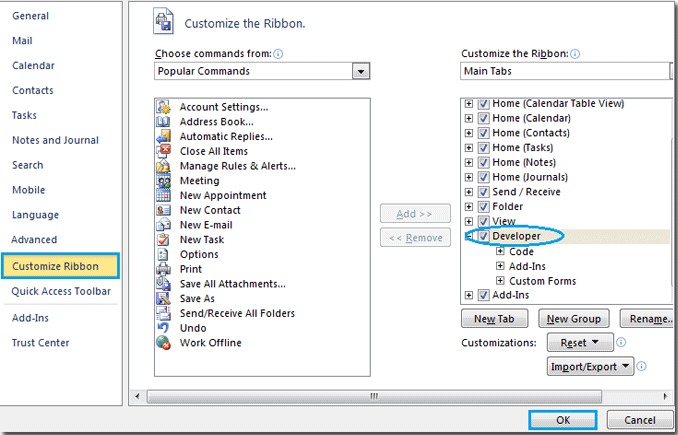
In outlook 2010, click File > Options. In Outlook Options window, click Customize Ribbon, then check theDeveloper box in the right pane, finally click OK button.
 |
 |
2. After you enable the Developer check box in the Customize Ribbon in outlook 2010, the Developer tab will be shown on the Ribbon. Go to the Developer tab, you can see the Visual Basic Editor locate on the left.

Tip: You can also launch Visual Basic Editor by pressing the hotkey Alt+F11.
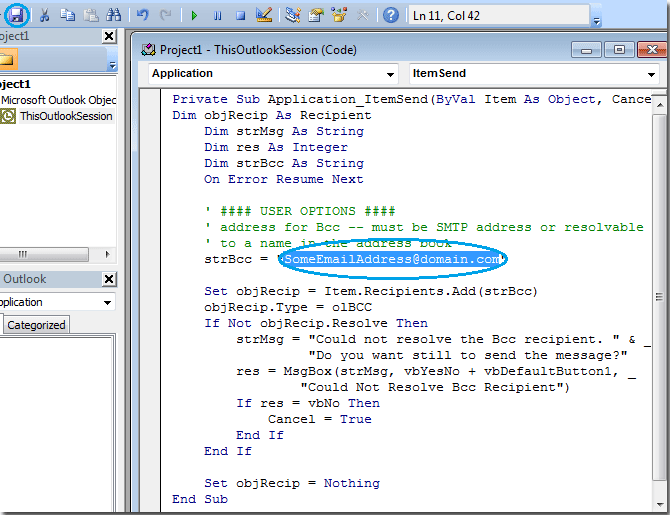
3. When the Visual Basic Editor was launched, double click on Project 1 > Microsoft Office Outlook >ThisOutlookSession to open the VBA editor. And in the opening code editing window, select the Application option from the drop-down box. Then the editing window will show as follows:
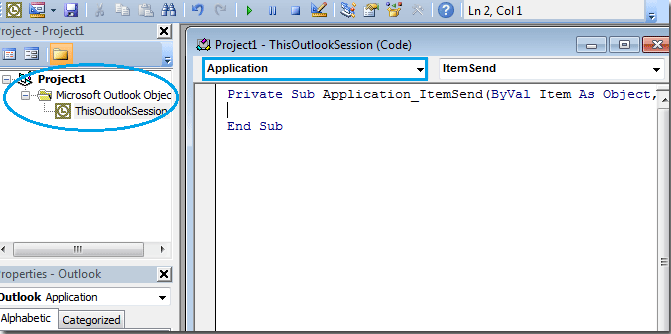
4. Between the “Private Sub Application_ItemSend (ByVal Item As Object, Cancel As Boolean)” and “End Sub”, copy and paste the following codes between these two lines.
VBA code: Auto bcc when sending all emails
Private Sub Application_ItemSend(ByVal Item As Object, Cancel As Boolean)
Dim objRecip As Recipient
Dim strMsg As String
Dim res As Integer
Dim strBcc As String
On Error Resume Next
' #### USER OPTIONS ####
' address for Bcc -- must be SMTP address or resolvable
' to a name in the address book
strBcc = "SomeEmailAddress@domain.com"
Set objRecip = Item.Recipients.Add(strBcc)
objRecip.Type = olBCC
If Not objRecip.Resolve Then
strMsg = "Could not resolve the Bcc recipient. " & _
"Do you want still to send the message?"
res = MsgBox(strMsg, vbYesNo + vbDefaultButton1, _
"Could Not Resolve Bcc Recipient")
If res = vbNo Then
Cancel = True
End If
End If
Set objRecip = Nothing
End Sub
5. Now you should pay more attention to the “WhateverEmailAddress@domain.com” line, because you need to replace it with the email address you like to bcc. When you finish typing the email address, click the Save button to save the code. Then close the editor.
Notes:
If you need this codes to be applied for Outlook 2013, after you have finished the above steps, you need to do as follows.
a. Go to the Developer tab, and then click Macro Security in the Code group.

b. When the Trust Center dialog popping up, in the Macros Settings section, select the Enable all macros (not recommended; potentially dangerous code can run) option, and then click OK.
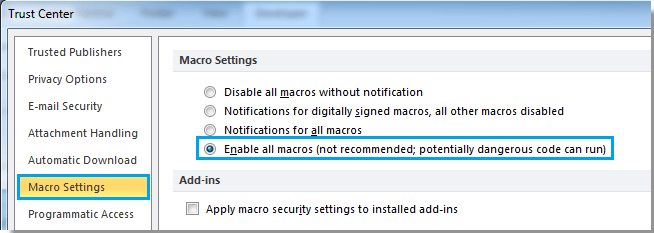
c. Now you need to close the Outlook application and restart it later. Now the codes can be applied for Outlook 2013.
6. From now on, you don’t need to fill the address in the Bcc field. When you send email from your outlook, it will automatically bcc to your desired recipient as the VBA code is carrying out.

Tip: If you don’t want to bcc anymore, you can open the Visual Basic Editor again and remove the whole VBA code from the editor. When you close the Visual Basic Editor, there will be no auto bcc action existing when you sending emails.
1 comment:
Outlook is sending two emails
Post a Comment