How To Automount NFS Share in Linux Using Autofs
Network File System (NFS) is a robust way to share directories across systems, enabling seamless access to files. However, manually mounting NFS shares can be tedious, especially when managing multiple systems. This is where autofs, a dynamic automounting tool, shines. Autofs automatically mounts NFS shares when accessed and unmounts them when idle, saving system resources.
Prerequisites
- A working NFS server with shared directories.
- A Linux client machine (tested on Debian 12, RHEL 9).
- Sudo or root access on the client machine.
Autofs service reads two files Master map file ( /etc/auto.master ) and a map file like /etc/auto.misc or /etc/auto.xxxx.
In ‘/etc/auto.master’ file we have three different fields :
/<Mount-Point> <Map-file> <Timeout-Value>
In map file (/etc/auto.misc or /etc/auto.xxxx) also we have three different fields:
<Mount-Point> <Mount-Options> <Location_of_File System>
In this tutorial, we will demonstrate how to mount an NFS share using autofs. The NFS share /var/nfs_share is exported from an Ubuntu 24.04 NFS server with the IP address 192.168.1.11. We will mount this NFS share on both RHEL 9 and Debian 12 or Ubuntu 24.04 Linux systems using autofs.
Mount nfs share using Autofs in RHEL 9
1) Install autofs package
Install the autofs package using below yum command if it is not installed.
$ sudo rpm -q autofs
package autofs is not installed
$ sudo dnf install autofs
2) Edit the Master map file (/etc/auto.master )
Add the following line .
$ sudo vi /etc/auto.master
/dbstuff  /etc/auto.nfsdb  --timeout=180
Note : Mount point ‘/dbstuff’‘ must exist on your system. If not then create a directory ‘mkdir /dbstuff‘. NFS Share will automatically umount after 180 seconds or 3 minutes if don’t perform any action on the share.
3) Create a map file ‘/etc/auto.nfsdb’
Create a map file and add the following line.
$ sudo vi /etc/auto.nfsdb
db_backup -fstype=nfs,rw,soft,intr 192.168.1.11:/var/nfs_share
Save and exit the file.
Where :
- db_backup is a mount point.
- -fstype=nfs is the file system type & ‘rw,soft,intr’ are mount options.
- ‘192.168.1.11:/var/nfs_share’ is nfs share location.
4) Start the auotfs service
$ sudo systemctl restart autofs.service
$ sudo systemctl enable autofs.service
5) Try to access the mount point
Mount point of nfs share will be ‘/dbstuff/db_backup‘. When we try access the mount point then autofs service will mount nfs share automatically as shown below:

Mount NFS share using autofs in Debian 12 / Ubuntu 24.04
1) Install the autofs package using apt command
$ sudo apt update && sudo apt install autofs -y
2) Edit the Master Map file ‘/etc/auto.master’
Add the following line in the master map file.
$ sudo vi /etc/auto.master
/dbstuff   /etc/auto.nfsdb   --timeout=180
Save & exit the file.
Create the mount point.
$ sudo mkdir /dbstuff
3) Create a map file ‘/etc/auto.nfsdb’
Add the following line in the map file.
$ sudo vi /etc/auto.nfsdb
db_backup   -fstype=nfs4,rw,soft,intr   192.168.1.11:/var/nfs_share
4) Start the autofs service
$ sudo systemctl restart autofs && sudo systemctl enable autofs
5) Try to access the mount point
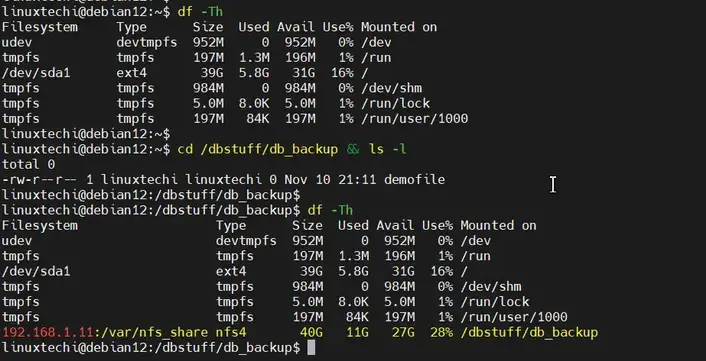
Perfect, above confirms that NFS share has been mount automatically via autofs.
That’s all from tutorial, I hope you have found it useful and informative, feel free to post your queries and feedback in below comments section.
No comments:
Post a Comment