Posting insightful information thus encompassing everything technical to assist in the enlightenment of others!
Tuesday, February 14, 2017
Install KVM (QEMU) on CentOS 7 / RHEL 7
KVM stands for Kernel Based Virtual Machine, is a virtualization software which provides ability to run a multiple guest operating systems with the help of hardware virtualization extensions. It supports wide variety of guest operating system’s such as Linux, Windows, Solaris, Haiku, REACT OS and much more.
KVM can be managed using command line or available graphical tools. Virt-Manager (Virtual Machine Manager) is the most widely used application for managing KVM based virtual machines, it supports creating, editing, starting, and stopping KVM-based virtual machines, as well as live or cold migration of guest machines between hosts.
Pre-requisites:
As said earlier, KVM will work only if the CPU has a support of hardware virtualization, either Intel VT or AMD-V. To find whether your cpu supports VT features, run the following command.
# egrep '(vmx|svm)' /proc/cpuinfo
CentOS 7 – Intel VT Support
If the above commands returns with any output showing vmx or svm then your hardware supports VT else it does not.
Installing KVM:
Issue the following command to install latest qemu package and also virt-manager which provides graphical interface to manage virtual machines.
virt-install = Command line tool to create virtual machines.
libvirt = Provides libvirtd daemon that manages virtual machines and controls hypervisor.
libvirt-client = provides client side API’s for accessing servers and also provides virsh utility which provides command line tool to manage virtual machines.
virt-viewer – Graphical console
Creating Virtual Machine:
Once you have installed KVM and other tools, it is all set to start creating virtual machines. We will look be looking at creating virtual machines in both command line and graphical mode.
Command Line Mode:
virt-install is used to create virtual machines using command line, this command needs multiple inputs from us to create a virtual machine such as CPU,Memory, disk, network, installation media location, os variant and more.
Note: The above command uses bridged networking “br0” for allowing virtual machines to communicate with outside network, you can find a tutorial on creating bridged networking with Virt Manager.
–name – Name of the Virtual machine
–ram – Memory size in MB
–vcpus – Virtal cpu’s in numbers
–cdrom – Location of the ISO image
–os-type – OS type like Linux, Windows and Unix
–os-variant – OS variant like rhel 6, solaris
–network – Networking
–graphics – Guest display settings
–disk path – Location of the disk with size of 4 GB
Once you’ve issued the above command, virt-install will create a virtual machine and starts virt viewer console for OS installation.
CentOS 7 – Guest Installation command Line Virt Viewer
Graphical Mode:
Type the following command in terminal in GUI mode.
# virt-manager
or
Application –> System Tools –> Virtual Machine Manager.
You may be asked to enter password, if you don’t have root access.
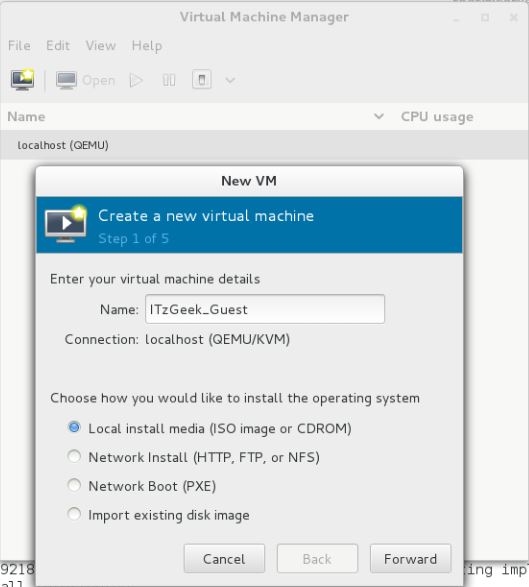
Once it is opened, right-click on localhost(QEMU) and Click on New. Virtual Machine Manager will start a new wizard for creating virtual machine, you will find no difficulty in using this graphical mode.
Step 1: You would require to name your virtual machine, in the same window, you would be asked to choose how would you like to install the operating system. Here i chose to install it from ISO image or CD-ROM.
CentOS 7 – Virt Manager – Create VM
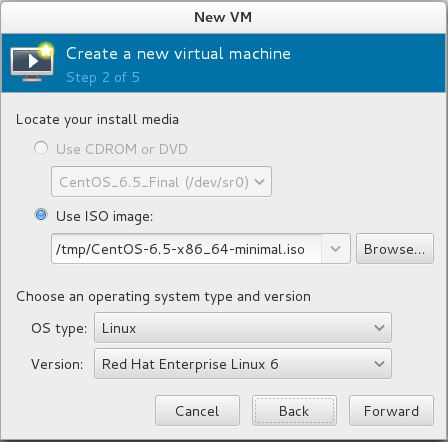
Step 2: Enter the location of ISO image as physical CD-ROM pass through is not supported by hypervisor, do not forget to choose operating system type and version.
CentOS 7 – Virt Manager – Installation Media
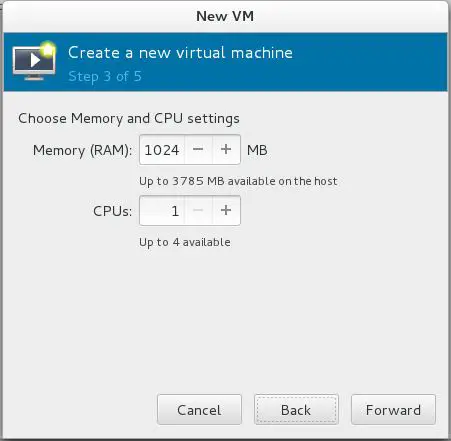
Step 3: Configure CPU and memory for virtual machine.
CentOS 7 – Virt Manager – Memory and CPU
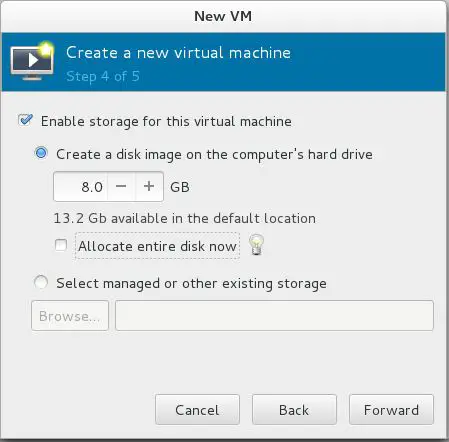
Step 4: You have to mention the amount of storage that you want to assign to a virtual machine, Un check on “Allocate entire disk now”, this will prevent from allocating full disk at the VM creation. Disk size will be allocated dynamically depending on the virtual machine usage.
CentOS 7 – Virt Manager – Allocating Storage
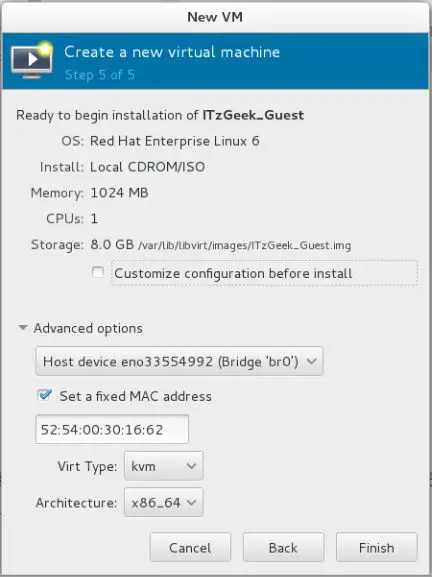
Step 5: Summary of all the settings, click on advanced settings to select bridged networking in order to allow virtual machine to communicate outside network. Click on Finish.
CentOS 7 – Virt Manager – Summary
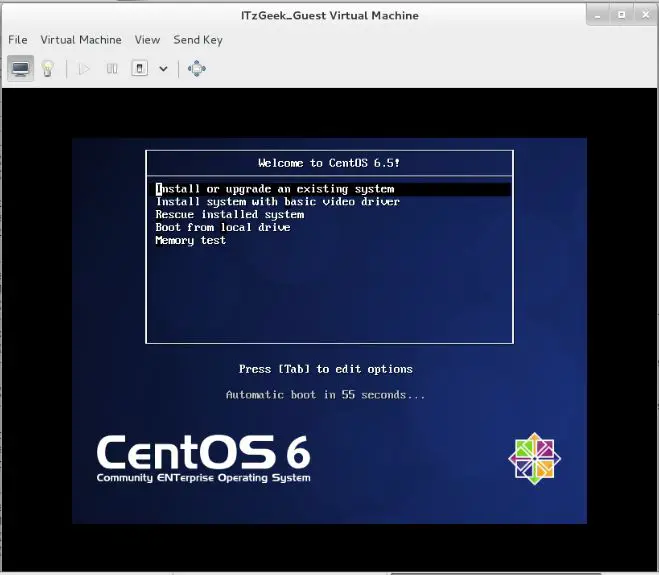
Step 6: KVM will start to create a virtual machine depends on our input, once vm is created. Virt manager will start a console for OS installation. The following screen shows the installation screen of CentOS 6.
CentOS 7 – Virt Manager – VM Console
Managing Virtual Machine:
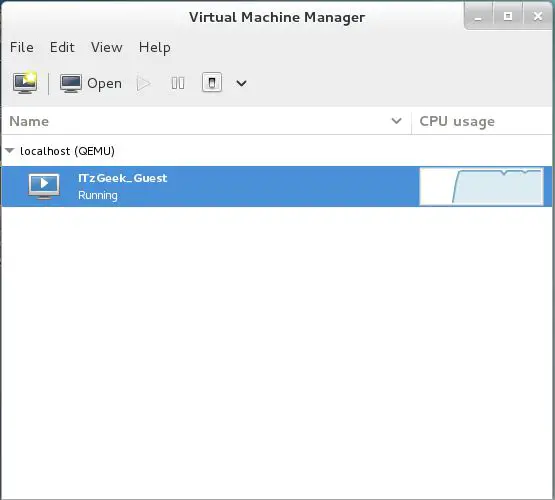
With the Virtual Machine Manger, you can perform vm’s life cylcle actions such as start, power off, reset, clone and migration by right clicking on selected virtual machine.
CentOS 7 – Virt Manager
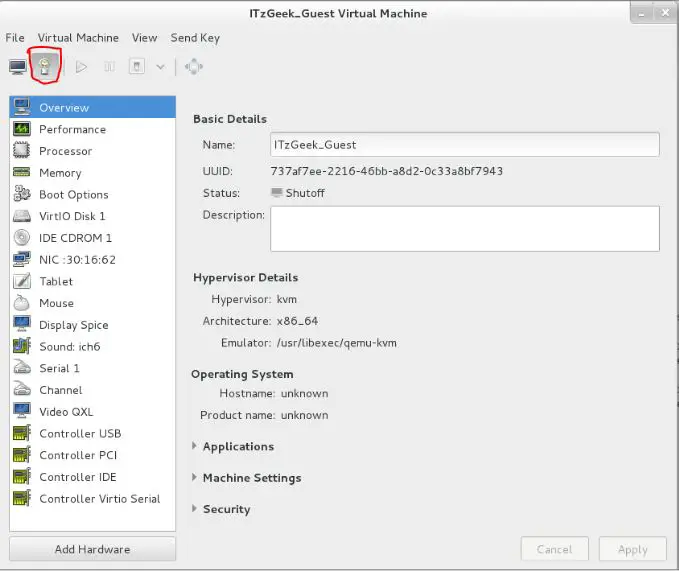
Managing virtual machine using virt manager is very simple, you can just click on “bulp” icon in the vm console. Here you can add, modify and remove devices.
This article describes keyboard shortcuts that are available in Microsoft Office Word 2010, Word 2007, Word 2003, and Word 2002. If one of the keyboard shortcuts doesn't work for your version of Word, go to one of the following articles:
These keyboard shortcuts refer to the U.S. keyboard layout. Keys on other layouts might not correspond exactly to the keys on a U.S. keyboard.
For keyboard shortcuts in which you press two or more keys at the same time, the keys to press are separated by a plus sign (+).
For keyboard shortcuts in which you press one key immediately followed by another key, the keys to press are separated by a comma (,).
This article does not cover customizing keyboard shortcuts or creating keyboard shortcuts for macros or AutoText. For more information, click a link in the See Also section.
If you are using Microsoft Word 2010 Starter, be aware that not all features that are listed for Word are supported in Word Starter. For more information about the features that are available in Word Starter, see Word Starter feature support.
Microsoft Office basics
Display and use windows
To do this
Press
Switch to the next window.
ALT+Tab
Switch to the previous window.
ALT+SHIFT+Tab
Close the active window.
CTRL+W or CTRL+F4
Restore the size of the active window after you maximize it.
ALT+F5
Move to a task pane from another pane in the program window (clockwise direction). You may have to press F6 multiple times.
F6
Move to a task pane from another pane in the program window (counterclockwise direction).
SHIFT+F6
When more than one window is open, switch to the next window.
CTRL+F6
Switch to the previous window.
CTRL+SHIFT+F6
Maximize or restore a selected window.
CTRL+F10
Copy a picture of the screen to the Clipboard.
PRINT SCREEN
Copy a picture of the selected window to the Clipboard.
ALT+PRINT SCREEN
Use dialog boxes
To do this
Press
Move to the next option or option group.
Tab
Move to the previous option or option group.
SHIFT+Tab
Switch to the next tab in a dialog box.
CTRL+Tab
Switch to the previous tab in a dialog box.
CTRL+SHIFT+Tab
Move between options in an open drop-down list, or between options in a group of options.
Arrow keys
Perform the action assigned to the selected button; select or clear the selected check box.
SPACEBAR
Select an option; select or clear a check box.
ALT+the letter underlined in an option
Open a selected drop-down list.
ALT+DOWN ARROW
Select an option from a drop-down list.
First letter of an option in a drop-down list.
Close a selected drop-down list; cancel a command and close a dialog box.
ESC
Run a selected command.
Enter
Use edit boxes within dialog boxes
Note An edit box is a blank in which you type or paste an entry, such as your user name or the path of a folder.
To do this
Press
Move to the beginning of the entry.
HOME
Move to the end of the entry.
END
Move one character to the left or right.
LEFT ARROW or RIGHT ARROW
Move one word to the left.
CTRL+LEFT ARROW
Move one word to the right.
CTRL+RIGHT ARROW
Select or cancel the selection of one character to the left.
SHIFT+LEFT ARROW
Select or cancel the selection of one character to the right.
SHIFT+RIGHT ARROW
Select or cancel the selection of one word to the left.
CTRL+SHIFT+LEFT ARROW
Select or cancel the selection of one word to the right.
CTRL+SHIFT+RIGHT ARROW
Select from the cursor to the beginning of the entry.
SHIFT+HOME
Select from the cursor to the end of the entry.
SHIFT+END
Use the Open and Save As dialog boxes
To do this
Press
Display the Open dialog box.
CTRL+F12 or CTRL+O
Display the Save As dialog box.
F12
Open the selected folder or file.
Enter
Open the folder one level above the selected folder.
BACKSPACE
Delete the selected folder or file.
DELETE
Display a shortcut menu for a selected item such as a folder or file.
SHIFT+F10
Move forward through options.
Tab
Move back through options.
SHIFT+Tab
Open the look in list.
F4 or ALT+I
Undo and redo actions
To do this
Press
Cancel an action.
ESC
Undo an action.
CTRL+Z
Redo or repeat an action.
CTRL+Y
Access and use task panes and galleries
To do this
Press
Move to a task pane from another pane in the program window. You may have to press F6 multiple times.
F6
When a menu is active, move to a task pane. You may have to press CTRL+Tab multiple times.
CTRL+Tab
When a task pane is active, select the next or previous option in the task pane.
Tab or SHIFT+Tab
Display the full set of commands on the task pane menu.
CTRL+SPACE BAR
Perform the action assigned to the selected button.
SPACE BAR or Enter
Open a drop-down menu for the selected gallery item.
SHIFT+F10
Select the first or last item in a gallery.
HOME or END
Scroll up or down in the selected gallery list.
PAGE UP or PAGE DOWN
Close a task pane
Press F6 to move to the task pane, if it is necessary.
Press CTRL+SPACEBAR.
Use the arrow keys to select Close, and then press Enter.
Move a task pane
Press F6 to move to the task pane, if it is necessary.
Press CTRL+SPACEBAR.
Use the arrow keys to select Move, and then press Enter.
Use the arrow keys to move the task pane, and then press Enter.
Resize a task pane
Press F6 to move to the task pane, if it is necessary.
Press CTRL+SPACEBAR.
Use the arrow keys to select Size, and then press Enter.
Use the arrow keys to resize the task pane, and then press Enter.
Access and use available actions
To do this
Press
Display the shortcut menu for the selected part.
SHIFT+F10
Display the menu or message for an available action or for the Autocorrect Options button or the Paste options button. If more than one action is present, switch to the next action and display its menu or message.
ALT+SHIFT+F10
Move between options in a menu of available actions.
Arrow keys
Perform the action for the selected item on a menu of available actions.
Enter
Close the available actions menu or message.
ESC
Tips for Word 2010
You can ask to be notified by a sound when an action is available (not available in Word Starter). To hear audio cues, you must have a sound card. You must also have Microsoft Office Sounds installed on your computer.
If you have access to the Internet, you can download Microsoft Office Sounds from Office.com. After you install the sound files, do the following:
Press ALT+F, T to open Word Options.
Press A to select Advanced, and then press Tab to move to the Advanced Options for working with Word.
Press ALT+S two times to move to the Provide feedback with sound check box on the General tab, and then press SPACEBAR.
Press Tab repeatedly to select OK, and then press Enter.
Note When you select or clear this check box, the setting affects all Office programs that support sound.
Navigating the Ribbon
Access any commands by using several keystrokes
Access keys let you quickly use a command by pressing several keystrokes, regardless of where you are in the program. Every command in Word 2010 can be accessed by using an access key. You can access most commands by using two to five keystrokes. To use an access key, follow these steps:
Press ALT. The KeyTips are displayed over each feature that is available in the current view.
Press the letter shown in the KeyTip over the feature that you want to use.
Depending on which letter that you press, you may be shown additional KeyTips. For example, if the Home tab is active and you press N, the Insert tab is displayed, together with the KeyTips for the groups on that tab.
Continue pressing letters until you press the letter of the command or control that you want to use. In some cases, you must first press the letter of the group that contains the command.
Note To cancel the action that you are taking and hide the KeyTips, press ALT.
Change the keyboard focus without using the mouse
Another way to use the keyboard to work with programs that feature the Office Ribbon is to move the focus among the tabs and commands until you find the feature that you want to use. The following table lists some ways to move the keyboard focus without using the mouse.
To do this
Press
Select the active tab of the Ribbon and enable the access keys.
ALT or F10. Press either of these keys again to move back to the document and cancel the access keys.
Move to another tab of the Ribbon.
F10 to select the active tab, and then LEFT ARROW or RIGHT ARROW
Expand or collapse the Ribbon.
CTRL+F1
Display the shortcut menu for the selected item.
SHIFT+F10
Move the focus to select the following areas of the window:
Active tab of the Ribbon
Any open task panes
Status bar at the bottom of the window
Your document
F6
Move the focus to each command on the Ribbon, forward or backward.
Tab or SHIFT+Tab
Move down, up, left, or right, among the items on the Ribbon.
DOWN ARROW, UP ARROW, LEFT ARROW, or RIGHT ARROW
Enable the selected command or control on the Ribbon.
SPACEBAR or Enter
Open the selected menu or gallery on the Ribbon.
SPACEBAR or Enter
Enable a command or control on the Ribbon so that you can change a value.
Enter
Finish changing a value in a control on the Ribbon, and move the focus back to the document.
Enter
Get help on the selected command or control on the Ribbon. If no Help topic is associated with the selected command, a general Help topic about the program is shown instead.
F1
Quick reference for Microsoft Word
Common tasks in Microsoft Word
To do this
Press
Create a nonbreaking space.
CTRL+SHIFT+SPACEBAR
Create a nonbreaking hyphen.
CTRL+SHIFT+HYPHEN
Make letters bold.
CTRL+B
Make letters italic.
CTRL+I
Make letters underline.
CTRL+U
Decrease font size one value.
CTRL+SHIFT+<
Increase font size one value.
CTRL+SHIFT+>
Decrease font size 1 point.
CTRL+[
Increase font size 1 point.
CTRL+]
Remove paragraph or character formatting.
CTRL+SPACEBAR
Copy the selected text or object.
CTRL+C
Cut the selected text or object.
CTRL+X
Paste text or an object.
CTRL+V
Paste special.
CTRL+ALT+V
Paste formatting only
CTRL+SHIFT+V
Undo the last action.
CTRL+Z
Redo the last action.
CTRL+Y
Open the Word Count dialog box.
CTRL+Y
Working with documents and webpages
Create, view and save documents
To do this
Press
Create a new document.
CTRL+N
Open a document.
CTRL+O
Close a document.
CTRL+W
Split the document window.
ALT+CTRL+S
Remove the document window split.
ALT+SHIFT+C or ALT+CTRL+S
Save a document.
CTRL+S
Find, replace and browse through text
To do this
Press
Open the Navigation task pane (to search document).
CTRL+F
Repeat find (after closing Find and Replace window).
ALT+CTRL+Y
Replace text, specific formatting, and special items.
CTRL+H
Go to a page, bookmark, footnote, table, comment, graphic, or other location.
CTRL+G
Switch between the last four locations that you have edited.
ALT+CTRL+Z
Open a list of browse options. Press the arrow keys to select an option, and then press ENTER to browse through a document by using the selected option.
ALT+CTRL+HOME
Move to the previous browse object (set in browse options).
CTRL+PAGE UP
Move to the next browse object (set in browse options).
CTRL+PAGE DOWN
Switch to another view
To do this
Press
Switch to Print Layout view.
ALT+CTRL+P
Switch to Outline view.
ALT+CTRL+O
Switch to Draft view.
ALT+CTRL+N
Outline view
To do this
Press
Promote a paragraph.
ALT+SHIFT+LEFT ARROW
Demote a paragraph.
ALT+SHIFT+RIGHT ARROW
Demote to body text.
CTRL+SHIFT+N
Move selected paragraphs up.
ALT+SHIFT+UP ARROW
Move selected paragraphs down.
ALT+SHIFT+DOWN ARROW
Expand text under a heading.
ALT+SHIFT+PLUS SIGN
Collapse text under a heading.
ALT+SHIFT+MINUS SIGN
Expand or collapse all text or headings.
ALT+SHIFT+A
Hide or display character formatting.
The slash (/) key on the numeric keypad
Show the first line off body text or all body text.
ALT+SHIFT+L
Show all headings with the Heading 1 style.
ALT+SHIFT+1
Show all headings up to Heading n.
ALT+SHIFT+n
Insert a tab character.
CTRL+TAB
Print and preview documents
To do this
Press
Print a document.
CTRL+P
Switch to print preview.
ALT+CTRL+I
Move around the preview page when zoomed in.
Arrow keys
Move by one preview page when zoomed out.
PAGE UP or PAGE DOWN
Move to the first preview page when zoomed out.
CTRL+HOME
Move to the last preview page when zoomed out.
CTRL+END
Review documents
To do this
Press
Insert a comment.
ALT+CTRL+M
Turn change tracking on or off.
CTRL+SHIFT+E
Close the Reviewing Pane if it is open.
ALT+SHIFT+C
Full Screen Reading view
Note Some screen readers may not be compatible with Full Screen Reading view.
To do this
Press
Go to the beginning of document.
HOME
Go to the end of document.
END
Go to page n.
n, ENTER
Exit reading layout view.
ESC
References, footnotes and endnotes
To do this
Press
Mark a table of contents entry.
ALT+SHIFT+O
Mark a table of authorities entry (citation).
ALT+SHIFT+I
Mark an index entry.
ALT+SHIFT+X
Insert a footnote.
ALT+SHIFT+F
Insert an endnote.
ALT+SHIFT+D
Work with webpages
To do this
Press
Insert a hyperlink.
CTRL+K
Go back one page.
ALT+LEFT ARROW
Go forward one page.
ALT+RIGHT ARROW
Refresh.
F9
Edit and move text and graphics
Delete text and graphics
To do this
Press
Delete one character to the left.
BACKSPACE
Delete one word to the left.
CTRL+BACKSPACE
Delete one character to the right.
DELETE
Delete one word to the right.
CTRL+DELETE
Cut selected text to the Office Clipboard.
CTRL+X
Undo the last action.
CTRL+Z
Cut to the Spike.
CTRL+F3
Copy and move text and graphics
To do this
Press
Open the Office Clipboard.
Press ALT+H to move to the Home tab, and then press F,O
Copy selected text or graphics to the Office Clipboard.
CTRL+C
Cut selected text or graphics to the Office Clipboard.
CTRL+X
Paste the most recent addition or pasted item from the Office Clipboard.
CTRL+V
Move text or graphics one time.
F2 (then move the cursor and press ENTER)
Copy text or graphics one time.
SHIFT+F2 (then move the cursor and press ENTER)
When text or an object is selected, open the Create New Building Block dialog box.
ALT+F3
When the building block - for example, a SmartArt graphic - is selected, display the shortcut menu that is associated with it.
SHIFT+F10
Cut to the Spike.
CTRL+F3
Paste the Spike contents.
CTRL+SHIFT+F3
Copy the header or footer used in the previous section of the document.
ENTER (after you type the first few characters of the AutoText entry name and when the ScreenTip appears)
Insert characters by using character codes
To do this
Press
Insert the Unicode character for the specified Unicode (hexadecimal) character code. For example, to insert the euro currency symbol, type 20AC, and then hold down ALT and press X.
The character code, ALT+X
Find the Unicode character code for the selected character.
ALT+X
Insert the ANSI character for the specified ANSI (decimal) character code. For example, to insert the euro currency symbol, hold down ALT and press 0128 on the numeric keypad.
ALT+the character code (on the numeric keypad)
Select text and graphics
Select text by holding down SHIFT and using the arrow keys to move the cursor.
Extend a selection
To do this
Press
Turn extend mode on.
F8
Select the nearest character.
F8, and then press LEFT ARROW or RIGHT ARROW
Increase the size of a selection.
F8 (press one time to select a word, two times to select a sentence, and so on)
Reduce the size of a selection.
SHIFT+F8
Turn extend mode off.
ESC
Extend a selection one character to the right.
SHIFT+RIGHT ARROW
Extend a selection one character to the left.
SHIFT+LEFT ARROW
Extend a selection to the end of a word.
CTRL+SHIFT+RIGHT ARROW
Extend a selection to the beginning of a word.
CTRL+SHIFT+LEFT ARROW
Extend a selection to the end of a line.
SHIFT+END
Extend a selection to the beginning of a line.
SHIFT+HOME
Extend a selection one line down.
SHIFT+DOWN ARROW
Extend a selection one line up.
SHIFT+UP ARROW
Extend a selection to the end of a paragraph.
CTRL+SHIFT+DOWN ARROW
Extend a selection to the beginning of a paragraph.
CTRL+SHIFT+UP ARROW
Extend a selection one screen down.
SHIFT+PAGE DOWN
Extend a selection one screen up.
SHIFT+PAGE UP
Extend a selection to the beginning of a document.
CTRL+SHIFT+HOME
Extend a selection to the end of a document.
CTRL+SHIFT+END
Extend a selection to the end of a window.
ALT+CTRL+SHIFT+PAGE DOWN
Extend a selection to include the complete document.
CTRL+A
Select a vertical block of text.
CTRL+SHIFT+F8, and then use the arrow keys; press ESC to cancel selection mode
Extend a selection to a specific location in a document.
F8+arrow keys; press ESC to cancel selection mode
Select text and graphics in a table
To do this
Press
Select the next cell's contents.
TAB
Select the previous cell's contents.
SHIFT+TAB
Extend a selection to adjacent cells.
Hold down SHIFT and press an arrow key repeatedly
Select a column.
Use the arrow keys to move to the column's top or bottom cell, and then do one of the following:
Press SHIFT+ALT+PAGE DOWN to select the column from top to bottom.
Press SHIFT+ALT+PAGE UP to select the column from bottom to top.
Extend a selection (or block).
CTRL+SHIFT+F8, and then use the arrow keys; press ESC to cancel section mode
Select a complete table.
ALT+F5 on the numeric keypad (with NUM LOCK off)
Move through your document
To move
Press
One character to the left
LEFT ARROW
One character to the right
RIGHT ARROW
One word to the left
CTRL+LEFT ARROW
One word to the right
CTRL+RIGHT ARROW
One paragraph up
CTRL+UP ARROW
One paragraph down
CTRL+DOWN ARROW
One cell to the left (in a table)
SHIFT+TAB
One cell to the right (in a table)
TAB
Up one line
UP ARROW
Down one line
DOWN ARROW
To the end of a line
END
To the beginning of a line
HOME
To the top of the window
ALT+CTRL+PAGE UP
To the end of the window
ALT+CTRL+PAGE DOWN
Up one screen (scrolling)
PAGE UP
Down one screen (scrolling)
PAGE DOWN
To the top of the next page
CTRL+PAGE DOWN
To the top of the previous page
CTRL+PAGE UP
To the end of a document
CTRL+END
To the beginning of a document
CTRL+HOME
To a previous revision
SHIFT+F5
After you open a document, go to the location that you were working in when the document was last closed
SHIFT+F5
Move around in a table
To move
Press
To the next cell in a row
TAB
To the previous cell in a row
SHIFT+TAB
To the first cell in a row
ALT+HOME
To the last cell in a row
ALT+END
To the first cell in a column
ALT+PAGE UP
To the last cell in a column
ALT+PAGE DOWN
To the previous row
UP ARROW
To the next row
DOWN ARROW
Row up
ALT+SHIFT+UP ARROW
Row down
ALT+SHIFT+DOWN ARROW
Insert paragraphs and tab characters in a table
To insert
Press
New paragraphs in a cell
ENTER
Tab characters in a cell
CTRL+TAB
Use Overtype mode
To change the Overtype settings so that you can access Overtype mode by pressing INSERT, follow these steps:
Press ALT+F, T to open Word Options.
Press A to select ADVANCED, and then press TAB.
Press ALT+O to move to the Use the Insert key to control overtype mode check box.
Press SPACEBAR to select the check box, and then press ENTER.
To turn Overtype mode on or off, press INSERT.
Character and paragraph formatting
Copy formatting
To do this
Press
Copy formatting from text.
CTRL+SHIFT+C
Apply copied formatting to text.
CTRL+SHIFT+V
Change or resize the font
Note The following keyboard shortcuts do not work in Full Screen Reading mode.
To do this
Press
Open the Font dialog box to change the font.
CTRL+SHIFT+F
Increase the font size.
CTRL+SHIFT+>
Decrease the font size.
CTRL+SHIFT+<
Increase the font size by 1 point.
CTRL+]
Decrease the font size by 1 point.
CTRL+[
Apply character formats
To do this
Press
Open the Font dialog box to change the formatting of characters.
CTRL+D
Change the case of letters.
SHIFT+F3
Format all letters as capitals.
CTRL+SHIFT+A
Apply bold formatting.
CTRL+B
Apply an underline.
CTRL+U
Underline words but not spaces.
CTRL+SHIFT+W
Double-underline text.
CTRL+SHIFT+D
Apply hidden text formatting.
CTRL+SHIFT+H
Apply italic formatting.
CTRL+I
Format letters as small capitals.
CTRL+SHIFT+K
Apply subscript formatting (automatic spacing).
CTRL+EQUAL SIGN
Apply superscript formatting (automatic spacing).
CTRL+SHIFT+PLUS SIGN
Remove manual character formatting.
CTRL+SPACEBAR
Change the selection to the Symbol font.
CTRL+SHIFT+Q
View and copy text formats
To do this:
Press:
Display nonprinting characters.
CTRL+SHIFT+* (asterisk on numeric keypad does not work)
Review text formatting.
SHIFT+F1 (then click the text with the formatting you want to review)
Copy formats.
CTRL+SHIFT+C
Paste formats.
CTRL+SHIFT+V
Set the line spacing
To do this
Press
Single-space lines.
CTRL+1
Double-space lines.
CTRL+2
Set 1.5-line spacing.
CTRL+5
Add or remove one line space before a paragraph.
CTRL+0 (zero)
Align paragraphs
To do this
Press
Switch a paragraph between centered and left-aligned.
CTRL+E
Switch a paragraph between justified and left-aligned.
CTRL+J
Switch a paragraph between right-aligned and left-aligned.
CTRL+R
Left align a paragraph.
CTRL+L
Indent a paragraph from the left.
CTRL+M
Remove a paragraph indent from the left.
CTRL+SHIFT+M
Create a hanging indent.
CTRL+T
Reduce a hanging indent.
CTRL+SHIFT+T
Remove paragraph formatting.
CTRL+Q
Apply paragraph styles
To do this
Press
Open Apply Styles task pane.
CTRL+SHIFT+S
Open Styles task pane.
ALT+CTRL+SHIFT+S
Start AutoFormat.
ALT+CTRL+K
Apply the Normal style.
CTRL+SHIFT+N
Apply the Heading 1 style.
ALT+CTRL+1
Apply the Heading 2 style.
ALT+CTRL+2
Apply the Heading 3 style.
ALT+CTRL+3
To close the Styles task pane, follow these steps:
If the Styles task pane is not selected, press F6 to select it.
Press CTRL+SPACEBAR.
Use the arrow keys to select Close, and then press ENTER.
Insert and edit objects
Insert an object
To insert an object, follow these steps:
Press ALT, N, J and then J to open the Object dialog box.
Do one of the following:
Press DOWN ARROW to select an object type, and then press ENTER to create an object.
Press CTRL+TAB to switch to the Create from File tab, press TAB, and then type the file name of the object that you want to insert or browse to the file.
Edit an object
To edit an object, follow these steps:
With the cursor positioned to the left of the object in your document, select the object by pressing SHIFT+RIGHT ARROW.
Press SHIFT+F10.
Press the TAB key to reach Object name, press ENTER, and then press ENTER again.
Insert SmartArt graphics
To insert SmartArt graphics, follow these steps:
Press and release ALT, N, and then M to select SmartArt.
Press the arrow keys to select the kind of graphic that you want.
Press TAB, and then press the arrow keys to select the graphic that you want to insert.
Press ENTER.
Insert WordArt
To insert WordArt, follow these steps:
Press and release ALT, N, and then W to select WordArt.
Press the arrow keys to select the WordArt style that you want, and then press ENTER.
Type the text that you want.
Press ESC to select the WordArt object, and then use the arrow keys to move the object.
Press ESC again to return to the document.
Mail merge and fields
Perform a mail merge
Note You must be on the Mailings tab to use these keyboard shortcuts.
To do this
Press
Preview a mail merge.
ALT+SHIFT+K
Merge a document.
ALT+SHIFT+N
Print the merged document.
ALT+SHIFT+M
Edit a mail-merge data document.
ALT+SHIFT+E
Insert a merge field.
ALT+SHIFT+F
Work with fields
To do this
Press
Insert a DATE field.
ALT+SHIFT+D
Insert a LISTNUM field.
ALT+SHIFT+L
Insert a PAGE field.
ALT+SHIFT+P
Insert a TIME field.
ALT+SHIFT+T
Insert an empty field.
CTRL+F9
Update linked information in a Word source document.
CTRL+SHIFT+F7
Update selected fields.
F9
Unlink a field.
CTRL+SHIFT+F9
Switch between a selected field code and its result.
SHIFT+F9
Switch between all field codes and their results.
ALT+F9
Run GOTOBUTTON or MACROBUTTON from the field that displays the field results.
ALT+SHIFT+F9
Go to the next field.
F11
Go to the previous field.
SHIFT+F11
Lock a field.
CTRL+F11
Unlock a field.
CTRL+SHIFT+F11
Language bar
Handwriting recognition
To do this
Press
Switch between languages or keyboard layouts.
Left ALT+SHIFT
Display a list of correction alternatives.
+C
Turn handwriting on or off.
+H
Turn Japanese Input Method Editor (IME) on 101 keyboards on or off.
ALT+~
Turn Korean IME on 101 keyboards on or off.
Right ALT
Turn Chinese IME on 101 keyboards on or off.
CTRL+SPACEBAR
Tips
You can select the keyboard shortcut for switching between languages or keyboard layouts in the Advanced Key Setting dialog box. To open theAdvanced Key Setting dialog box, right-click the Language bar, and then click Settings. Under Preferences, click Key Settings.
The Windows logo key is available on the bottom row of keys on most keyboards.
Function key reference
Function keys
To do this
Press
Get Help or go to Microsoft Office.com.
F1
Move text or graphics.
F2
Repeat the last action.
F4
Select the Go To command (Home tab).
F5
Go to the next pane or frame.
F6
Select the Spelling command (Review tab).
F7
Extend a selection.
F8
Update the selected fields.
F9
Show KeyTips.
F10
Go to the next field.
F11
Select the Save As command.
F12
SHIFT+Function key
To do this
Press
Start context-sensitive Help or reveal formatting.
SHIFT+F1
Copy text.
SHIFT+F2
Change the case of letters.
SHIFT+F3
Repeat a Find or Go To action.
SHIFT+F4
Move to the last change.
SHIFT+F5
Go to the previous pane or frame (after you press F6).
SHIFT+F6
Select the Thesaurus command (Review tab, Proofing group).
SHIFT+F7
Reduce the size of a selection.
SHIFT+F8
Switch between a field code and its result.
SHIFT+F9
Display a shortcut menu.
SHIFT+F10
Go to the previous field.
SHIFT+F11
Select the Save command.
SHIFT+F12
CTRL+Function key
To do this
Press
Expand or collapse the Ribbon.
CTRL+F1
Select the Print Preview command.
CTRL+F2
Cut to the Spike.
CTRL+F3
Close the window.
CTRL+F4
Go to the next window.
CTRL+F6
Insert an empty field.
CTRL+F9
Maximize the document window.
CTRL+F10
Lock a field.
CTRL+F11
Select the Open command.
CTRL+F12
CTRL+SHIFT+Function key
To do this:
Press
Insert the contents of the Spke.
CTRL+SHIFT+F3
Edit a bookmark.
CTRL+SHIFT+F5
Go to the previous window.
CTRL+SHIFT+F6
Update linked information in a Word 2010 source document.
CTRL+SHIFT+F7
Extend a selection or block.
CTRL+SHIFT+F8, and then press an arrow key
Unlink a field.
CTRL+SHIFT+F9
Unlock a field.
CTRL+SHIFT+F11
Select the Print command.
CTRL+SHIFT+F12
ALT+Function key
To do this
Press
Go to the next field.
ALT+F1
Create a new Building Block.
ALT+F3
Exit Word 2010.
ALT+F4
Restore the program window size.
ALT+F5
Move from an open dialog box back to the document, for dialog boxes that support this behavior.
ALT+F6
Find the next misspelling or grammatical error.
ALT+F7
Run a macro.
ALT+F8
Switch between all field codes and their results.
ALT+F9
Display the Selection and Visibility task pane.
ALT+F10
Display Microsoft Visual Basic code.
ALT+F11
ALT+SHIFT+Function key
To do this
Press
Go to the previous field.
ALT+SHIFT+F1
Select the Save command.
ALT+SHIFT+F2
Display the Research task pane.
ALT+SHIFT+F7
Run GOTOBUTTON or MACROBUTTON from the field that displays the field results.
ALT+SHIFT+F9
Display a menu or message for an available action.
ALT+SHIFT+F10
Select the Table of Contents button in the Table of Contents container when the container is active.
 KVM stands for Kernel Based Virtual Machine, is a virtualization software which provides ability to run a multiple guest operating systems with the help of hardware virtualization extensions. It supports wide variety of guest operating system’s such as Linux, Windows, Solaris, Haiku, REACT OS and much more.
KVM can be managed using command line or available graphical tools. Virt-Manager (Virtual Machine Manager) is the most widely used application for managing KVM based virtual machines, it supports creating, editing, starting, and stopping KVM-based virtual machines, as well as live or cold migration of guest machines between hosts.




 or the Paste options
 button. If more than one action is present, switch to the next action and display its menu or message.
 +C
 +H
 is available on the bottom row of keys on most keyboards.