Thursday, May 19, 2022

How to set up L2TP/IPsec VPN on Windows 10


L2TP/IPsec is a popular VPN protocol built-in to most modern platforms including Microsoft Windows 10. Using a built-in protocol can be a good choice as you do not have to install any extra applications or worry if they are written securely and bug free. Depending on your provider’s software they can be a little trickier to set up as you need to manually enter in your VPN configuration.

The following tutorial with plenty of screenshots will show you how to set up a L2TP/IPsec VPN on Windows 10 using the built-in capabilities of the operating system.

L2TP/IPsec Windows 10 setup

Step 1: Open Network settings

Click on the Network icon on the taskbar and then click on Network settings.
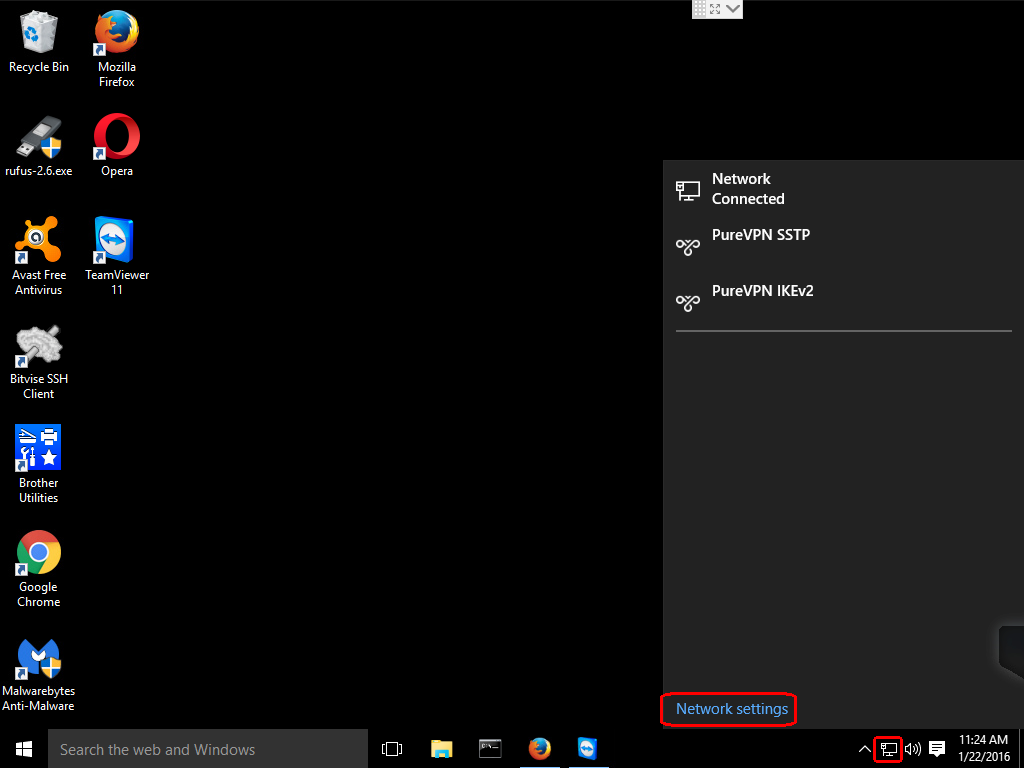
Win10 Network Settings

Step 2: Add a VPN connection

Click on the VPN option and then click on the Add a VPN connection.
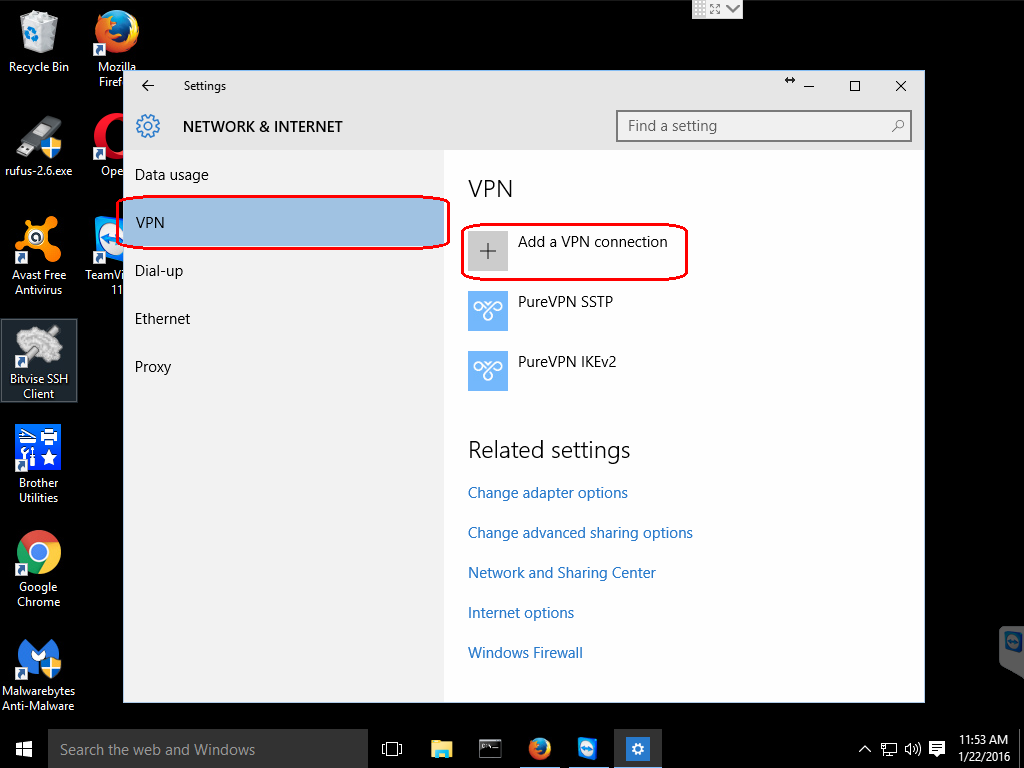
Add a VPN Connection Win10

Step 3: Configure VPN connection

  1. Left-click the VPN provider drop down menu and select Windows (built-in).
  2. Click on the Connection name box and enter a name for your connection.
  3. Click the Server name or address box and enter a FQDN or IP address for your VPN server. Your VPN provider should have a list of their servers available on their website.
  4. Click the VPN type drop down menu and select Layer 2 Tunneling Protocol with IPsec (L2TP/IPsec).
  5. Click the Type of sign-in info drop down menu and select User name and password.
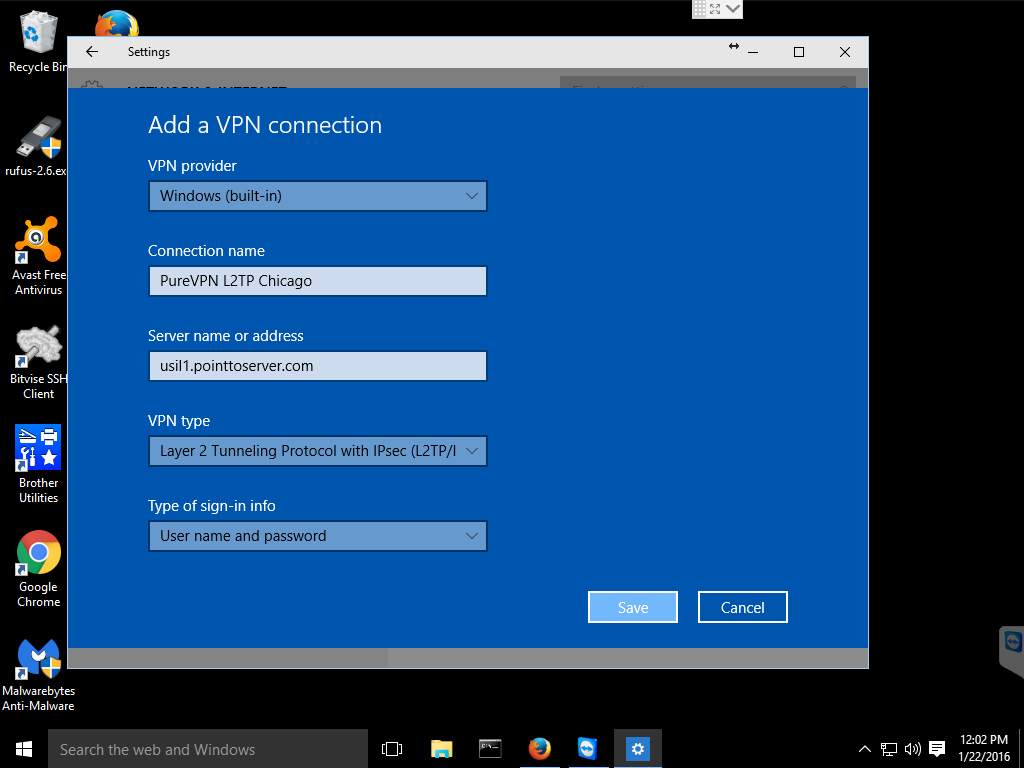
VPN Settings L2TP Win10

Step 4: Enter username and password (optional)

You may need to scroll down in the VPN configuration window to see the rest of the options, depending on the size of your Settings window.

If you desire, you can enter your VPN username and password in the appropriate fields and check the Remember my sign-in info and then you will not be asked for this information every time you activate your VPN connection.

When you are done entering all your information, click on the Save button to save your new VPN connection.
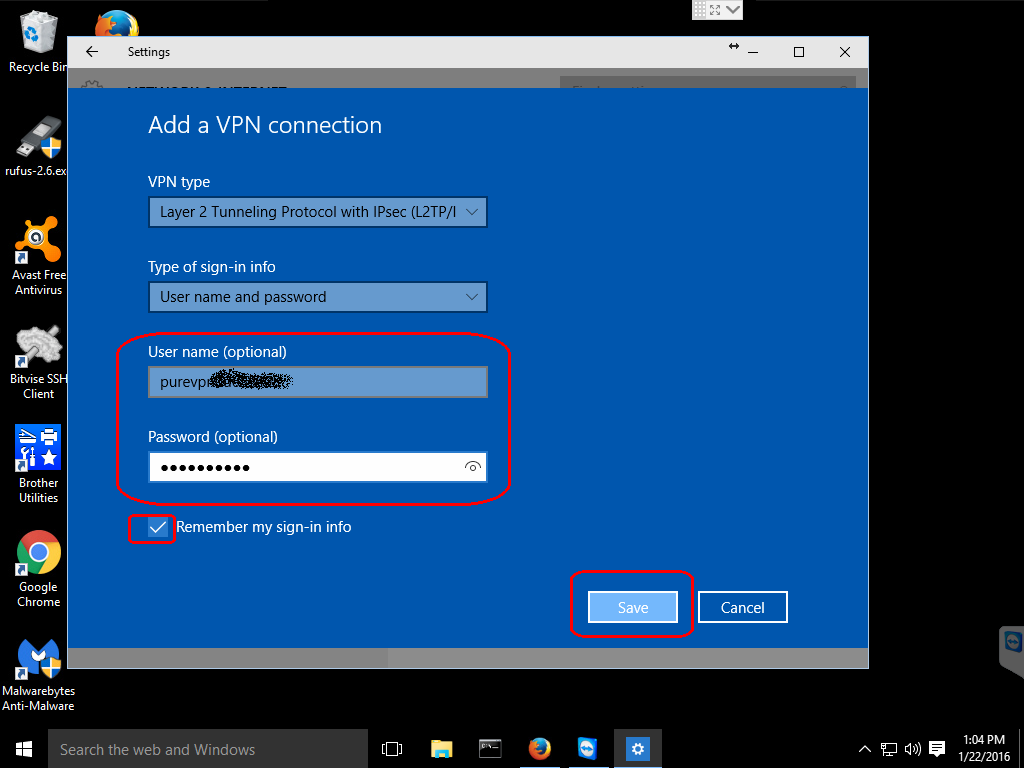
usernamepasswordblur

Step 5: Configure advanced settings

Under Related settings click on the Change adapter options choice.
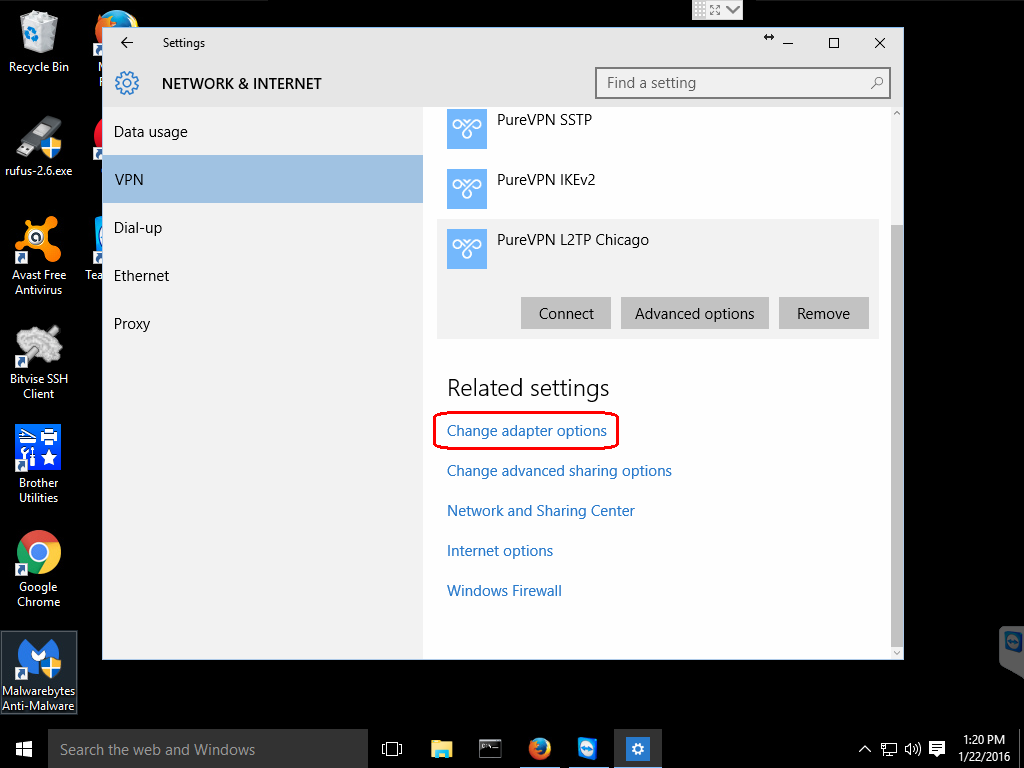
advancedsettings l2tp win10

This will open a new window titled Network Connections. Right-click on your newly created connection and this will bring up another menu. Click on the Properties option in this menu.

vpn properties

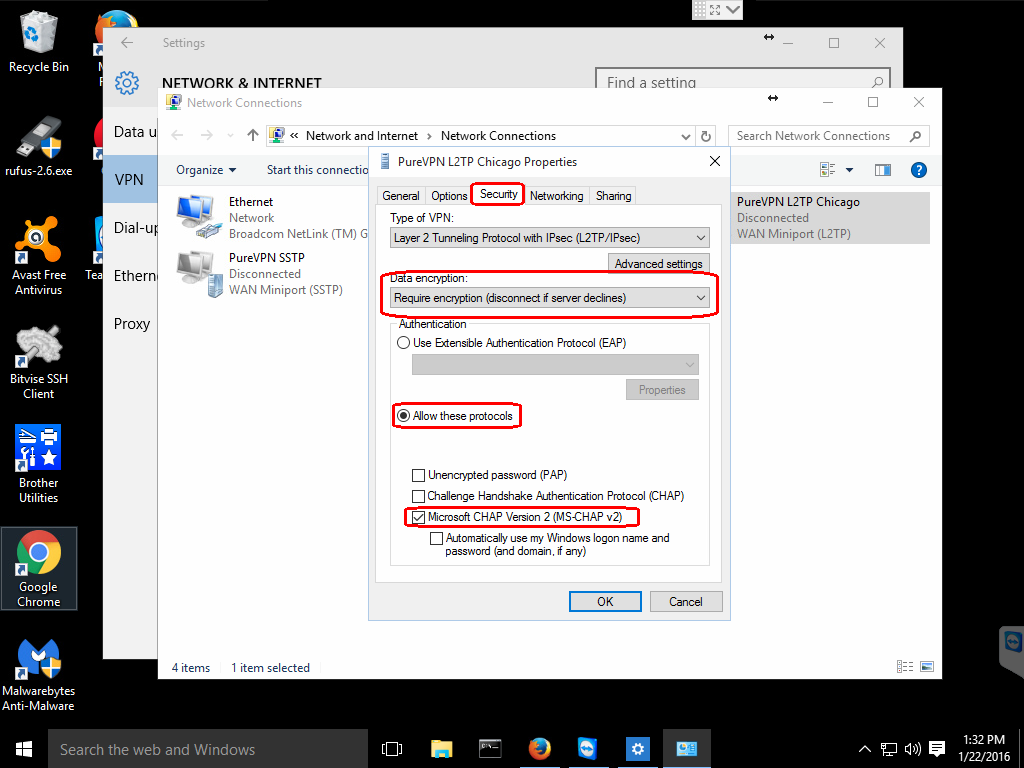
This will open a Properties window for the connection. Select the Security tab in this window.

Under the Data encryption: drop-down menu select Require encryption (disconnect if server declines).

Check the Allow these protocols radio button and ensure that only the Microsoft CHAP Version 2 (MS-CHAP v2) is checked.

There might be cases such as geo-unblocking streaming services where you might not want your connection encrypted. But you would probably be better served by using Smart DNS or some other proxy service for this.

MS-CHAP v2 is the only protocol that is still considered secure.
securitytab1

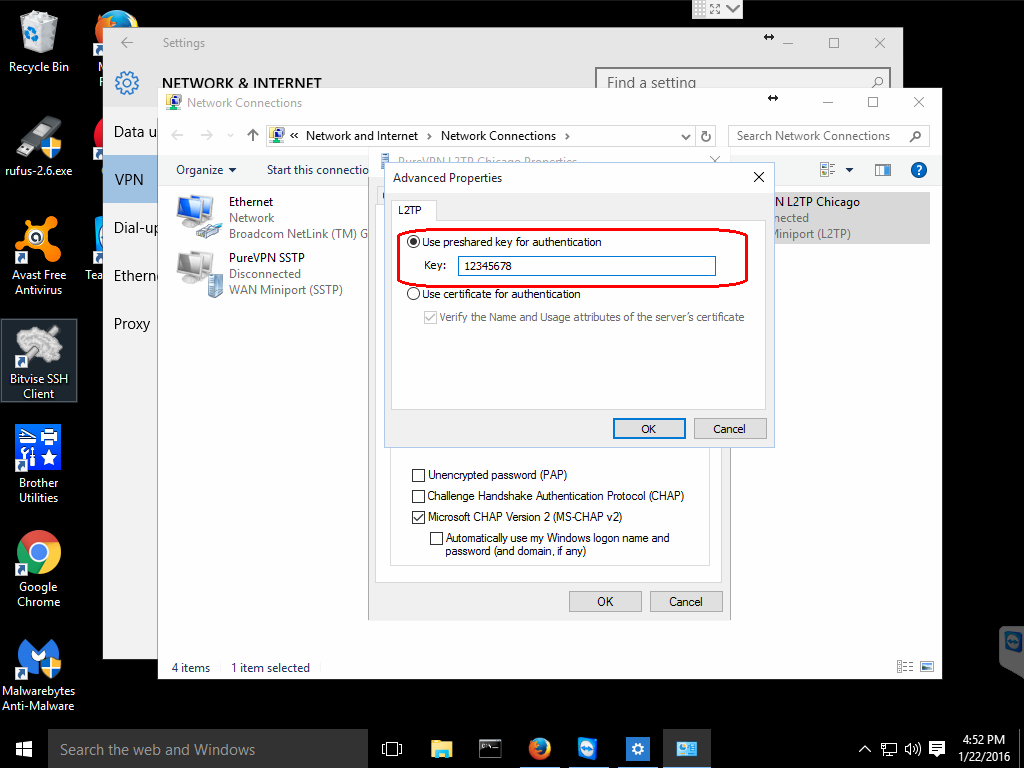
There is still one more setting that you will need to set for most providers. Stay on the Security tab and click the Advanced settings button.

Once you have the advanced settings open, click on the Use preshared key for authentication radio button and enter the key provided by your VPN provider.
preshared key win10 l2tp

Most providers utilize a preshared key for authentication and this should be provided on their website, possibly in the client area or in the tutorials section.

Click the OK button on the Advanced properties. Then click the OK button on the Security tab.

Step 6: Connect to newly configured VPN

If you like, you can close any of the windows that you still have open from configuring your new VPN connection.

Click on the network icon on the taskbar and this will bring up a list of your configured connections.

Click on the name you gave your new configuration and this will bring up the NETWORK & INTERNET settings screen.

Click the name of your new configuration and this will reveal three buttons. Click the Connect button.

connect l2tp win10

Once you click the Connect button, you will see the Windows 10 spinner and some informative messages and then it should say Connected, if all went well.

l2tp connected win 10

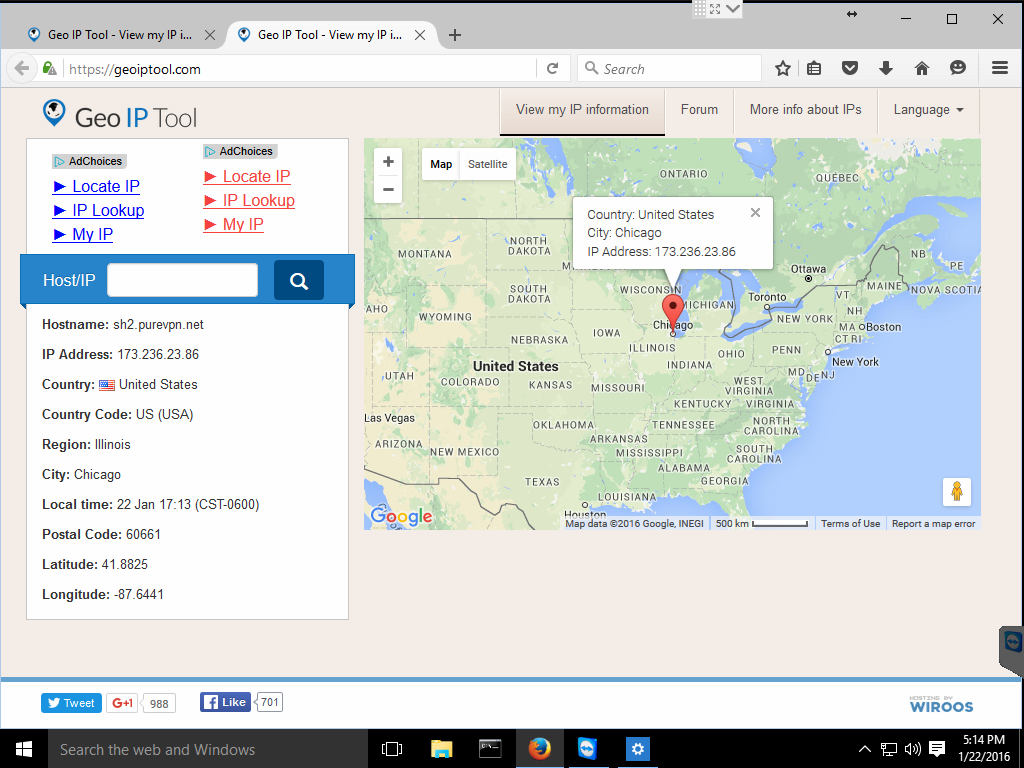
It is a good idea to use a tool to check what your IP is, it should now be reported as your VPN server;
geoip l2tp win 10

And that is it! I now appear to be coming from the VPN server located in Chicago.

You can also check the network properties to get some information on your connection. Open the NETWORK & INTERNET window again by clicking on the network icon in the taskbar and selecting Network settings.

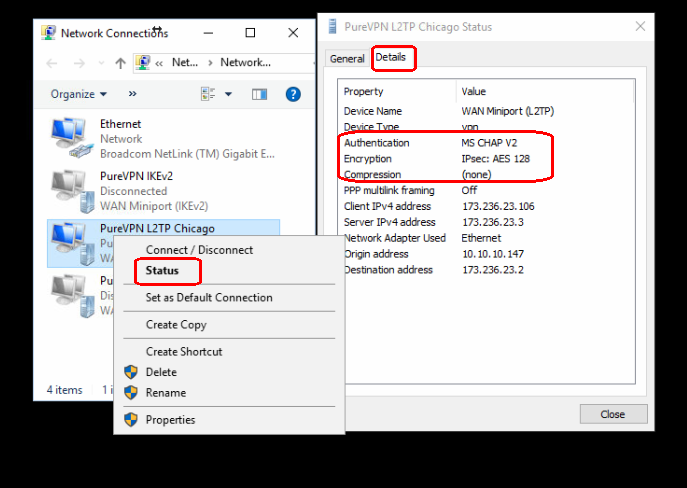
In the NETWORK & INTERNET window under Related settings select Change adapter options and this will bring up the Network Connections window. Right-click on the icon with the name of your VPN and select Status from that menu.

The General tab has some basic information but if you click on the Details tab you are provided with information about your VPN connection such as the cipher being used.
detailedstatus win10 l2tp

When you wish to disconnect from the VPN, you can click on the network icon and select your VPN connection profile which will bring up the NETWORK & INTERNET setting window again and click the Disconnect button.
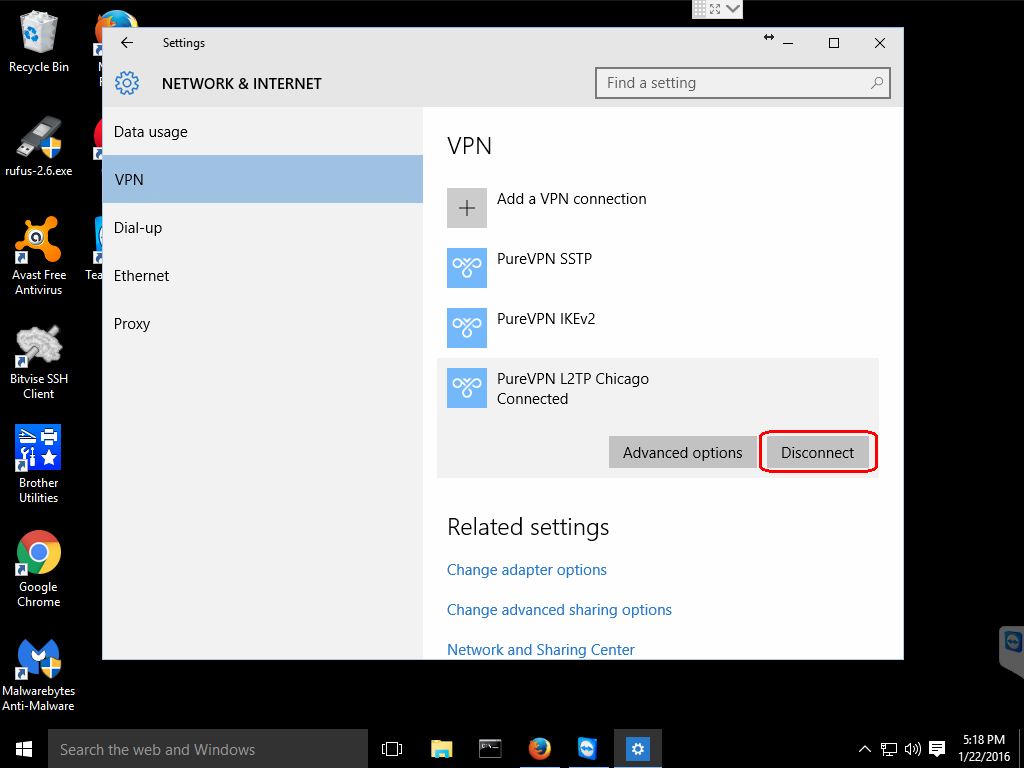
disconnect l2tp win10

That is all there is to setting up a L2TP/IPsec VPN using the built-in Microsoft Windows 10 functionality. I hope you found this tutorial to be useful and are enjoying your new VPN connection.
Tuesday, May 3, 2022


2 ways to activate Windows 10 for FREE without additional software

Activate windows 10 for free without additional software

As you know, Microsoft notified Windows 10 is “the last version of Windows” and explained that they will be focused on the development of powerful and new features under the guise of software updates instead of building a new version. This means there will be no Windows 11 or 12 in the future(*). So if you are thinking about an upgrade, this is the best time to get it.

Windows 10 free upgrade

The representative of Microsoft has confirmed that Windows 10 is a free upgrade for all customers using a genuine copy of Windows 7 or higher. But this offer officially will expire on Friday so do not hesitate to own it before it is too late. Your time is running out. After July 29, the upgrade will cost up to $119 for the Home edition or $199 for the Professional one. Personally, that amount of money is enough to pay my rent this month so there is no reason for me to deny that.

Should you upgrade to Windows 10

“Do not upgrade to Windows 10”. This seems to contradict the above analysis but that is the statement of security experts. They said that Microsoft has been violating users’ privacy by collecting their personal information like gender, age, hobby, and Internet habits… without your permission. The options relating to sending feedback and data to Microsoft were enabled automatically from the moment that you installed Windows 10 successfully so most people don’t know about them. However, you can disable them in Settings/Privacy easily.

Install Windows 10 using ISO file instead of an upgrade

You can get the latest version of Windows 10 Professional here if you don’t have it already. If you have ever installed any versions of Windows before, I am sure you will have no difficulty getting started with Windows 10. If you are looking to install it with a USB flash drive, please consult the video “How to create a bootable USB stick”. The following are the detailed instructions for installing Windows 10.

Upgrading to Windows 10 using the ISO file video instructions

Activate Windows 10 without using any software

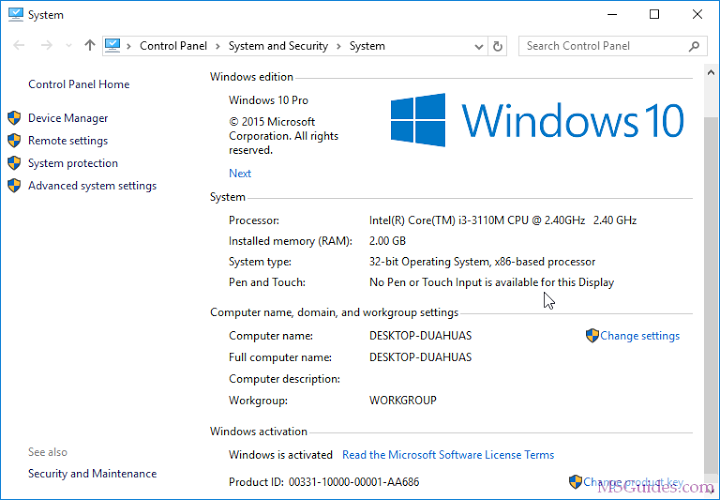
Windows 10 is not activated


Method 1: Manual activation

Legal way to use Windows 10 for FREE using KMS license

Time needed: 1 minute.

Run KMS commands on the command prompt.

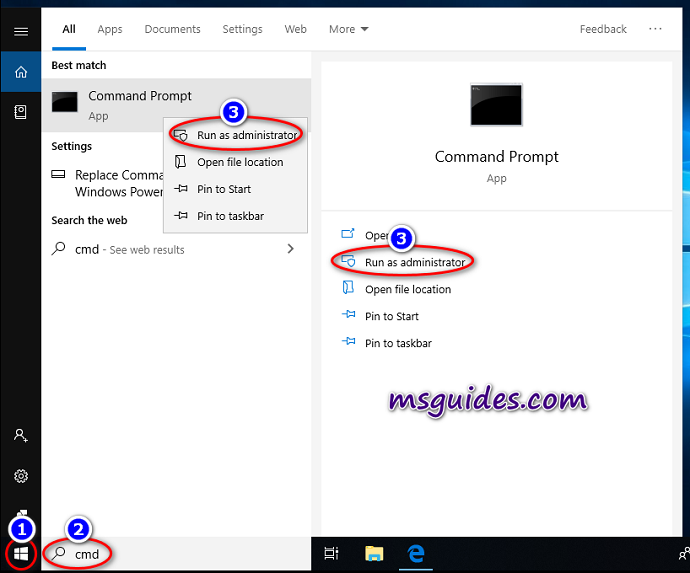
  1. Open Command Prompt as administrator.

    Click on the start button, search for “cmd” then run it with administrator rights

  2. open cmd with admin rights - 2 ways to activate Windows 10 for FREE without additional software

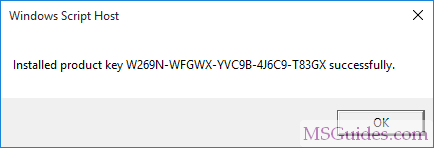
  3. Install KMS client key

    Use the command “slmgr /ipk yourlicensekey” to install a license key (yourlicensekey is the activation key that corresponds to your Windows edition). The following is the list of Windows 10 Volume license keys.

    Home: TX9XD-98N7V-6WMQ6-BX7FG-H8Q99
    Home N: 3KHY7-WNT83-DGQKR-F7HPR-844BM
    Home Single Language: 7HNRX-D7KGG-3K4RQ-4WPJ4-YTDFH
    Home Country Specific: PVMJN-6DFY6-9CCP6-7BKTT-D3WVR
    Professional: W269N-WFGWX-YVC9B-4J6C9-T83GX
    Professional N: MH37W-N47XK-V7XM9-C7227-GCQG9
    Education: NW6C2-QMPVW-D7KKK-3GKT6-VCFB2
    Education N: 2WH4N-8QGBV-H22JP-CT43Q-MDWWJ
    Enterprise: NPPR9-FWDCX-D2C8J-H872K-2YT43
    Enterprise N: DPH2V-TTNVB-4X9Q3-TJR4H-KHJW4

    (Note: You need to hit [Enter] key to execute commands.)

    windows 10 for free 4 - 2 ways to activate Windows 10 for FREE without additional softwarewindows 10 for free 5 - 2 ways to activate Windows 10 for FREE without additional software

  4. Set KMS machine address

    Use the command “slmgr /skms s8.uk.to” to connect to my KMS server.set kms8 as main kms server

  5. Activate your Windows

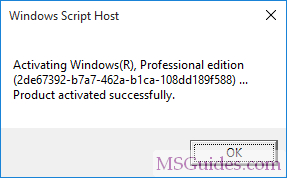
    The last step is to activate your Windows using the command “slmgr /ato”.
    windows 10 for free 8 - 2 ways to activate Windows 10 for FREE without additional software
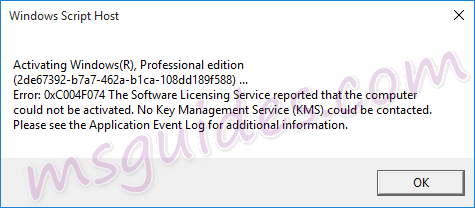
    Fix 0xc004f074 error
    If you see the error 0xC004F074, it means that your internet connection is unstable or the server is busy. Please make sure your device is online and try the command “ato” again until you succeed.
    windows 10 for free 9 - 2 ways to activate Windows 10 for FREE without additional software

Now check the activation status again.

Windows 10 is activated successfully

Method 2: Using a batch file

This one is not recommended anymore due to the new update of Microsoft.

Step 1: Copy the code below into a new text document.

@echo off
title Activate Windows 10 (ALL versions) for FREE - MSGuides.com&cls&echo =====================================================================================&echo #Project: Activating Microsoft software products for FREE without additional software&echo =====================================================================================&echo.&echo #Supported products:&echo - Windows 10 Home&echo - Windows 10 Professional&echo - Windows 10 Education&echo - Windows 10 Enterprise&echo.&echo.&echo ============================================================================&echo Activating your Windows...&cscript //nologo slmgr.vbs /ckms >nul&cscript //nologo slmgr.vbs /upk >nul&cscript //nologo slmgr.vbs /cpky >nul&set i=1&wmic os | findstr /I "enterprise" >nul
if %errorlevel% EQU 0 (cscript //nologo slmgr.vbs /ipk NPPR9-FWDCX-D2C8J-H872K-2YT43 >nul||cscript //nologo slmgr.vbs /ipk DPH2V-TTNVB-4X9Q3-TJR4H-KHJW4 >nul||cscript //nologo slmgr.vbs /ipk YYVX9-NTFWV-6MDM3-9PT4T-4M68B >nul||cscript //nologo slmgr.vbs /ipk 44RPN-FTY23-9VTTB-MP9BX-T84FV >nul||cscript //nologo slmgr.vbs /ipk WNMTR-4C88C-JK8YV-HQ7T2-76DF9 >nul||cscript //nologo slmgr.vbs /ipk 2F77B-TNFGY-69QQF-B8YKP-D69TJ >nul||cscript //nologo slmgr.vbs /ipk DCPHK-NFMTC-H88MJ-PFHPY-QJ4BJ >nul||cscript //nologo slmgr.vbs /ipk QFFDN-GRT3P-VKWWX-X7T3R-8B639 >nul||cscript //nologo slmgr.vbs /ipk M7XTQ-FN8P6-TTKYV-9D4CC-J462D >nul||cscript //nologo slmgr.vbs /ipk 92NFX-8DJQP-P6BBQ-THF9C-7CG2H >nul&goto skms) else wmic os | findstr /I "home" >nul
if %errorlevel% EQU 0 (cscript //nologo slmgr.vbs /ipk TX9XD-98N7V-6WMQ6-BX7FG-H8Q99 >nul||cscript //nologo slmgr.vbs /ipk 3KHY7-WNT83-DGQKR-F7HPR-844BM >nul||cscript //nologo slmgr.vbs /ipk 7HNRX-D7KGG-3K4RQ-4WPJ4-YTDFH >nul||cscript //nologo slmgr.vbs /ipk PVMJN-6DFY6-9CCP6-7BKTT-D3WVR >nul&goto skms) else wmic os | findstr /I "education" >nul
if %errorlevel% EQU 0 (cscript //nologo slmgr.vbs /ipk NW6C2-QMPVW-D7KKK-3GKT6-VCFB2 >nul||cscript //nologo slmgr.vbs /ipk 2WH4N-8QGBV-H22JP-CT43Q-MDWWJ >nul&goto skms) else wmic os | findstr /I "10 pro" >nul
if %errorlevel% EQU 0 (cscript //nologo slmgr.vbs /ipk W269N-WFGWX-YVC9B-4J6C9-T83GX >nul||cscript //nologo slmgr.vbs /ipk MH37W-N47XK-V7XM9-C7227-GCQG9 >nul||cscript //nologo slmgr.vbs /ipk NRG8B-VKK3Q-CXVCJ-9G2XF-6Q84J >nul||cscript //nologo slmgr.vbs /ipk 9FNHH-K3HBT-3W4TD-6383H-6XYWF >nul||cscript //nologo slmgr.vbs /ipk 6TP4R-GNPTD-KYYHQ-7B7DP-J447Y >nul||cscript //nologo slmgr.vbs /ipk YVWGF-BXNMC-HTQYQ-CPQ99-66QFC >nul&goto skms) else (goto notsupported)
:skms
if %i% GTR 10 goto busy
if %i% EQU 1 set KMS=kms7.MSGuides.com
if %i% EQU 2 set KMS=s8.uk.to
if %i% EQU 3 set KMS=s9.us.to
if %i% GTR 3 goto ato
cscript //nologo slmgr.vbs /skms %KMS%:1688 >nul
:ato
echo ============================================================================&echo.&echo.&cscript //nologo slmgr.vbs /ato | find /i "successfully" && (echo.&echo ============================================================================&echo.&echo #My official blog: MSGuides.com&echo.&echo #How it works: bit.ly/kms-server&echo.&echo #Please feel free to contact me at msguides.com@gmail.com if you have any questions or concerns.&echo.&echo #Please consider supporting this project: donate.msguides.com&echo #Your support is helping me keep my servers running 24/7!&echo.&echo ============================================================================&choice /n /c YN /m "Would you like to visit my blog [Y,N]?" & if errorlevel 2 exit) || (echo The connection to my KMS server failed! Trying to connect to another one... & echo Please wait... & echo. & echo. & set /a i+=1 & goto skms)
explorer "http://MSGuides.com"&goto halt
:notsupported
echo ============================================================================&echo.&echo Sorry, your version is not supported.&echo.&goto halt
:busy
echo ============================================================================&echo.&echo Sorry, the server is busy and can't respond to your request. Please try again.&echo.
:halt
pause >nul

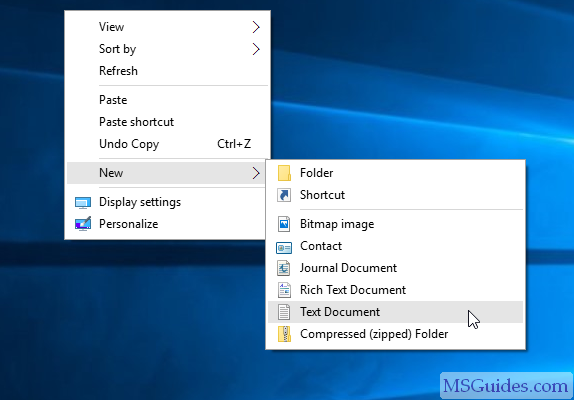
Create a new text document.

Create a new text document

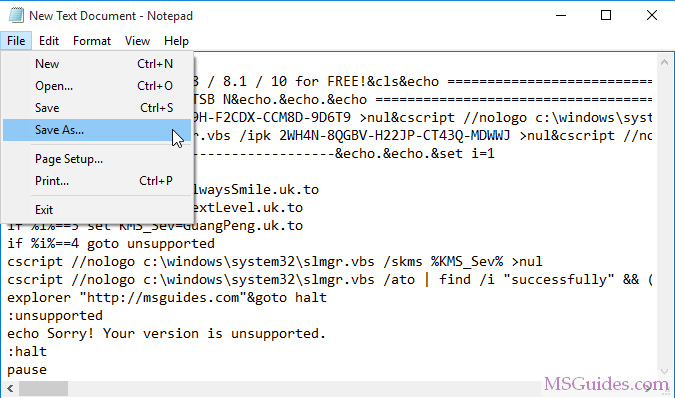
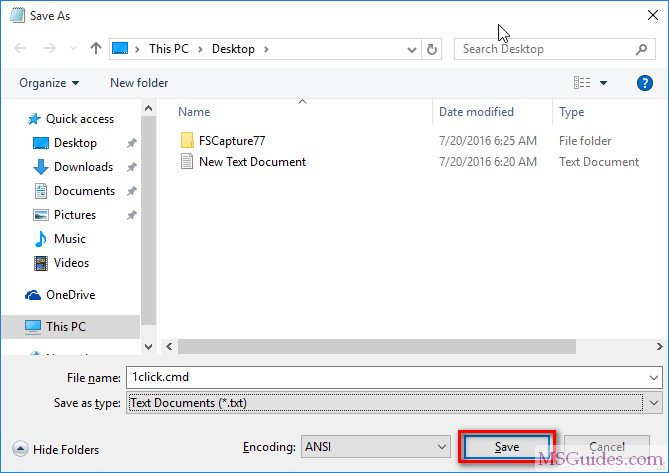
Step 2: Paste the code into the text file. Then save it as a batch file (named “1click.cmd”).

Save the text file
Save the text file
Set name of the batch file

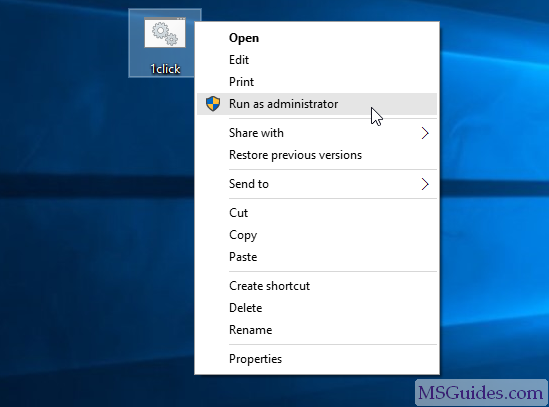
Step 3: Run the batch file as administrator.

Run the batch script with admin rights

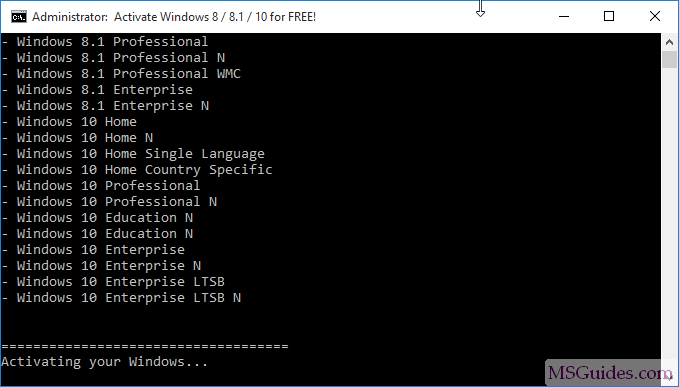
Please wait a minute.

The batch script is processing

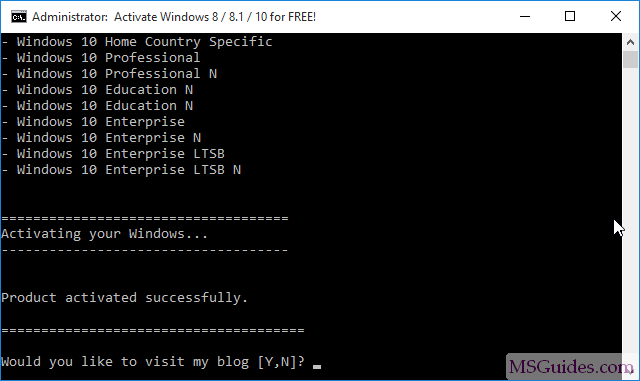
Done!

Your Windows is activated

Note: If you guys see the same error message saying that the connection to the KMS server was unsuccessful three times , please read this post.

Check the activation status again.

Check out activation status of Windows 10

If you would have any questions or concerns, please leave your comments. I would be glad to explain in more details. Thank you so much for all your feedback and support!