How To Set Up Multiple WordPress Sites on a Single
Linux Server
Introduction
WordPress is a popular CMS (content management system) that can
help you get your site off of the ground quickly and easily. Sometimes, you
need to host multiple, unrelated sites on the same server.
This guide will cover how to host two separate WordPress instances
on one server. They will each have their own domain name. This is different from setting up
multisite.
We will accomplish this through the use of virtual hosts. This
guide will use an CentOS 7 server, but other distributions should
function in a similar way.
Prerequisites
This guide has a few requirements that are covered in-depth in
some of our other articles. Before you begin, make sure you have completed the
following:
· Create a new CentOS Linux Server to host your WordPress sites.
· Set up two domain names
with your DNS provider.
· Install a LAMP
stack on CentOS using this guide.
At this point, you should have LAMP installed on CentOS and both
of your domain names should be pointing to your Server.
Ensure that this is the case by visiting your domain names in a
web browser. Both domains should give you the same default Apache index page:
Site
Name
|
firstsite.com
|
secondsite.com
|
Database
Name
|
FirstDatabase
|
SecondDatabase
|
Database
User
|
FirstUser
|
SecondUser
|
Database
Password
|
FirstPassword
|
SecondPassword
|
If your domains do not lead to this page, then either you need to
wait for the DNS changes to propagate, or you have misconfigured something in
the previous steps. Do not continue until this is resolved.
Download
Wordpress
When you are ready, log into your server and change to your home
directory. We will download the files here:
cd
wget http://wordpress.org/latest.tar.gz
Unzip and decompress the archive file by issuing the following
command:
tar xzvf latest.tar.gz
Create
Site Databases and Users
Before we continue, we need to configure an independent database
and user for each site within MySQL. This will ensure that the site data is
separate.
For the purposes of this guide, we will be using the following
information:
Site
Name
|
firstsite.com
|
secondsite.com
|
Database
Name
|
FirstDatabase
|
SecondDatabase
|
Database
User
|
FirstUser
|
SecondUser
|
Database
Password
|
FirstPassword
|
SecondPassword
|
The table above is provided to give you context for the commands
we will be using. Substitute your own information when you are filling out the
commands that follow.
Log into MySQL using the administrator account you configured
during the MySQL installation:
mysql -u root -p
You will be prompted for the MySQL root password and then you will
be dropped into a MySQL prompt.
Create the two databases with the following commands:
CREATE DATABASE FirstDatabase;
CREATE DATABASE SecondDatabase;
Create a user that will be associated with each database:
CREATE USER FirstUser@localhost;
CREATE USER SecondUser@localhost;
Next, set up the password access for each account:
SET PASSWORD FOR FirstUser@localhost= PASSWORD("FirstPassword");
SET PASSWORD FOR SecondUser@localhost= PASSWORD("SecondPassword");
Finish up by granting privileges to the new users. This associates
the database users with their respective databases and grants them appropriate
permissions:
GRANT ALL PRIVILEGES ON FirstDatabase.* TO FirstUser@localhost IDENTIFIED BY 'FirstPassword';
GRANT ALL PRIVILEGES ON SecondDatabase.* TO SecondUser@localhost IDENTIFIED BY 'SecondPassword';
Refresh MySQL's privilege information to implement the changes:
FLUSH PRIVILEGES;
Exit out of MySQL to return to the shell session:
exit
Configuring
Site Root Directories
We will be installing both of the sites within individual
directories in the web root of our server.
Change to the "/var/www/" directory:
cd /var/www
Create a directory for each of our sites. These will store the
site files:
sudo mkdir FirstSite
sudo mkdir SecondSite
Copy the sample configuration before we move the web contents into
our folders:
cp ~/wordpress/wp-config-sample.php
~/wordpress/wp-config.php
Finally, copy the files to the directories you created under the
web root of the server:
sudo rsync -avP ~/wordpress/ /var/www/FirstSite/
sudo rsync -avP ~/wordpress/ /var/www/SecondSite/
Give ownership of the directories to the Apache web user and then
add your linux username to the web group:
sudo chown www-data:www-data * -R
sudo usermod -a -G www-data linux_user_name
WordPress
Configuration
We will configure each site with the information about our sites.
First
Site Configuration
Change directories to the first site's document root:
cd /var/www/FirstSite
Open the WordPress Configuration file for editing:
sudo nano wp-config.php
Find the section that contains the fields below and substitute the
database, username, and password for your first site:
// ** MySQL settings - You can get this info from
your web host ** //
/** The name of the database for WordPress */
define('DB_NAME', 'FirstDatabase');
/** MySQL database username */
define('DB_USER', 'FirstUser');
/** MySQL database password */
define('DB_PASSWORD', 'FirstPassword');
Save and exit.
Second
Site Configuration
Change directories to the second site's document root:
cd /var/www/SecondSite
Open the WordPress Configuration file for editing:
sudo nano wp-config.php
Find the same section you edited for the previous site. You will
be entering information for the second site this time.
// ** MySQL settings - You can get this info from
your web host ** //
/** The name of the database for WordPress */
define('DB_NAME', 'SecondDatabase');
/** MySQL database username */
define('DB_USER', 'SecondUser');
/** MySQL database password */
define('DB_PASSWORD', 'SecondPassword');
Save and exit.
Apache
Virtual Host Configuration
We need to configure Apache to direct traffic from each domain to
their respective directories. We will do this by creating separate virtual host
files for each domain.
Change the directory to Apache's available sites directory:
cd /etc/apache2/sites-available
Create a new virtual host file for each site by copying the
default virtual host file:
sudo cp default FirstSite
sudo cp default SecondSite
First
Site Virtual Host Configuration
Open the first file you copied to configure the virtual host for
the first site:
sudo nano FirstSite
Change the information in the file to match the following.
Remember to substitute the information in red to match your first site:
<VirtualHost *:80>
ServerAdmin
your_email_address
ServerName
firstsite.com
ServerAlias
www.firstsite.com
DocumentRoot
/var/www/FirstSite
<Directory
/>
Options
FollowSymLinks
AllowOverride
None
</Directory>
<Directory
/var/www/FirstSite>
Options
Indexes FollowSymLinks MultiViews
AllowOverride
None
Order
allow,deny
allow
from all
</Directory>
. . .
. . .
If you need to enable pretty permalinks, you can change the
"AllowOverride None" within the "<Directory
/var/www/FirstSite>" block to "AllowOverride All". You can
learn more about the requirements
for pretty permalinks here.
After making the changes, save and close the file.
Second
Site Virtual Host Configuration
Open the second virtual host file for editing:
sudo nano SecondSite
Change the information to reflect your second site's information:
<VirtualHost *:80>
ServerAdmin
your_email_address
ServerName
secondsite.com
ServerAlias
www.secondsite.com
DocumentRoot
/var/www/SecondSite
<Directory
/>
Options
FollowSymLinks
AllowOverride
None
</Directory>
<Directory
/var/www/SecondSite>
Options
Indexes FollowSymLinks MultiViews
AllowOverride
None
Order
allow,deny
allow from all
</Directory>
. . .
. . .
Save and close the file.
Final
Configuration
There are a few more steps necessary to get our sites working.
First, WordPress needs an extra PHP module installed in order to
function correctly. Install it by typing:
sudo apt-get install php5-gd
Next, enable the virtual host files that we created by typing:
sudo a2ensite FirstSite
sudo a2ensite SecondSite
Finally, reload Apache so that it reads our changes:
sudo service apache2 reload
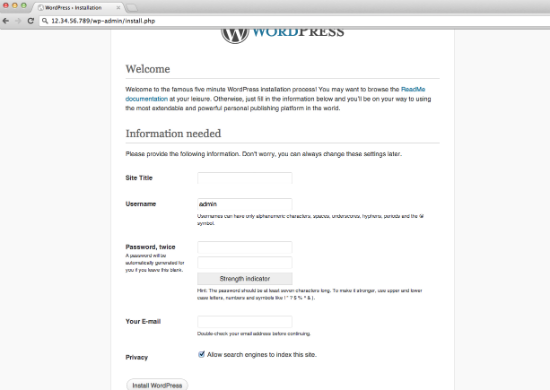
Seeing
the Results
In order to see your new WordPress sites, simply navigate to your
domain names in a web browser.
If you have configured everything correctly, you should be greeted
by a page that looks like this:
You can now log in and configure each site independently. These
sites are completely separate and can be administered as if they exist on two
entirely different servers.