Don't dabble with GAL settings. Either leave the configuration alone, and just let Outlook users see the Default Global Address List; or else, take the time to study, plan, and test before you implement custom Address Lists.
- A directory service for Outlook users to find email addresses and distribution lists.
- THE phone book for email.
- An inventory of all Exchange 2007 objects.
- The mother of custom Address Lists.
- Some people refer to the GAL as the Global Address Book (Rather than List).
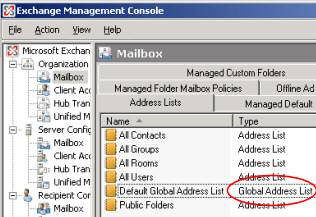
- Launch the Exchange Management Console.
- Expand the Organization Configuration (Key point).
- Select the Mailbox node.
- Click on the Address Lists tab.
- Observe the Default Global Address List
Default Address Lists (See Screenshot above)
Once you realize that there are a handful of built-in Address Lists, you soon realize that you could create your own Custom Address Lists. However, be careful, don't create too many lists, and furthermore, give thought to meaningful names for your lists.
- All Users
- All Groups
- All Contacts
- All Rooms
- Default Global Address Lists
- Public Folders
- (Custom Address Lists)
The situation, you want to modify the GAL, however, you discover that you cannot edit (or delete) the Default Global Address List. This is the master list of all the Exchange 2007 objects, and the operating system won't let you mess with it. Fortunately, there is a well respected work-around, create a new Global Address List, and then 'update' the mailbox. This procedure has its own PowerShell command.
As an alternative to clicking in the Exchange Management CONSOLE, you could type commands in the Exchange Management SHELL. Using cmdlets like those below will save you time, more so when you realize that every Exchange 2007 configuration task has a faster command-line equivalent. Furthermore, certain commands are ONLY available in the Shell, for example, new-GlobalAddressList.
As a learning progression, by all means start with GUI Exchange Management Console, but note as each Wizard completes so it shows you the corresponding PowerShell commands. Why not save these so that in future you can use the cmdlets in the Shell?
Research in the Exchange Management Shell with:
get-Command *GlobalAddressList
Five verbs for GlobalAddressList
get, new, remove, set, and update. For example:
get-help new-GlobalAddressList
Note 1: As usual, PowerShell uses a singular noun: GlobalAddressList
Note 2: There is another family of cmdlets without the word 'Global', their noun is plain 'AddressList'.
Preliminary Step: Create a new Global Address List
Launch the Exchange Management SHELL and use this PowerShell cmdlet
new-GlobalAddressList -Name "Worcester" -IncludedRecipients MailboxUsers
Important: Firstly, you have to use PowerShell to create your new Global Address List (There is no equivelent command in the GUI). Secondly, once created, you can only edit it with the set-GlobalAddressList cmdlet.
Suggestion: Research the cmdlet new-GlobalAddressList, in particular the -conditional family of parameters. Try: get-help new-GlobalAddressList -full
Help with error message: 'Access to address list service on all Exchange 2007 servers has been denied' try the following.
a) Simply repeat the command! It worked for me, also maybe try a different name, I tried "Worcester2" the second time I ran the command.
b) Check the Services snap-in. Are all the Exchange services running, e.g. System Attendant?
c) Revert to the old trick of rebooting the server, maybe it has just received a 'Patch' or update.
Method: PowerShell - Exchange Management SHELL
The situation, you have created and defined a new Global Address List using the above cmdlet.
update-GlobalAddressList -Identity "Worcester"
Note 1: If you don't get the required result either create a new Global Address List, else use set-GlobalAddressList to modify the one you created earlier.
Guy recommends: SolarWinds LANsurveyor
LANsurveyor will produce a neat diagram of your network topology. But that's just the start; LANsurveyor can create an inventory of the hardware and software on your machines and network devices. Other neat features include dynamic update for when you add new devices to your network. I also love the ability to export the diagrams to Microsoft Visio.
Finally, Guy bets that if you take a free trial of LANsurveyor then you will find a device on your network that you had forgotten about, or someone else installed without you realizing.
Begin with a clear idea of what you want to achieve with a custom address list. Presumably, making it easier for Outlook users to find addresses ranks high on your agenda. If you are doing this task for real, as opposed to just learning about Exchange 2007 Address Lists, then involve at a cross-section of users before you design a complex, multi-levelled, address list scheme only to find that the end-users hate it.
Good news, behind the scenes Active Directory changes the members of the list dynamically based on LDAP queries.
Research in the Exchange Management Shell with:
get-Command *AddressList
Let me emphasise that these are simple Address Lists (There is no 'Global' word here).
Six verbs for AddressList
get, move, new, remove, set, and update. For example:
get-help update-AddressList
Note 1: There is another family of cmdlets without the word 'Global', their noun is plain AddressList.
Method 1: PowerShell and the Exchange Management SHELL
The situation, you have created, and defined a new Address List using the Exchange Management SHELL.
update-AddressList -Identity "Boston"
or
update-AddressList -Identity "All Users\Campus\Students"
Note 1: 'Students' is the name of the Address List. All Users\Campus is a sub-folder.
That's it! This is why people use PowerShell instead of the GUI! To be fair, you need to run the cmdlet below to see the names of possible Address Lists. Again, to be fair, everyone takes a peek in the GUI the first time they configure an item; it's for the repetitive tasks that PowerShell saves times.
Method 2: Exchange Management CONSOLE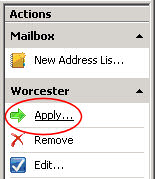
Here below is an alternative to PowerShell. Before you 'Apply' your Global Address List you may like to click on Edit, the benefit is that you can check, and if necessary, edit the settings.
- Launch the Exchange Management Console
- Expand the Organization Configuration node
- Select Mailbox.
- Click the Address List tab
- Select the particular Address List that you want.
- Click 'Apply' in the Actions pane. (Key point)
- The Apply Address List wizard should launch.
- On the Introduction page, complete the following fields:
- Apply the address list
Immediately (Best)
At the following time (If the server is busy).
Quite frankly, RUS was slow and cumbersome, so he won't be missed now that his role has been incorporated into Exchange 2007.
Exchange 2003's RUS (Recipient Update Service) has been replaced in Exchange 2007 by two PowerShell cmdlets, update-AddressList and update-EmailAddressPolicy.
Thus, don't go looking for RUS in Exchange 2007, instead launch the Exchange Management Shell and experiment with 'Address' family of cmdlets.
Exchange 2007's E-mail address policy generates email addresses for your users, contacts, and groups. This is important, for without an address nobody could send or receive emails. The killer reason to configure this setting is to adjust the way that email addresses display in the Exchange 2007 GAL. For example, small companies display email addresses as FirstName LastName, whereas large companies display prefer, Lastname, Firstname. It is small companies who are exapanding that need to change their Email Address Policy, this is how you can adjust the Exchange 2007 GAL settings.
Using the Exchange Management Console to Configure your E-Mail Address Policy
Stage One
- Launch the Exchange Management Console.
- Expand the Organization Configuration
- Select the Hub Transport node (Key point).
- Click on the Address Lists tab.
- Click E-Mail Address Policies tab.
- Select the e-mail address policy that you want to edit.
- In the Actions pane, click Edit.
Stage Two - Follow the Address Policy Wizard
- On the Introduction page, review the name.
- From the Conditions page, view or edit the following fields:
- Select the condition(s) Use this section to set one or more conditions for your e-mail address policy. If you do not want to set any conditions for the policy, do not select any of the check boxes.
- On the E-Mail Addresses page, select the e-mail address, and then click Edit.
- You can now change the way email addresses display in the GAL,
First name.last name.
or Last name.first name.
(and many other formats).
PowerShell Commands to Manage EmailAddressPolicy
Research in the Exchange Management Shell with:
get-Command *EmailAddressPolicy
Five verbs for EmailAddressPolicy
get, new, remove, set, and update
Note 1: Singular EmailAddressPolicy
Principles and techniques that you learned with other Exchange 2007 'Address' names, will be useful for the Offline Address Book. Please take note, this is not the Global Address Book.
- Launch the Exchange Management Console.
- Expand the Organization Configuration.
- Select the Mailbox node.
- Click on the Offline Address Book tab. (Key point)
- Right-click on the Default Offline Address Book.
- Tick the box: Include the following address lists.
- Make your selection of Address List(s).
PowerShell Commands to Manage OfflineAddressBook
Research with:
get-Command *OfflineAddressBook
Six verbs for OfflineAddressBook
get, new, new, remove, set and update
Note 1: Singular OfflineAddressBook
Note 2: There is another family of cmdlets, their noun is OABVirtualDirectory.
Where Exchange 2007 and Exchange 2003 coexist, you can edit the GAL or the Address List objects from either Exchange 2003 or Exchange 2007. However, there are two 'gotchas'; firstly, you must upgrade Exchange 2003 objects before they can be edited by Exchange 2007. Secondly, if you do upgrade the object, then you cannot edit it from Exchange 2003.
I often say that being good at computing means being aware of subtle difference in Microsoft names. Exchange 2007's mail objects is a case in point. Pay careful attention to the difference between a mailbox enabled user and a mail-enabled user; a security group and a distribution group. Here is a list of the objects which you find the Global Address List.
- Mailbox enabled accounts. Regular users with MAPI mailboxes Active Directory accounts.
- Mail-enabled users. Contractors who have an Active Directory logon but no mailbox. (No mailbox in your Exchange Organization.)
- Contacts. Suppliers, customers, people with email address outside your organization. No Active Directory account. Thankfully, contacts have a different symbol in the GAL.
- Distribution groups. These can be Global or Universal Groups, but they are designed for email rather than security. These are sometimes referred to as DLs - Distribution lists instead of distribution groups. Pay attention to detail and examine the Members and MemberOf tabs.
- Query-based distribution groups. Well worth setting up. Again, note the different symbol from other groups. Incidentally, I wish Microsoft would use different colors for different scopes of group. Say, Red for Universal and Green for Local Groups.
- Mail-enabled groups. Security groups that have mailboxes. Guy says that unless you have a good reason, favour the classic Distribution group and avoid Mail Enabled Security Groups.
- Public Folders. Mail-enabled public folders if your users need an easy way to post.
All the address information is held by Active Directory. To the left of the @ is the username, to the right of the @, the email domain name. In fact, I think of the GAL as merely a fancy LDAP query which produces a list of addresses, for example guyt @ cp.com. The final piece of the address jigsaw is RUS (Recipient Update Service. RUS is the engine which generates and updates the email addresses that you see in the GAL.
If the GAL is slow to update, then look to the Global Catalog servers. Make sure that there is Windows 2007 Global Catalog server near the Exchange 2007 server. As you may know, the Global Catalog replicates a sub-set of all the user's properties, including Exchange features such as email address. So if Exchange has access to a local Global Catalog server, then its GAL will be up-to-date.
Clients
Potentially, any client who can query Active Directory can access the GAL. However, you can control who sees which list through read permission on the security tab found on the lists.
Summary - Exchange 2007 Global Address List (GAL)
It's only natural that Outlook users try and find each others email addresses in the GAL. But why would an administrator need to configure Exchange 2007's GAL? The most likely answers are: control how the names are displayed in the Global Address List, and possible the need for custom lists.dit.


